Fuselage

Priming and painting

Aside: this actually covers work done both yesterday and today. Yesterday it was super windy, and so I scaled back my priming goals and decided to just get the longerons done. We also hosted a class at our house than ran super long and took up more of the day than I expected, so the longeron priming was all I got done yesterday. And for some reason, I was really tired that night, and fell asleep without even doing my write-up, which is…unusual.

Today, however, I had nothing else to do but work on the plane. Unfortunately, it was still pretty windy, but I decided to press on and at least get the forward fuse subassembly primed and painted. I quickly surmised that this was going to be a more complex endeavor than I’d originally thought. Way back when I riveted the gear towers in place, I’d only primed the area under the towers, figuring the rest would get scratched up along the way. As I considered the annoyance of trying to prime around the firewall and gear towers, I kind of regretted that decision. But oh well.

One decision I made was to not paint the inboard gear weldments. For one thing, they’re already finished with a nice durable powder coat, and for another, they have lots of nooks and crannies. Most importantly, they’re attached with bolts and thus removable. So off they came. (not actually that simple, since they have 18 bolts each!)

Next, I masked off the exposed portions of the firewall. I don’t want the firewall painted, since its function is to contain an engine fire. If that happens, it’s going to get super hot, and anything not temperature-resistant on it will burn, outgas, or maybe both. I don’t want to find out that the paint emits noxious fumes or anything.

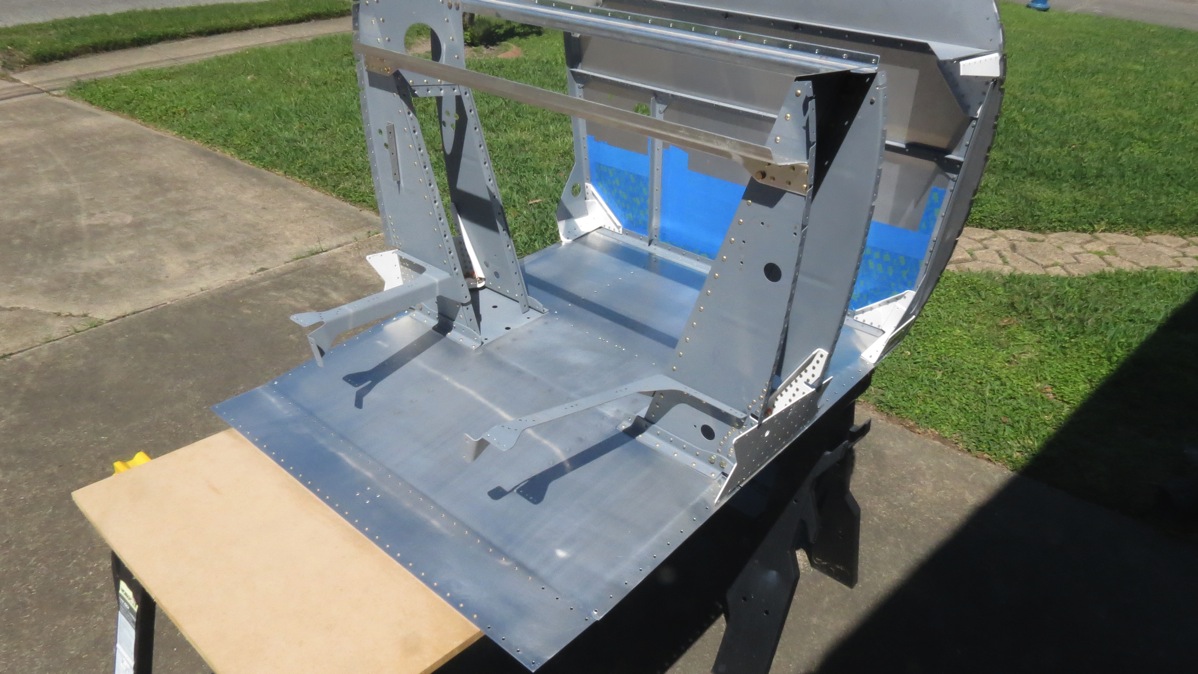
Then it was time to clean and scuff the floor for priming. Normally, I do this with degreaser and water, but if I did that here, it would take days to dry. Instead, I first used a blow gun to get rid of accumulated dust, then wiped down with a dry cloth before scuffing with a maroon scotchbrite pad. I followed this with another blow-off, and several rounds of acetone wipedowns. I figured that would be roughly equivalent to my usual prep (which, honestly, is probably overkill for self-etch primer).

Here’s the assembly after scuffing, just before priming:
IMG 6667

After shooting the primer, I went inside to have lunch, giving the primer time to set up prior to spraying the top coat. As I’ve probably mentioned before, I’ve decided to go with a granite-texture spray paint for visible interior surfaces, in lieu of more expensive two-part topcoats. I figure this stuff will hide damage well, and be easy to touch up if necessary. Plus I don’t think it’ll look bad, either. A nice bonus is that the gray 7220 primer makes for a nice base coat under the gray granite paint.

Spraying that stuff didn’t take too awful long, but I knew from experience that it would take a fairly long time to dry to the touch, so I decided to move on to other things. I’d intended to also paint the forward baggage bulkhead pieces, which are already primed, but when I tried to set up my sawhorse painting jig, the wind blew it over! Well, so much for that.

It then occurred to me that there were some visible areas on the center section assembly, so that became the new goal. These areas were small, but I wanted to ensure that I didn’t get overspray in places it shouldn’t go – for example, the close-tolerance bolt holes where the wings will attach. Any paint in there would be a problem, especially this textured gunk. So I spent a decent amount of time carefully masking the spar carry-through area, so I could only actually spray the bulkheads.

After this, I took another break to watch the MotoGP race (new season has finally started!), and after that, I figured the paint ought to be good and dry, so I went out to bring everything in from the driveway and wrap things up for the day. But first, I had to reinstall those gear weldments (and all 36 bolts).

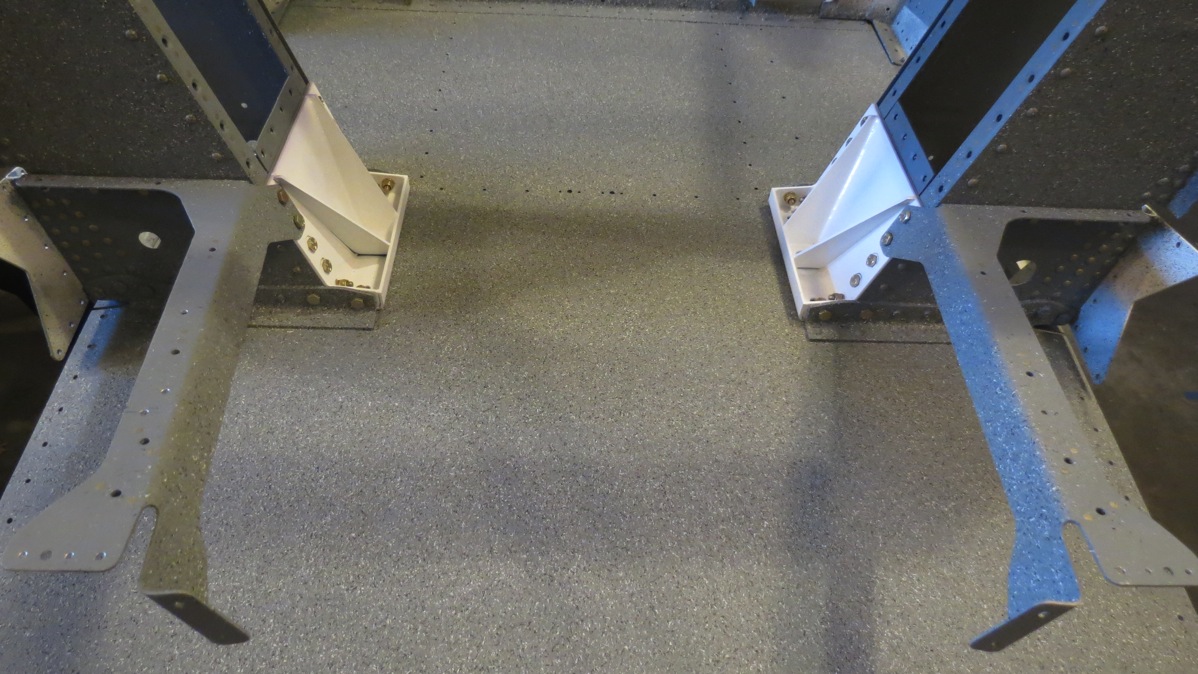
Here’s a look at the painted floor area:
IMG 6675

Note that some areas are still bare primer; for example, the tops of the mid-cabin braces. There will be covers in both those locations, so there’s no point spraying paint there. Similarly, the side of the gear tower below the braces won’t be visible, so no paint there either.

Another angle, showing the nice contrast of the gear weldments:

IMG 6676

So that’s it for the weekend. I have enough parts painted now that I can move forward with assembly this week; the next tasks are installing the lower longerons, then joining the center section and seat rib/floor assembly to the forward fuse. Once that’s done, I think the next step is assembling the mode side skin/armrest assemblies, which will require some more priming and painting. Fortunately, future priming and painting should be much simpler than today’s work.

Posted in Fuselage | Hours Logged: 7

Longeron riveting, center section join

I started out tonight by finishing attachment of the lower longerons to the forward floor. Last time, I slipped them in place, clecoed them, and installed the flush screws that go inside each gear tower. Tonight, I installed the four bolts at the forward end of each one (which go through the lower engine mount weldment as well) and then shot all the rivets to the forward floor. Most of these were easily done with a squeezer, but the ones near the gear towers were significantly less fun. In order to get decent access for using the rivet gun, I opted to roll the forward fuse assembly on its side:

IMG 6679

Even then, it was still challenging, but I only fouled up one rivet to the point that it had to be drilled out.

Next, I set about cleaning off a workbench to move the forward fuse assembly to. The next steps were to first attach the center section assembly, then the seat rib/floor assembly, which meant the board on the sawhorses was going to be too small. Better to move the assembly yo the larger table before adding the heavy center section, I figured. I also figured that I’d be able to get the center section attached and at least cleco the seat rib assembly in place for a photo op, but I severely underestimated the annoyances of attaching the center section.

After moving the forward fuse to the workbench, I set the center section in place and clecoed it at the bottom flanges. From here, I was to attach the mid-cabin braces, using a combination of rivets and bolts (one bolt per brace). Fortunately, I did the bolts first, because, well, the matching holes in the braces were way undersize for the called-out AN4 bolts. They looked about the right size for an AN3 bolt, but this seemed worthy of some quick research. Sure enough, they really are supposed to be AN4 bolts; the holes in the braces need to be drilled to final size, for whatever reason. So I went and removed all the clecos and took the center section right back off again. This allowed me to confirm that the matching holes in the spar carry through were sized for AN4.  After drilling the brace holes to the proper size and deburring them, I once again set the center section in place.

Inserting the bolts into the holes was easy enough. Gaining access to install the washers and nuts was…not. This required getting my hand in between the forward and aft web of the center section. Access from the ends was blocked by the spacers I installed way back when to maintain proper alignment in the center section. There’s a hole in the center for the control column to pass through, though. It was just barely enough for my meat paws to fit in, and get the washers and nuts installed, but I was highly skeptical of my ability to get a wrench in there to hold the nuts while I tightened the bolts. I ended up removing the upper bolt in each spacer, allowing me to pivot it out of the way while I held the wrench and torqued each bolt.

Next were the rivets attaching the upper flange of each brace to the center section. There’s a -4 rivet and two -3 rivets in assembly with a nutplate in this location. I’d previously countersunk the spar web for NAS rivet for the nutplates, which was dumb, because I have no NAS rivets long enough for this location. So I had to dig out the countersink cage and enlarge the countersinks for regular old -3 flush rivets. Then I got this set of rivets squeezed.

That leaves one more rivet on each brace, which goes through the same flange as the bolt, and into the spar web. Best access to buck these will probably be through the ends of the center section, which means removing the end spacers…again. By the time I came to this realization, it was nearly 11:30, so I decided to quit for the night. With the spacers out of the way, I think access for bucking these won’t be too bad, though I will have to do it basically blind. But once they’re done, I can add the seat rib assembly…and then this thing will really be taking shape. There will be a lot of two-person riveting in the near future…

Here’s the forward fuse with the center section joined:

IMG 6681

And a kind-of random close-up of the rivets joining the upper portion of the brace to the center section:

IMG 6684

Posted in Fuselage | Hours Logged: 3

Joining the seat rib assembly

Pretty short night of work tonight. I started off by shooting those last two rivets in the mid-cabin braces. Getting those done was mildly tedious, but not too bad overall. Definitely not the best rivets I’ve ever shot, though. Then it was time to bring over the seat rib assembly and cleco it in place. The first rivets joining the assemblies go through the inboard seat ribs and the front seat ramp brackets. I thought these would be a royal pain, since most of them sit really close to the spar web, but they actually went quickly. It took me a bit to figure out how to shoot them, though. I ended up using the single-offset rivet seat, with some masking tape to keep it from rotating in the gun as I shot.

Next, I clecoed the outboard seat ribs, forward and aft, into place. These attach to the rear spar bulkhead with two rivets and one bolt each. The bolt goes through the rear spar attach bars, along with a spacer that I made probably a year ago. I didn’t torque the bolts yet, even though they’re surely installed for good now. This is because my tubes of torque seal have dried up beyond use, and my personal policy is to mark every fastener as soon as it’s torqued – this makes it easy to determine anything that hasn’t been torqued properly. I should have some more torque seal in a day or two.

In the meantime, there are a few more minor items to rivet to the seat rib assembly, and then it’s on to assembling the mid side skins and armrests. I’ll want to prime and paint those, so they’ll have to wait until this weekend, but I also still have the electric aileron trim brackets just clecoed in place – I think I’ll dig out the instructions for that kit and finish up its installation before I make that area any less accessible.

Here’s a photo of the joined cabin floor assembly:

IMG 6688

Posted in Fuselage | Hours Logged: 1.5

Aileron trim bracket installation

As alluded to last night, tonight I finished installing the aileron trim components that rivet to the inboard seat ribs. These parts were fitted to those ribs a while back, but never actually riveted in place. The left-hand bracket, where the trim servo will mount, also needed to have the four attach nutplates installed, so that was the first order of the night – drilling all the holes to final size, deburring, countersinking for rivets, and riveting the nutplates. Then it was just a matter or riveting both brackets in place. There were more rivets than normal, since I mis-drilled the right-side bracket originally, and added a doubler for reinforcement.

Here’s an overview of the trim system, with the servo and actuating rod temporarily in place:

IMG 6690

In this view, the front of the plane is towards the top of the photo, rear to the bottom. The trim system is a simple spring-bias setup. The control column will pass above the actuator rod here, from front to rear. Two springs will attach to the bottom of the column, one going left, one right, with the outboard ends of the spring attached to the actuator. As the servo moves the rod, the springs will apply force to the column in the same direction, providing a slight roll input to counter any imbalance, for example if one fuel tank is fuller than the other.

Next up, I get to rivet the outboard seat ribs to the bottom skin, and then it’ll be time to start assembling the mid side skins + armrest assemblies. I’ll also want to probably go ahead and order my fuel pump and filter, so I can go ahead and mount them and fabricate fuel lines before the forward fuse is closed up. It’ll be much easier without the forward side skins in place.

Posted in Fuselage | Hours Logged: 2

Mid side skin priming

I bailed out of work a little early today, with the intent of trying to get as much of the mid side skin parts primed as possible. As it turned out, there was ample time to get it all done. The big piece of work was priming the inside of the skins themselves, but I also had to deal with the armrests (three pieces per side) and bulkheads (two per side). Nothing to horrible, just a bit tedious. On, and the spray nozzle on the garden hose broke. Fortunately, it did this as I was finishing up the last part I had to clean. Pretty good timing.

It was sunny and warm enough that the cleaned parts dried quickly, and I pretty much immediately jumped into shooting primer on the skins, then the structural pieces. Here are the armrests and bulkheads after priming:

IMG 6692

This weekend looks set to be eventful. Looking ahead in the instructions, tomorrow will probably consist of finishing riveting of the outboard seat ribs, then riveting the armrests and bulkheads to the mid side skins. Once that’s done, those assemblies will get painted. In the meantime, it’ll be time to join the upper longerons to the current cabin assembly, at which point I’ll permanently have a 16’ long airplane assembly in the garage. So I guess I’ll have to work out where to put the thing tomorrow or Sunday. There might be some more minor garage reorg involved, we’ll see.

Also, it’s occurring to me that the fuselage is the last major structural piece to be assembled. Obviously, there’s a lot more work to be done here, but I’m at a point where something resembling completion of the airframe is conceivable. After that, there’ll of course be a lot of work installing systems and so forth, but first I have to figure out how to pay for all this stuff…I’m getting close to the time where I need to write big checks, but I don’t really have any big checks available.

Posted in Fuselage | Hours Logged: 1.5

Mid side skin assembly, rear rudder pedal brackets

So my main goal for today was to get the mid side skins assembled with the arm rests and bulkheads, and maybe painted if time allowed – and time did in fact allow. Pretty productive day all around.

I actually started by finishing some work on the seat rib assembly. The outboard seat ribs needed to be riveted to the bottom skin – a fairly simple task, but made a bit awkward since I had to shoot from under the skin, and reach over the seat rib with the bucking bar. Not too horrible, though. Once those rivets were done, I had to move the cabin floor assembly outside, because I needed the workbench it was on for assembling and back riveting the mid side skins. Moving this thing is definitely a two-person job now, so I recruited Josie to help me out.

Looks kind of nice sitting out in the front yard, doesn’t it?

IMG 6698

Next, I set about riveting together the armrest and bulkhead assemblies. Fairly simple stuff, but a touch awkward in a couple spots. These assemblies then get back riveted to the mid side skins, though curiously, the construction manual says not to back rivet the aft most armrest. Not really sure what the reason for that is, but I guess I’ll figure it out eventually. The back riveting was made a bit more interesting due to the mid side skins having a bit of curvature to them; I had to prop up one end of the skin at certain points to keep the portion I was riveting flat on the back rivet plate.

Even so, I got a bit sloppy. Here’s what it looks like when you have a rivet sitting right on the edge of the back rivet plate and you don’t know it:

IMG 6701

Drilling that mangled thing out was an interesting experience, but I managed somehow to not bugger up the hole.

Next, I shot paint on the inside of each mid side skin assembly. Here are the painted skins sitting out in the grass to dry:

IMG 6704

And that made it time to move the fuse assembly back into the garage. This time, I put two sawhorses out to support the assembly for the time being. I also decided to get a shot of the vacant garage, since this is the last time it’ll be this roomy out here for quite some time:

IMG 6706

Once the fuselage was moved back inside, I started installing more parts. The instructions call for installing the upper longerons, center section plates, and the mid side skins. I did the former two, but then abruptly remembered the rear seat rudder pedal kit I was going to install. I wasn’t sure what was involved in installing that kit, but it seemed prudent to stop here and check that out before putting the mid side skins in place and thus restricting access  into the fuselage.

This turned out to be a good call. Two brackets need to be installed on each side for the pedals; an idler bracket that attaches to the base of the gear tower, and a guide bracket that attaches to the top of the center section. The idler bracket is easy enough; it just uses two existing bolt holes, but the guide brackets are more fun. They attach to the top of the center section and the side of the forward seat ramp angle, with two screws in each of those two pieces. Only one of these holes is preexisting; a screw hole that is also used by the mid-cabin cover plate. So there’s a lot of careful lining up of things here

It doesn’t help that the kit instructions are kind of vague. I did some research and apparently they date back to before the -8 kits were prepunched, so they’re a touch dated. It turns out that my center section is prepunched for the second nutplate after all; it’s just not obvious because the holes are only through one piece, and only visible from beneath:

IMG 6709

This is kind of tight spot as well. Even with my angle drill, I could only drill the two outboard holes. The third one was just too close to the bulkhead web, and the bolt head didn’t help either. So I devised a plan: drill the two outboard holes, install the nutplate on the top of the flange, and use it as a guide to drill the third hole. This worked out quite well:

IMG 6711

Next, I installed the two new nutplates. The plan from here was to clamp the guide brackets in place and drill through the nutplates from below, using a #30 bit, which fits nicely inside the #8 nutplate. Then I could drill the screw holes to final size on the drill press. Here’s the right bracket clamped in place, ready for drilling:

IMG 6714

The drilling went as planned, and the brackets are now secured in place for me to pick back up tomorrow, when I intend to install the idler brackets and maybe at least mock up the rudder extensions. I imagine I’ll leave the guide brackets uninstalled for now, since they’re held in by screws.

Finally, here are a couple photos of the current assembly in the garage:

IMG 6718

Note the aft end of the longerons dangling in thin air. I clecoed the aft most bulkhead in place, and put out my tall saw horse, just to keep these from banging into each other until I get to the tail cone. It also makes it a little less likely for me to walk into the longerons:

IMG 6720

And that’s all for now!

Posted in Fuselage | Hours Logged: 7.5

Assembling stuff

I’d wanted to continue working on the rear rudder pedal brackets today, but that didn’t really work out. The idler brackets, which attach to the base of the gear towers, only have one prepunched hole; the other has to be drilled in assembly. This is kind of a problem, since the hole has to be drilled in a super tight spot. There’s no way to get an angle drill in there to drill in assembly, and I couldn’t even figure out a way to try and mark the hole – an option that I didn’t really like anyway, since it not only depends on the mark being accurate, but me accurately punching the center of the marked hole for drilling. I briefly tried to fabricate a small transfer punch for this, but pretty rapidly decided that I might as well just buy a hole duplicator set instead.

So I set the rudder pedals aside and moved on to installing the mid side skin assemblies instead. I don’t really need to worry about access for the rudder bracket any more, since the guide brackets are fitted, and they’re the only thing that would have been blocked by the mid side skins. Adding the skins was just a matter of doing a bunch of clecoing. I also had to move my sawhorses around a bit – initially, I had one just behind the firewall, and the other under the center section. But once I added the mid side skins and started clecoing, the fuselage became pretty well-balanced on the center section, moving around like a teeter totter while I worked. So I moved the rear sawhorse back to the rear spar area, and now everything is a lot more smooth.

Next, I riveted the upper longerons to the tops of the gear towers and the firewall angles. The gear towers were straightforward, as were most of the firewall angles, but it was a bit tricky when I got close to the firewall, due to limited access. I did mangle a rivet and have to drill it out, but that’s it. Here’s one of the firewall angle rivet jobs:

IMG 6723

The next steps in the instructions were for assembling and installing the forward side skins, but I’m delaying those until after I’ve installed the fuel pump and filter, and fabricated the required fuel lines, and maybe done the hard brake lines as well. Bottom line, it’ll be a bit before I’m ready to close this area up. So I skipped forward to the addition of the tail cone. First step was to cleco the bulkhead at the aft end of the seat ribs into place, and then rivet to the outboard seat ribs. Then I riveted the baggage ribs and angles together, and clecoed them in place. Riveting these looks mildly cumbersome, though, and I was getting a bit tired, so I decided to call it a night at this point.

Once the baggage ribs are riveted, I’ll move on to dimpling, assembling, and installing the aft side skins, along with the rest of the tailcone. Then I guess I get to flip this beast over and get going on a whole lot of skin riveting. And of course, there’s still the matter of fuel and brake system stuff. But first, it’s time to place another Spruce order…

Fun aside: I was working with the garage door open today, and it was amusing watching people on the sidewalk staring in the garage as they went by. I’ve reached a point where it’s obvious that something unusual is going together in here:

IMG 6726

And here are a couple more token photos of the current state of assembly:

IMG 6727

IMG 6729

Posted in Fuselage | Hours Logged: 3

Fitting autopilot servo brackets

Today I had lots of goodies come in from Aircraft Spruce. There was a set of hole duplicators, which I’ll use to drill those rudder pedal idler brackets up front, a tubing bender for when I get to making fuel and brake lines soon, and a pitch servo mount kit for the Dynon autopilot. I only bought the mount for the moment, for the sole reason that the servo is pretty expensive. The money I might have spent on the servo itself, I instead spent ordering a fuel pump and filter from Van’s, which I imagine should be here in the next day or so.

Tonight, I wanted to get the pitch servo brackets mounted. These are pretty simple, just a couple of extended angle bits that mount alongside the elevator bellcrank, which is in turn just aft of the rear baggage area. The servo will mount here and drive that bellcrank once everything is together. The first issue is that the angle pieces interfere with the bulkhead that’s located just aft of the bellcrank:

IMG 6731

IMG 6734

No big deal there, I just removed some material from the bulkhead to clear the angles:

IMG 6736

Then I laid out a rivet centerline using the baggage rib angles as a guide, and marked my rivet locations:

IMG 6738

And then finally clamped everything nice and tight and drilled the rivet holes:

IMG 6740

I’ll want to prime these angle pieces before permanently installing them, so that’ll have to wait until this weekend. I’m also a bit curious about the attachment of the servo itself; if I’m reading the diagrams properly, it’s only attached to the angle bracket by a single bolt, which seems a bit sketchy. I’ll have to ask in the VAF forums and see if I’m missing something, or maybe this isn’t as big a deal as I’m thinking it is.

Anyway, that’s it for tonight…

Posted in Fuselage | Hours Logged: 1.5

Misc stuff, adding aft side skins

So yesterday was pretty busy, and no work got done, but I made up for it with a productive day today. I started out by finishing up some miscellaneous tasks. First up were the rear rudder idler brackets. I bought a set of hole duplicators to help me drill these in assembly with the gear towers. The duplicators have two little arms; the first has a little nub that fits in the hole to be duplicated, and the second has a drill guide that sits on the other side of the part where the hole is to be duplicated. Since the arms are attached, both parts are kept in alignment, and you just slide the nub in between the two parts, then drill using the guide. Here’s the left bracket all set up for drilling:

IMG 6742

And after final assembly:

IMG 6743

While I was doing the idler brackets, I also final-torqued all the bolts in the gear towers and added torque seal. Next, I riveted the baggage ribs in place and added the autopilot servo mount brackets (after priming them):

IMG 6745

Then it was on to the bulk of the day’s work, preparing the aft side skins. I skipped dimpling these previously, because they were stored in a kind of obnoxious location. I figured it’d be better to pull them out, get all the prep work done, and then just install them on the fuse when done. There’s an assortment of dimpling to be done here; there are of course tons of skin rivet holes, but there are also flush screw holes for the access plates (for the elevator control horns) and the rudder cable exit fairing. At this point, I also scuffed and primed a small area on the skins, where they’ll be visible inside the baggage compartment.

With the dimpling done and the primer drying, the aft mid longerons could be prepared. These were already countersunk, so all I needed to do was rivet a few nutplates for the baggage compartment access panel (which will, when removed, allow access to work inside the tail, a prospect I don’t look forward to). Once this was done, the longerons were back riveted to the aft side skins. Then I went and shot the final coat of paint in the previously-primed areas.

After a break to allow the paint to dry a bit, it was time to install the skins on the airframe. This is definitely a two-person job, since the skins are about 10’ long or so! Then there was just a lot of clecoing to do…

Here are the skins installed:

IMG 6747

And a quick look at the painted areas inside where the baggage compartment will be:

IMG 6750

I’ve been making a real effort to paint any visible parts prior to assembly, and I’ve done fairly, well, except tonight I realize the bulkhead where the mid and aft side skins join (visible at the left of the photo above) will need to be painted as well. I guess I should try and shoot that soon, before access gets any more limited – by which I mean before I install the aft bottom skin. The fun part will be trying to clean the bulkhead in place without wiping off any other paint…

Next, I get to continue with the tailcone. I may hold off on installing the large aft bottom skin until I finish all the work up front, just to help keep the fuselage from getting tipsy on the sawhorses (which might happen with the tailcone fully assembled). Hopefully my fuel pump and filter will come in this week, so I can get to work on fuel lines. I suppose I could go ahead and start working on brake lines, come to think of it.

Posted in Fuselage | Hours Logged: 7

Fuel system planning

So today my package from Van’s arrived, containing my fuel pump and filter. In keeping with my previous decision, I’m going to focus on work with the fuel and brake lines (and anything else related to the forward fuse that I can think of) before closing things up. Before starting on the pump, I installed nutplates on the access cover holes at the tail of each aft side skin. I was supposed to do this before installing the skins, but I thought it would be easier to do with the skins on the airframe. I was kind of right and kind of wrong about that – while it was easier than dealing with a 10’ long skin draped on the bench, the entire tail wanted to move around while I was squeezing rivets, which isn’t conducive to great results. I ended up having to drill out and replace two rivets along the way, and this seemingly simple task took almost an hour.

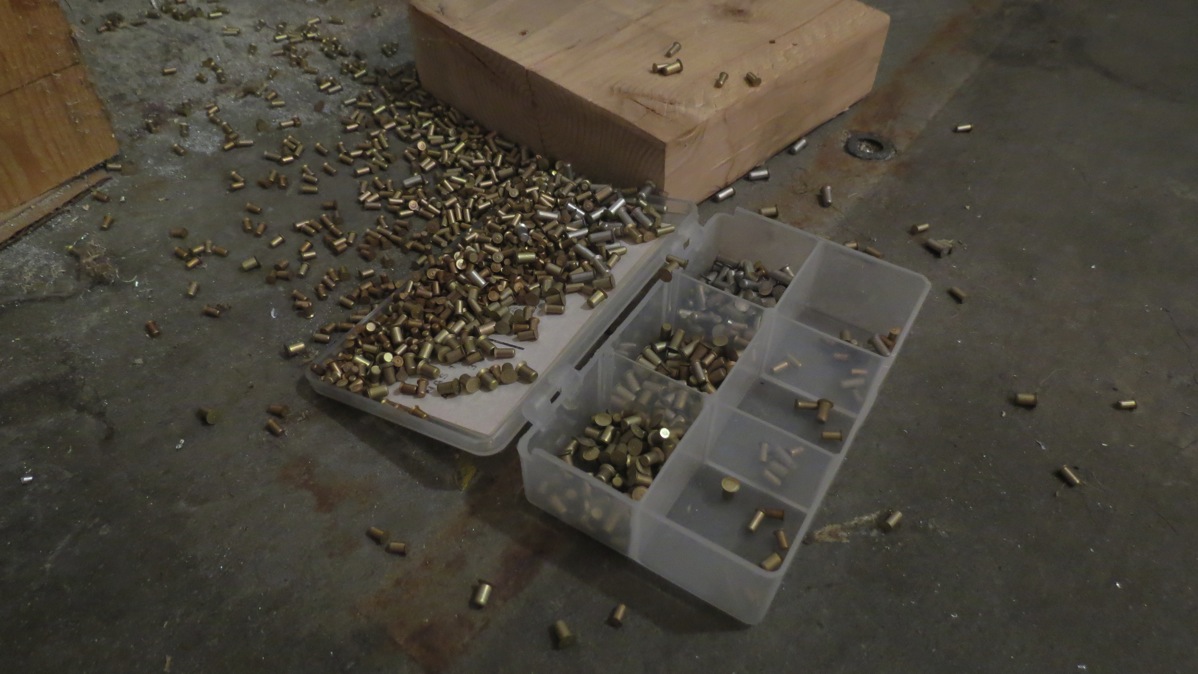
Next, I got out the plans page for the fuel system and went looking for the required parts – a couple of mount brackets and hose clamps. It took me a while to track these down as well – it’s a whole lot easier to find large parts than small ones… The brackets are thick alclad and needed quite a bit of prep work; polishing outside edges on the bench grinder, filing down inside edges, and doing some ext a bending work so the bottoms of the brackets were flat. While working on the bench grinder, I had an unfortunate incident. I’d left my container of NAS1097 rivets on the band saw table, since it was convenient while I was riveting the nutplates. Well, I forgot about them, and with the vibrations from the bench grinder, the container walked right off the band saw:

IMG 6752

I can’t decide whether I should just order a new assortment of NAS rivets or actually sort through this mess. On the upside, there are only six sizes to deal with…on the other hand, it would still be pretty unpleasant. So I dunno, maybe I’ll try sorting and see how long it takes for me to decide that I have better things to do with my time, like claw my eyes out.

Anyway, with the rivets in a cup for possible later sorting, I fitted the mount brackets to the forward floor and final-drilled all the mount holes. I’ll need to countersink these holes for flush rivets, which will probably be challenging due to the concave shape of the bracket…but it was late, so I quit before getting to that task.

Here’s the aft bracket, where the fuel filter will sit. This will be directly under the fuel selector, which is in turn just behind the left gear tower:

IMG 6754

I need to do some test bends with my tubing to figure out what the circumference of the bends will be – that’s going to be necessary information when I start laying out the actual lines and figuring out all that fun stuff. I suspect I’ll be throwing away a fair amount of tubing along the way. Next time I should be able to rivet these brackets down and start doing some actual layout work.

Posted in Fuselage | Hours Logged: 2