Wings

Aileron work surface, bending aileron skins, spar prep

Well, today turned out to mostly be a construction day. I set off for Home Depot with a bit of a shopping list and came home with quite the assortment of lumber. The first thing I wanted to get done – which I’ve been planning for a while now – is a work surface for building the ailerons and flaps. The instructions specifically mention using a good flat surface when building these parts, lest one accidentally build in a twist. Problem is, my workbench tops are not flat, they both have a bit of bow to them. After some research, I went with an idea I got from VAF to construct a work surface. The basic idea is to use two pieces of MDF and sandwich pieces of good straight hardwood between them. The result is a very stiff unit sort of reminiscent in construction to a hollow core door.

In lieu of MDF that I’ve have to cut – which I hate doing, it generates ridiculous amounts of fine dust – I bought two 12”x6’ veneered MDF shelves, along with a few pieces of 1×2 poplar (and I spent a fair amount of time going through the pieces of poplar to find really good straight ones). Once home, I cut two long poplar pieces to go lengthwise on the shelves, then cut the rest of what I had into short cross pieces. Then there was a lot of measuring, drawing layout lines, and so forth, until I finally got to start putting stuff together. The shelves and poplar pieces are joined using wood glue and finishing nails. Here’s the first shelf with all the poplar nailed/glued in place, just before I put the other shelf on:
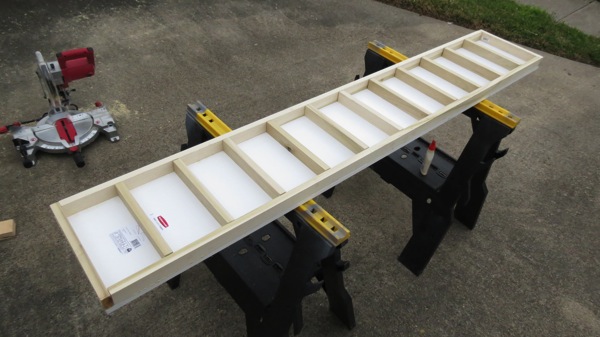
IMG 5416

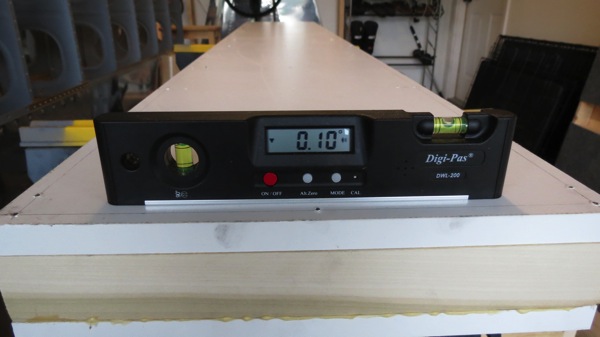
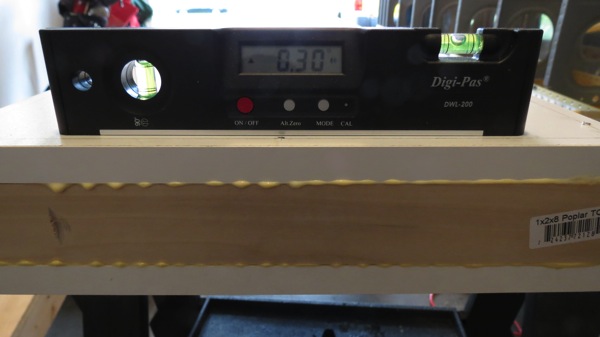
After nailing/gluing the second shelf to complete the sandwich, I put the finished unit on the sawhorses and used a digital level to check for twist:
IMG 5418

IMG 5419

I figure .2° of twist is an acceptable margin of error. And before anyone feel compelled to comment that it’s actually .4°, remember that the level was rotated. so the sign of one of those numbers has to be inverted before comparison. So it’s not .3 – -.1 = .4, it’s .3 – .1 = .2. Anyway, sorry for the math lesson.

With that done, I moved on to putting together the bending brake. I’d already cut the 2×6 I had into two lengths for this earlier, so now all I had to do was install the hinges to make the brake. I didn’t get any pictures of the brake by itself, because I was so eager to use the thing that I recruited Josie to come out and help me complete the skin bends. Here’s a 100% staged photo of the bending process:
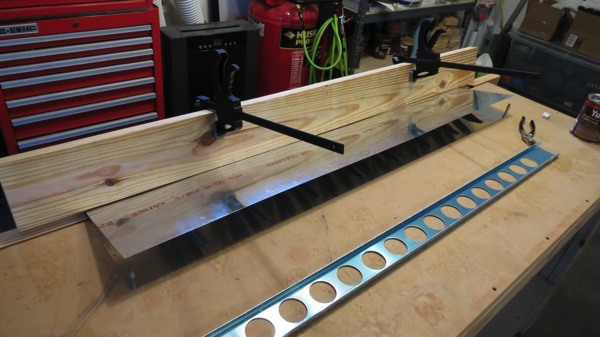
IMG 5421

Note the two large clamps on the top half of the brake. These were necessary in order to get sufficient leverage. That is, I couldn’t get the skin to bend simply by pushing on the board itself. In fact, to get the bend done, I was pushing down on the ends of those clamps with most of my (considerable) body weight while also leaning into the top of the board. If you’re wondering if it feels wrong to put that much force into a carefully-constructed aircraft part, then you’re 100% right. Funny thing is, I did this same thing with the elevators and rudder and I don’t remember it being this bad. I think maybe those skins were thinner than the aileron skin, but who knows.

Anyway, after finishing both bends, I clecoed the aileron spars into place so I could check the bends. The plans say the skins should be straight right up to the bend, and the bend itself should have a 1/8-3/32 radius. My bend radius actually came in a hair under the minimum (5/64), but I imagine that should be fine. It’s not as if I’m off by a huge degree. And the skins right up to the bend do look nice and straight:
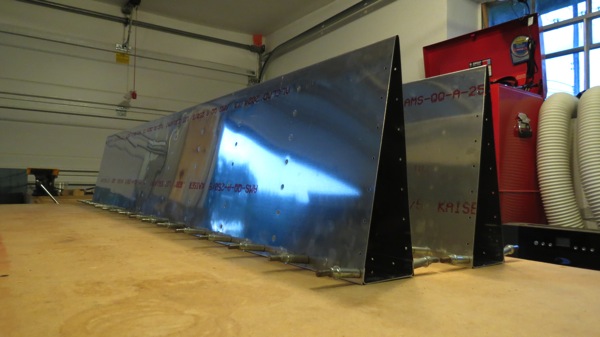
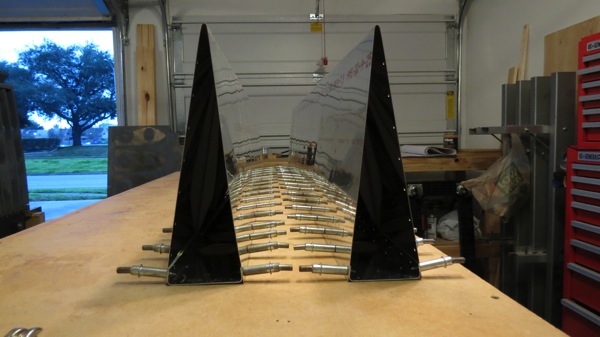
IMG 5426

IMG 5428

After that, I removed the spars and went to work preparing those. The next step in the plans is to clamp the spar reinforcements into place and match drill with the spar ends, then clamp the hinge points into place and drill their mount holes to full size. I meant to get a photo of this assembly, but I got carried away and tore everything apart for deburring before I remember about the photo. Whoops. I’m sure you’ll get to see it at some point down the road.

(Somewhere in the middle of all this I remembered that I was going to rivet the flap braces today. I got so carried away with the ailerons that I forgot. Guess I’ll backtrack to that maybe tomorrow night.)

Anyway, that’s it for tonight. Tomorrow my Stewart Systems epoxy primer is supposed to arrive, which is good, since I want to use that on the aileron counterweights. If I haven’t mentioned it before, the counterweights are galvanized water pipe. I want to take particular care to avoid having any direct contact between the steel pipe and the aluminum skins, to head off any possible galvanic corrosion. Probably overkill, but hey, it’s a primary flight control. Plus it’ll be a good thing for me to try the epoxy primer out on.

Update: I did a bit of research about the trailing edge bend radius. It seems that the bend radius has a significant effect on control forces; a larger radius reduces forces, whereas smaller increases them. Similarly, if the skins are slight convex up to the bend, this decreases forces, and concavity would increase forces. Some reports are that any significant concavity can lead to the ailerons being so sensitive as to be unpleasant…I’ll be paying close attention to that when the ailerons come together for good. But my slightly-undersize bends err on the better side, I think. It sounds like I can always increase the radius a bit by tapping on the bend with a piece of wood to swell it a bit, but I’m not going to bother with that unless flight testing makes me feel that the roll forces are too much. Even then, I think it’d have to be pretty bad for me to go monkeying with the ailerons.

Posted in Ailerons, Wings | Hours Logged: 5

Flap brace riveting

Mostly sort of a token work night tonight. I thought riveting the flap brace might be a little annoying, but it actually went fast. The only mildly annoying part was shooting the three inboard most rivets on each brace – that requires me to hold the bucking bar in between the closely-spaced wing walk ribs. Got it done with no bad rivets though. The rest were all easy to access.

Not the best photo, but it’s kind of hard to capture some of this stuff:

IMG 5429

At this point, I’d only been working about 40 minutes. So to fill out a real live hour of work, I warmed up the bench grinder and deburred the edges of the aileron spars, then clamped them i the vice and deburred the lightening holes with the die grinder. Going by the instructions, the next step on the ailerons is to prime the spar and reinforcements and the rivet them. I guess I’ll see what else I can do to prep more stuff for priming this weekend. I’d think that I could go ahead and do some match drilling/prep work on other aileron parts.

I also had a delivery from Aircraft Spruce today. It took forever to ship, but my Stewart Systems EkoPoxy finally showed up, a whole gallon of the stuff:

One thing I want to do this weekend is to try out my spray gun. Rather than initially test with the EkoPoxy ($210/gallon!), Stewart Systems recommends thinning regular latex paint to the appropriate viscosity to work out the paint gun setup. Guess I’ll grab some cheap stuff from Home Depot and spray-paint plywood in the driveway. I’m eager to shoot some of the EkoPoxy on scrap aluminum so I can see what the finish looks like. If it goes on relatively smooth, say with a satin finish, and seems durable (and I’d think an epoxy primer would certainly be durable), then I plan on just having my interior finish be the primer.

Posted in Wings | Hours Logged: 1

Right aileron match drilling

Finally back to work. It’s been a hectic week, between getting a flat on my car and dealing with various other annoyances. The good news is that we have no plans over the weekend – I’m not sen flying tomorrow – so I should be able to get in some good work.

Anyway, tonight I moved ahead to aileron match drilling tasks. First the nose ribs are fluted to straighten them, then they’re clecoed to the spars and those attach holes match drilled. Next the ribs are clecoed to the aft side of the spar and match drilled as well. I did all of these tasks on both ailerons together, since they were simple and didn’t take up a lot of work space. Next, though, the whole aileron gets clecoed together, so I put the left side parts away and focused only on the right aileron.

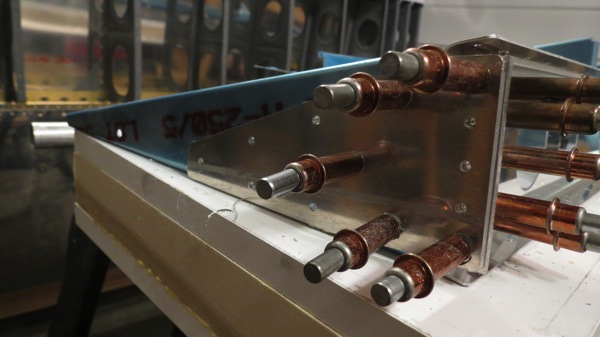
First the trailing edge skin is clecoed to the skeleton, and then the counterweight goes in place under the nose skin. Here’s the counterweight sitting in place just before I clecoed the nose skin on (it’s just steel water pipe):

IMG 5432

And then with the nose skin in place:

IMG 5433

IMG 5436

Then there’s a lot of match-drilling of stuff, with a few extra tasks. Most notably, the holes between the two skins and the bottom of the spar are drilled out to #30; these will get flush blind rivets as the last step to closing out the aileron. The real fun, though, is drilling the nose skin to the counterweight. There are holes all along the nose that are used as a guide to drill to the counterweight; these holes will get blind rivets as well. The prepunched holes in the skin are #40 but the final holes need to be #30. In order to make things easier – drilling through steel is a good bit tougher than aluminum – I first drilled all the holes to #40, clecoing as I went, then went back and enlarged all the holes to #30. Finally, the trailing edge skin is removed and a long #30 bit is used to drill a hole through each nose rib into the back of the counterweight.

Finally, it all comes back apart. Time to set this stuff aside and get going on the left aileron:

IMG 5437

Unfortunately, it looks rainy this weekend, so I don’t think I’ll be able to get any priming done. Maybe I can at least tinker with the spray gun a bit to get the hang of setting it up. Even if it’s rainy, I could probably set up just inside the garage door to shoot some thinned latex paint as a test run. I guess maybe I could prime in the garage like that too if I had to. If not, priming might end up being a roadblock here. At least daylight saving time will be back soon, which will give me some more flexibility to prime after work if need be.

Posted in Ailerons, Wings | Hours Logged: 2

Primer testing, aileron prep

The weather today turned out better than I expected, though far from perfect. There were sporadic showers through the afternoon, but in between it was ice and sunny out. So I managed to get in the spray gun practice that I’d wanted to do, which took up a lot of the day.

First I just filled the hopper with water and practiced spraying it against the side of the house. This was just to get familiar with the flow and pattern controls, and that didn’t take too long. Next I got some latex paint I had sitting around and thinned it to the recommended viscosity from Stewart (25 seconds in a viscosity cup). Pretty thin stuff. Then I went to town spraying the latex paint on some cardboard and the random sheet of plywood I use as a backer when I prime. This let me see how I could control the atomization of the paint with air pressure, but was kind of unsatisfying in terms of seeing how the paint was going on. So I scuffed a couple of pieces of scrap aluminum and shot paint on them. That was actually disappointing; the latex paint wouldn’t flatten out at all, and the coverage ended up spotty with tons of fisheye spots.

I wasn’t sure whether this was a problem with latex on aluminum, or me having not been particularly thorough about cleaning my test patches. So I decided to just go ahead and mix up a small batch of primer and shoot it on some more test patches. This time, I cleaned the patches thoroughly, using the EkoEtch stuff I got from Stewart. I also gave each patch a final wipedown with acetone before starting to prime.

I was relieved to see that the primer went onto the aluminum quite nicely, just about as easily as the rattle can stuff does. It did take a little experimentation to get the flow control at a place where I got good coverage; I overdid it on one patch and got some lovely runs. The other ones ended up looking halfway decent, though:

IMG 5441

As you can see, I still got some orange peel texture, so I still need some practice, but overall the coat looks good. I especially like that it has a sort of semigloss finish; between that and the color, I think my idea of just using this as the topcoat for the cockpit interior is going to work great. I’ll give these patches a day or so to dry and then abuse them with solvents and sharp objects to get an idea of how durable the finish is, but with it being an epoxy primer, I’m pretty confident it should be plenty durable.

With that done, I moved on to match drilling the left aileron. This went a lot faster than the right one since there was a lot less time spent scrutinizing the plans to ensure everything had gone together right. After pulling the aileron apart, I got started deburring the rivet holes in the ribs, then I decided to get the counterweights countersunk for their flush rivets. That was a little more challenging than normal countersinking, since I was working on a piece of pipe. I cut a chunk of 2×4 at an angle and attached both halves to a base to make a sort of holder for the counterweight pipe. The holder was clamped onto the drill press table with the countersink cage in place. Turned out to be a pretty nice setup:

IMG 5447

I got Josie to come help hold the pipe (it is 4+ feet long after all) while I ran the drill press. We made quick work of the countersinking this way:

IMG 5448

After that, I countersunk some flush rivet holes in the spar reinforcements, did a bit more deburring, and called it a night. Tomorrow I should be able to finish deburring and dimpling all the parts, I think. Too bad the weather will be so-so again, but maybe I’ll be able to get in some priming. It’d be nice to be able to start assembling the ailerons this week. If I can’t prime, I guess maybe I’ll move on to messing with the flaps.

Posted in Ailerons, Wings | Hours Logged: 6

Deburring

Another day with not so much airplane stuff. I had another “little thing” to work on that I thought would take basically no time, so of course it actually took about three hours. The weather was good, but I pretty quickly abandoned the idea of being able to prime today – there’s a ton of prep work to be done before I get to that point. Case in point, I spent 2.5 hours today just deburring parts. I still have to do a bunch of dimpling and countersinking, but at least all the holes and edges are deburred.

I didn’t take any photos today, there’s not much to see really.

Posted in Ailerons, Wings | Hours Logged: 2.5

DImpling

So yeah, it’s been a few nights since I did anything. The main reason is that it’s been rather cold here, and I don’t have a heater for the garage, nor do I intend to get one. While it’d be useful on nights like these, given the Houston weather it’d spent about 98% of the year just taking up space in the garage.

Tonight I got to work dimpling all the aileron parts. First up were the spars, which were mostly easy. However, the bottom holes which are drilled out to #30 for blind rivets need to be dimpled too, and the larger dimple die set has a larger base, and the flange is pretty short. Which is to say, I fired up the bench grinder and conducted another tool modification.

Much better:

IMG 5471

From there I did all the ribs and the trailing edge skins. Before dimpling the leading edge skins, though, I wanted to roll the skin edges a bit. I noticed when I clecoed the ailerons together that the top of the nose skin in particular seemed to want to pillow a bit. I want these skins to fit nice and tight, so I got out the until-now-unused edge forming tool and went to work. I’ve heard lots of guys say that they find this tool hard to use, but I thought it was pretty straightforward.

The slight bend line is barely visible in this photo, just on the outboard edge of the rivet holes:

IMG 5473

After dimpling the easy holes on the nose skins came the fun part. The rivet holes attaching the nose skin to the counterweight pipe needs to be dimpled for a flush rivet. Problem is, a regular dimple die can’t be used here due to the curvature of the skin. I already knew the accepted approach to this though – just cleco the counterweight pipe in place and use its countersunk holes as female dimple dies. The challenge was figuring out how to support the assembly against me hammering on the male dimple die.

After much experimentation, I came up with this Rube Goldberg assembly of scrap 2x4s and 2x6s:

IMG 5478

Worked great though!

IMG 5476

IMG 5481

And that, I believe, is it for aileron part prep. It looks like the weather will be OK Saturday, so I should be able to get all this stuff primed and then get to work assembling everything. Maybe the remainder of this week I’ll tinker with the flaps some.

Posted in Ailerons, Wings | Hours Logged: 2

Priming, tinkering with flaps

Didn’t get a lot done today. The main thing I wanted to get done was priming, but no sooner had I finished cleaning all the aileron parts when it started to drizzle. So I brought all the parts inside the garage and waited for them to dry even longer than I’d originally expected. I was able to set up my table and shoot primer on the small parts just inside the garage door though:

IMG 5485

But that’s all the priming I got done. I’m on my last can of 7220, and I think I’m going to keep using the 7220 for internal parts that don’t need to necessarily look good or have a tough finish. The rattle can is much easier than mixing up batches of epoxy all the time. So I suppose I’ll make a Napa run tomorrow morning and then try and get the spars primed. I do still want to use the EkoPoxy to do the counterweight pipes, and while I’m mixing up a batch, I figure I’ll prime the insides of the aileron pushrods as well. I cleaned those today too, and considered trying to prime them, but I thought it was better to let them dry overnight to ensure there’d not any remaining water inside them.

In the meantime, I started tinkering with the flaps a bit. The instructions say these are the easiest control surface to build, but I’m skeptical. The construction is actually kind of interesting. First off, in lieu of using stiffeners like the ailerons, the flaps have ribs throughout; I presume this is because they’re subjected to greater aerodynamic loads. Even more interestingly, the skins come in two pieces, but not joined at the trailing edge. The bottom flap skin terminates in a sort of quasi-spar that rivets to the trailing end of the internal ribs. The top skin, in turn, wraps around the trailing edge and includes the aft 20% or so of the bottom skin.

Kind of hard to explain, but here’s the bottom skin with an internal rib in place, showing the design:

IMG 5487

I didn’t really mess with the flaps much though. Some shims have to be constructed before doing any real match drilling, and I didn’t really feel like getting involved with all that today. Kind of feels like I have too many separate things going on right now; I’d rather finish the ailerons before I go nuts messing with flaps. Or maybe tomorrow I’ll feel more like playing with the flaps, we’ll see.

Posted in Ailerons, Wings | Hours Logged: 2.5

A little priming, a lot of flap work

So my first order of business for the day was to run to the nearest Napa and buy up their entire stock of 7220 self-etch primer. I should be set on that stuff for a while now, I think. Back at home, it was fairly rainy today, so I ended up priming just inside the garage door again. First up, I shot 7220 primer on the aileron spars. Next, I mixed up a small batch of EkoPoxy for the counterweights. Since I knew that I’d have a ton of extra epoxy primer mixed up, I decided to use the surplus to prime the insides of the counterweights as well as both pairs of aileron pushrod. The instructions recommend pouring the primer into the pushrods to do this; I decided to just spray it into one end with the spray gun until it ran out the other. It worked, but there’s a whole lot of waste in this technique:

IMG 5489

The bigger issue was that instead of using the surplus primer for this, I used all of the batch just on coating the insides. And I hadn’t sprayed the outside of the counterweight; that was going to be my last step. Fortunately, it’s acceptable to apply this primer with a brush, so my ghetto solution was to dip a paintbrush in all that extra primer that had run out of the tubes, and then I brushed that onto the counterweight tubes. The finish will look cruddy, but that’s OK, it won’t be on display.

Next, I went to work riveting the aileron skeletons, though I didn’t get very far. Step 1 was to rivet the hinge reinforcement plates onto the spar. Most of the rivet holes remain unfilled, since they rivet in assembly with the ribs:

IMG 5491

The next step in the instructions is to rivet the counterweights to the nose ribs. The counterweights that still had wet primer on/in them. So that was the end of aileron work for today. Time to move on to the flaps. First step was to match drill the ribs to the spars, then the bottom skin gets clecoed on, the holes in the reap spar are drilled to the internal ribs, and finally the bottom skin is match drilled.

Next up is drilling the piano hinge half that the flap will rotate on. The provided hinge pieces are much longer than needed; the plans say the hinges should be 56”, but the spars are a little longer, so I cut the hinges to be the same length as the spar. I realized about halfway through the drilling, when checking the plans, that the hinge doesn’t actually go the full length of the spar, hence why it should be a little shorter. I just went ahead and drilled the entire length of the hinge; I’ll trim it to the proper length when the time comes.

Anyway, drilling the hinges was fairly repetitive: After clamping the hinge in place, I just went down the spar, drilling, reclamping, and clecing as I went:

IMG 5492

IMG 5496

All done!

IMG 5498

Finally, I clamped the top skin into place on the right flap:

IMG 5500

The next step is to match drill this skin, but I stopped short of doing that. We’re going out to catch a movie, so I needed to get showered and ready to go. I guess I’ll keep going on the flaps for the time being, since my workbench is now covered with all the stuff I’ve been using for the flaps.

In other news, I called Van’s last week to check on the status of my fuselage kit. The only big piece I’m waiting on is the roll bar, which is off getting powder coated now. Sounds like the kit will be crated and shipped this coming week!

Posted in Flaps, Wings | Hours Logged: 6

Left flap prep

Started out tonight by match drilling the left flap skin, which I’d clecoed in place before knocking off last night. To be really careful about avoiding putting a twist into the structure, I put 2×4 blocks under the flap so it was resting on those instead of the clecos while I match drilled. Per the instructions, I match-drilled the top holes before flipping the flap over and doing the joint between the top and bottom skins.

The next order of business was to take care of the reinforcements in the inboard end; these provide the mount point for the flap actuator. There are two parts; the first is a flat plate that rivets to the end rib, and the second is fabricated from aluminum angle. Here’s the flat plate clecoed in place and drilled to the end rib:

IMG 5504

But there’s more fun to be had here. The inboard rib isn’t perpendicular to the spar, so that reinforcement has to be bent so the portion forward of the spar mates correctly with the angle bracket. And that plate is pretty beefy, so it takes a good bit of force. At first I just tried clamping the plate in the vise between two pieces of scrap poplar, but it was hard to get everything aligned properly. So I ended up using the bracket as a guide to drill holes in the poplar blocks, then I ground the heads off two rivets and used them as pins to hold the entire assembly together:

IMG 5507

IMG 5509

After committing repeated acts of violence on that plate, the bend was finally correct and I was able to cleco it back in place, clamp the rough-cut angle bracket on, and drill the rest of the rivet holes. Here’s the final reinforcement assembly in place:

IMG 5510

IMG 5513

Now I just get to repeat all this with the right flap tomorrow…but it should go a lot faster since I figured out a lot of stuff tonight.

Posted in Flaps, Wings | Hours Logged: 2

Right flap prep

Not a lot to report tonight. Mostly it was a replay of last night – match drilling the right flap top skin, then fitting and drilling the reinforcements for the inboard end. As I expected, it went quite a bit faster the second time around. Once I’d finished getting the right flap to the same point as the left, I needed to prep each inboard flap end for the pushrod attach point. This just involves drilling a previous hole out to 1/4” and then drilling for a nutplate that will mount inside the inboard rib.

With that done, I tore both flaps back down to bare parts, peeled off all the blue vinyl, marked each part, and now everything is ready for a good long deburring session:

IMG 5516

Now to decide whether to keep trucking on the flaps, or go back and start riveting the ailerons together. I’m leaning towards the latter right now, but we’ll see how I feel tomorrow, I suppose…

Posted in Flaps, Wings | Hours Logged: 1.5