Fiberglass

Rudder tip, yet again

So tonight after doing a bit of post-work flying, I got to sanding down my newly-epoxied tips. One immediate problem I had were some runs in the epoxy; it seems my attempts to squeegee off all the excess weren’t good enough. One recommendation for this procedure was to use a nappy paint roller to remove excess, but I didn’t have one so I tried the squeegee method. That, in turn, made sanding a little more fun than it needed to be, and I definitely went through the epoxy shell in a few places. Still, everything felt nice and smooth, so after fine-tuning and doing a final fit check, I decided it was time to shoot filler primer.

Here are the pieces after I shot a couple coats. One thing you might notice on the far left of the rudder tip is…a good-size pinhole. And it’s not the only one. The stab tip has a couple as well. Looks like I’ll be sanding this primer right back off and doing even more epoxy work. Maybe a trip to the hardware store for some paint supplies is in order tomorrow…

Posted in Empennage, Fiberglass | Hours Logged: 1

Rudder tip farce continues

OK, so yeah, the fun times keep on coming. First thing today I set about sanding off all that filler primer I shot Friday evening. That turned out to be more fun than I expected – that stuff really loves to clog sandpaper. I was taking lots of pauses to knock the crud off my paper, over and over again. But finally I got it all removed from both fiberglass pieces – well, mostly. There were some low spots where a layer of primer remained, and I decided that was fine since I’d be covering the whole thing with an epoxy skim coat again.

And so the epoxy dance began again. The idea here is to lay on a series of coats to build up a little thickness, and also to end up with a textured surface to provide a sanding guide (eg you sand the skim coat until the texture goes away). So you mix a batch of epoxy, coat the piece, squeegee most of it off, and then use a roller to even everything out and apply some texture. Then you let that coat tack up (about an hour or so in the current cool temperatures), then repeat this a couple more times.

Now, here’s the fun I had with this procedure today. First off, my nappy paint roller shed a fair bit of junk into the epoxy. That was almost enough to make me call it a day again, but I decided to soldier on, figuring I’d be sanding this down anyway. I guess there are worse things in the world than having odd fibers under the primer. Worst case, I sand it all off (again) and repeat this process (again). I think part of the problem was that the low temperature made the epoxy a lot sticker than it would have been otherwise.

The real fun came when I went out to apply my third and final epoxy coat of the day. I’d mixed up a batch, painted it onto the stab tip, and was just getting started on the rudder tip when…I bumped the stab tip accidentally, sending it off the workbench and onto the floor. Which meant that that epoxy I’d just laid on picked up all the dirt and random stuff on the floor where it landed. At first I tried wiping it off with a dry paper towel, but that wasn’t removing stuff too well, so then I switched to a towel soaked in acetone – which works well for cleaning up uncured epoxy. That did a good job of removing the epoxy I’d just put on, but I think it also removed some of the previous two coats. Kind of hard to tell. In any case, about all I felt I could do was to go ahead with that final coat of epoxy and hope it was enough for sanding later on.

Later, I went and reread some of the VAF fiberglass info, and another recommendation from Dan Horton (a guru-level composite guy) was to skim coat with a different product instead of raw epoxy. System Three Clearcoat is mainly used for waterproofing wood, but according to him a single coat goes in nicely, lays itself down smooth, and has a long enough pot life to have good working time. So I ordered some of that stuff, and will probably try it out the next time I need to shell out a fiberglass part. The whole half-day odyssey of multiple epoxy skim coats just isn’t doing it for me.

Now, let’s just hope that I won’t be trying that stuff on these same stupid tips. I’m really hoping that I can finally get these parts done and mounted, and move on to something else, maybe try that new epoxy stuff on the rubber bottom cap. At least with all this learning I know that the micro I’ve put on there needs more finishing before I shoot primer or anything like that.

Posted in Empennage, Fiberglass | Hours Logged: 1.5

Yes, more with the rudder tip

Not much to write about tonight. I spent about an hour sanding down the epoxy skim coat on the two tip pieces. So far it looks like the bits of fiber embedded in the coat aren’t a problem, everything sanded down nicely to a slick finish. I wanted to go ahead and shoot primer again, but it’s been super humid today and so conditions aren’t really that great. I’ll wait until it dries out some tomorrow instead.

I also poked at the horizontal stab tips some more too. I think I’m going to try just drilling the mount holes, clecoing the tips in, and see if they get pulled decently into alignment. If that doesn’t work than I may see about adding a rib further forward in the tip to spread it out, in addition to the rib closing out the rear of the tip. Getting just the right fit won’t be a lot of fun but I think it’s a better option than something like splitting the tip and rebuilding it. Hopefully it won’t be necessary though…

Posted in Empennage, Fiberglass | Hours Logged: 1

More rudder tip. Also starting on the horizontal tips

Notably, this entry actually covers work done over a couple days – I did bits of work on the rudder tip over the weekend, but at some point it seems absurd to keep making short entries and having to invent new title variations. Hence me combining them instead.

After sanding the epoxy skim coat, I shot filler primer on the tips once again. This revealed a few remaining pinholes in both pieces, but this time, instead of doing a big sand-down operation, I mixed slightly wetter micro and worked it into each pinhole just using a finger, leaving a bit of excess around each spot. After that cured for a day, a quick bit of sanding smoothed everything out, and I shot primer yet again. Finally, at this point, the vertical stab tip was pinhole-free, but I found a few more stragglers on the rudder tip, so I repeated the same procedure again.

As of tonight, the rudder tip was also pinhole-free, but I wanted to do a bit of touch-up on the flanges. The “step” where the flanges begin was uneven in some spots due to buildup from my multiple epoxy coat applications, so I went to work with a bit of 120-grit on a popsicle stick to clean those up a bit and make sure the flanges were nice and crisp. With that done, I shot primer…yet again.

As primer tends to do, it highlighted a new problem I created during my flange work. Looks like I got a little overzealous with the paper here, and now I’ve got a new groove to deal with:

That’s probably fixable with a touch of micro – or maybe I should just go ahead and get some regular old filler for this stuff instead of continuing to make batches of micro and then throwing away 99% of them. Anyway, the rudder trip farce keeps going…

On the other hand, I’m feeling good enough about my fiberglass learning to get going on the horizontal tips. I laid out the rivet holes on the stab and got those drilled in assembly with the tip pieces. For the most part, they seem to fit pretty decently with just the cloches holding them in place, but I think I’m still going to end up adding some support further forward to help them conform a bit better. I also expect that I’ll end up building them up a bit to get a nice smooth transition from fiberglass to aluminum…here’s hoping that process goes a lot more smoothly than the vertical stuff.

Next up will be trimming the horizontal tips and adding the closeouts on the aft ends…then there’s glassing in the elevator counterweights…plus continuing to bang on that rudder tip…

Posted in Empennage, Fiberglass | Hours Logged: 3.5

Getting going on the horizontal tips

So it’s been another batch of cold days, which has kept me from really getting into any work, but I did find time a couple nights ago to pick up some actual body filler to use for pinhole filling and other minor touch-up work. Tonight I made the first use of that by mixing up a small batch and using it to restore that groove I accidentally cut in the rudder tip. Also, another nice touch with the filler is that it sets up a lot faster than micro – the touch-up I did was sandal within an hour or two. That, in turn, allowed me to get my sanding done a lot sooner, and I even shot a light coat of primer just to get a better look at any imperfections. The whole piece needs maybe one more overall sanding and another coat of high-build, but I think at that point these will finally be ready to rivet.

In the meantime, I got back to work on the horizontal tips. The stab tips that I drilled last time needed to be trimmed to length; I made some starting marks last session and tonight extended those around the pieces and got them rough-trimmed and sanded to shape. A test-fit on the actual stab allowed me to finalize the shape and check fit against the elevator tips as well.

Next I worked on cleaning up the elevator counterweights. These are going to get wrapped in fiberglass, but before that can be done the shape needs some fine-tuning to match the counterweight skin. I spent some time working on those with a file, giving them some nice rounded edges, as well as a little inset compared to the counterweight skins, to allow for the eventual glass layup.

Then it was time to prep the elevator tips for glassing in the counterweights. As provided, these pieces are a bit long, actually extending past the counterweight itself. Some trimming is required here before getting to the glassing; here you can see the mark I made about 1/4” back to use as a trim reference:

After extending that line all the way around, I trimmed the tips, then went to work sanding a nice taper to the cut edge. This taper will allow for a good solid scarf joint with the glass plies I’ll be adding:

Now that the counterweight is exposed, I can also see that I’m going to want to work on the stab tips a bit too. The gap is nice in the skin area, but tapers a bit with where the actual weight is. I suppose I could trim the counterweight a bit, but I think it’ll be easier to get a nice edge by working on the tip instead. I’ll be wanting to get that done before I go to work adding glass here.

Also, I still need to drill the elevator tips to the elevators; obviously I’m going to want those clecoed in place before I start adding glass plies. Having the whole thing move around wouldn’t exactly make for a nice shape…

The good news is that it’s warming up again this week, so the weather should be good for getting this glass work done.

Posted in Empennage, Fiberglass | Hours Logged: 2.5

Continuing with the horizontal tips

That title’s not entirely accurate, or at least it’s not the full story, but hey, it captures the broad strokes. I started off giving the vertical tips some attention again, giving them a good sanding to remove the last few imperfections, then shooting some more primer. For once, I didn’t immediately see a new flaw with fresh primer, so I think that odyssey is finally coming to an end. Once the primer has had a day or two to cure, I’ll drill the mount holes to final size, dimple and countersink as needed, and get the blind riveting done.

But the real work tonight was on the horizontal tips. First, I turned my attention to the gap issues I mentioned last night. Rather than simply sand the horizontal tips to match, I decided to take a close look at the elevator counterweights. I used a square to evaluate how well the counterweights matched the profile of the counterweight skins, and there were some irregularities. This probably isn’t too surprising, as the lead weights don’t exactly seem to be precision cast or anything.

Anyway, I ended up doing some more filing on the weights to shape them more to my liking, both getting the profiles to match and rounding the edges a bit more. Once I was satisfied with those, only then did I sand the horizontal tips a bit more to get the gaps nice and even. It’s also worth noting that this sanding still won’t be setting the final gap. As I did with the vertical, once I’ve built up the elevator tips and closed out the stab tips, I’ll wrap sandpaper along with gradually increasing backer material around the front of the elevator, and swing the elevator to get a really nice and even gap, as well as a slight concave profile to the back of the stab tip.

That’s down the road, though, for now I have a nice-looking gap as things sit:

Also visible in this photo are clecos in the elevator tip. I clamped those and drilled the initial mount holes tonight as well. For the most part I’m OK with the gap at the base of the tip, but I think I’m still going to add some micro along the interfaces to make things nice and tight. it also looks like I’ll need to work the elevator skins a bit to get them to mate better with the tips.

It was still too cold to really do any glass work tonight, but I did decide to go ahead and make the balsa inserts that will close out the stab tips. I discovered that, while folks seem to recommend cutting balsa wood with a hobby knife, in fact a metal blade on the bandsaw does a much nicer job. As before, after rough cutting the pieces it just took some trial and error, removing material with 40-grit sandpaper, to get a nice snug fit. Hopefully tomorrow it’ll be nice enough that I can get these closeout pieces bonded into the tips.

Posted in Empennage, Fiberglass | Hours Logged: 3

Vertical done-ish, closing out horizontal tips

Well, I almost talked myself out of working on the horizontal tips tonight, since it’s dropping into the 40s later, but eventually I decided to do it, and just bring the heat lamp into play if necessary. First up, I actually needed to fine-tune my balsa inserts a bit more. One thing I noticed as I was finishing up last night was that the horizontal tip profile didn’t match the elevators very well – it was a bit fatter not too far from where it joined the stab.

One thing I’ve learned is that these gelcoat pieces can be coaxed into a more permanent shape change by stressing them and leaving them that way for a bit. This is, in fact, how I handled these same pieces not fitting the stab curve very well – I stuck little popsicle-stick spacers in to spread the pieces to fit, and found that after a few days they were staying in that shape.

So last night, before quitting, I put a clamp on each stab tip to squeeze the open end to better match the elevator, and left those overnight. Today when I removed the clamps the tips stayed where they were, and matched the elevator profile much better. But that did change the shape of the open end, so I had to tweak the balsa plugs a bit.

After that was done, I got to work bonding the plugs into place. One thing I learned after closing the vertical stab tip was that it would have been better to lay up the glass cloth reinforcement over the wet flox mixture, rather than doing two separate work sessions. Makes sense – having the still-runny flox mixture under the glass means it’ll make much better contact, rather than trying to shape it around dried flox.

The concern I had with this was that without the plugs bonded in place, I was worried they’d move around as I was working the glass plies into place and wetting them out. That was easily solved by using a spring clamp on the open end of each tip after placing the plugs with the flox around them. The clamp also provided a handy handle while working with the pieces:

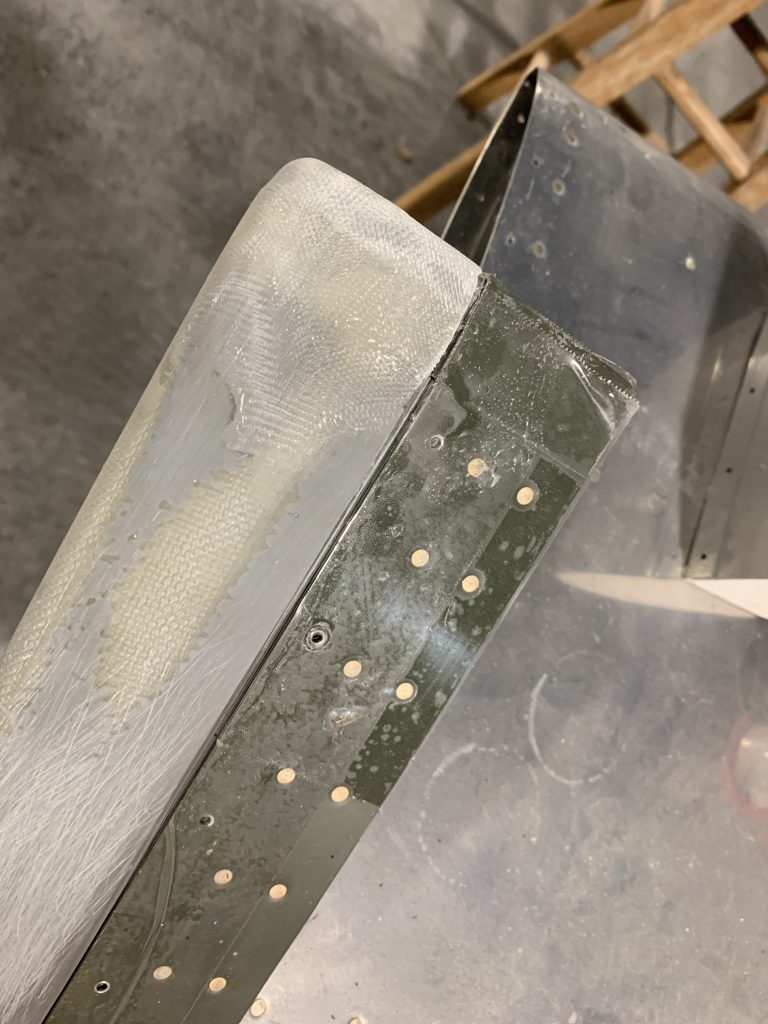
The fun part about working inside these tips is trying to wet the glass out without making too big of a mess. It seemed unavoidable to have an excess of epoxy end up inside, even when I tried hard to use the excess for wetting out. If I’d let the tips cure in the position shown above, that wouldn’t have been too bad, just a bit of extra epoxy weight – but these needed to be clecoed to the elevator while curing, to ensure that the whole assembly cured up nice and square. The last thing I wanted was epoxy running out for the tips and gluing these unfinished tips to the stab, which is why I topped everything with the peel ply. This isn’t really required here but it’ll help keep the excess epoxy from going anywhere it’s not supposed to.

The last step for the tips was to clamp the open ends again just to make sure they held snug against the plugs while curing:

With that done, I moved on to permanently mounting the (finally) finished vertical stab and rudder tips. These needed to be clecoed in, the mount holes drilled up to #30, then everything dimpled or countersunk as appropriate. Once that was done, the tips went back on one last time, and I went to town with the blind rivets. In spite of a weird hangup partway through – the pop rivet tool I was using spontaneously disassembled itself – I still got it done. Good thing I have two pop rivet tools, I guess.

Anyway, it’s been a long road but now I have the vertical closed out. Well mostly..there’s still the rudder bottom cap to finish out and put in place. But that needs far less work than the tips, so hopefully it’ll go a lot quicker…

Posted in Empennage, Fiberglass | Hours Logged: 3

Glassing over the elevator counterweights

OK, back at it again. Hopefully we’re at the point where it’s not gonna get too cold for fiberglass any more this year. One thing I see from looking back is that I never wrote up a short build session from about a week ago, when I added micro to the closeouts on the h-stab tips that I’d previously closed in.

Tonight, though, it was time for the real fun – that is, adding glass to the forward edge of the elevator tips to enclose the counterweights. For this work, I’m basically just doing the work in place, using the counterweights themselves as my “mold.” So the first step is to cover everything in the area with clear packing tape to act as a mold release:

Then, it’s just a matter of adding plies of glass cloth. Before doing anything, I wanted to evaluate whether I could use single pieces of glass for each layer, or if I’d have to get creative with shapes to conform to the curvature here. The glass cloth I have is really good at conforming, but I decided to try test-fitting a piece of dry cloth beforehand just to get an idea. Not only did this show me that it would conform, but it also gave me a good idea of what I’d need to do with the wet cloth to get the conformation to happen – much better than figuring that out with wet plies.

For this task, I used the helpful tip of putting the cloth between two pieces of plastic, and working the epoxy around with a squeegee to get everything saturated. This is especially helpful with this cloth, since it’ll deform really easily. This way, the cloth retains its shape while being wetted out, and I can cut out each piece, plastic and all, and only peel the plastic off when I’m ready to apply. This also makes it really easy to cut out nice regular size/shape plies.

There’s not really a lot more to say, but here’s that same elevator tip after adding three plies and then topping it all off with peel ply. Tomorrow’s the really big day, when I get to find out if I did a good enough job with my packing tape…hopefully these tips don’t end up bonded to the aluminum….

Posted in Empennage, Fiberglass | Hours Logged: 2.5

Glassing over the elevator counterweights…again

Not a lot to report tonight. I finished taping up the elevators after running out for more packing tape, got the tips clecoed in place, and laid up two layers of glass over each counterweight. I decided to trim the glass plies immediately rather than waiting for them to cure partially, since the goal was to make sure they were pulled in tight against the counterweights. I figured they’d be more likely to sit proud if I waited.

I think this was a good idea, but making it happen was somewhat annoying. At first I tried using a razor to cut the glass, but even something that sharp was more likely to drag the cloth than cut it. I ended up using my little pizza-cutter type thing that I use for cutting raw glass cloth, which did the trick but then was a lot of fun to clean up.

From the looks of things I’ll have much better results than last time; tomorrow we’ll get to find out if my optimism is merited. In the meantime, here’s another photo of wet glass and peel ply:

Posted in Empennage, Fiberglass | Hours Logged: 1.5

Elevator tip shaping

The day after doing a layup is always fun – it’s time to rip off the peel ply and see if you did something right, or if it’s gonna be do-over city again. In my case, there was the additional mild concern that I’d epoxied the tips to the elevator in spite of taping up, but once again both tips popped right off with no drama. After removing the peel ply and putting them back in place, the front-end profile matches up far better than last time:

Next up was cleaning things up. The ragged edge where I cut the wet cloth got sanded to a nice straight line, and then I went to work sanding along the joint to remove the excess cloth and make a nice smooth scarf joint. With that done, the tips look a lot better already:

The next step is to slop on some micro and work on the final contour for these guys. Most of this will involve shaping the front end I glassed over, but I also want to fill the gap between the fiberglass tip and the aluminum skin. The photo above in particular shows one of the unsightly gaps that I want to take care of. Before doing this, though, I wanted to tighten up the glass-aluminum interface; right now the edge of the elevator skins want to curl up a bit. That just required a bit of work with a hand seamer, and eventually things were looking much more flush, and thus conducive to adding micro.

I also temporarily added the stab tips to get an idea how things will line up. Interestingly, whereas on the vertical the rudder tip needed to be built up to match the stab, here I have the opposite problem; I’ll need to build up the stab tips a bit to match the elevator. I’ve also got a bit of refinement to do between the tip and skin contour there, so overall there’s gonna be a decent amount of micro applied, which in turn means a good bit of sanding.

Initially I’d thought I might get to doing micro tonight but I ended up just doing prep work instead. I sanded all the tip pieces down to remove the gloss from the gel coat and promote adhesion when I add micro. I also sanded the epoxy skim coat on the rudder bottom that I added previously, so that piece should be ready for primer once I get the tail light fitted. Though as I type this I’m remembering my intent to add some more glass to the open part of the front end, so never mind that last part…

Posted in Empennage, Fiberglass | Hours Logged: 1.5