Ailerons

Aileron bracket prep

Yup, I still have yet to do any riveting on the main skins. But I have good reasoning behind it! What I got to thinking about today is that the riveting is an inside job, and doesn’t require nice weather or daylight. Priming, on the other hand, requires both, and it was a really beautiful day. The next task after finishing the main skin riveting is to build and attach the aileron hinge brackets. The way I figure it, if we put in a bunch of time today to rivet he main skins, I’d find myself without a lot to do over the course of this week. So instead I decided to make it my goal to get those bracket pieces primed today.

Each bracket is made of two pieces of really thick alclad, with a bearing trapped in between and angled pieces to allow attachment to the rear spar. As is usually the case with the thick alcad pieces, the edges are pretty rough:

IMG 5261

Previously, I’ve just taken pieces like this straight to the bench grinder to smooth the edges, which turned out to be somewhat tedious. This time I took a different approach, clamping the pieces in the vise and using a vixen file to remove the tooling marks on the straight edges. Much faster:

IMG 5263

After doing all eight pieces, I ended up with quite a pile of shavings:

IMG 5264

From there I went to the grinder to finish the edges and take care of the corners and curved portions, then I clecoed each bracket assembly together for match drilling. The plans call for a combination of universal and flush rivets here, presumably due to potential interference issues with the ailerons. One of the callouts for the flush rivet seemed odd to me – by the plans, the outboard brackets would have the flush head outboard and the protruding shop head inboard. I went in to do some research and there didn’t seem to be a great consensus as to whether this was correct or not. A common recommendation was to countersink both sides of the holes and make a double-flush rivet. As the name implies, to do this you countersink/dimple both sides, and when you rivet, the shop head forms in the countersunk hole instead of sticking out.

The double-flush option seemed like a good one, but I was still loathe to go ahead and commit to countersinking. It was bothering me that I couldn’t really visualize how everything would go together, and eventually I decided to cleco together the left aileron to help get an idea of what everything looked like together. As a side benefit, it’s cool to have this on your workbench:

IMG 5266

In any case, I decided to go ahead with the double-flush rivet option, so I went to town countersinking, then cleaned, dried, and primed all the bracket pieces:

IMG 5269

I still had a bit of daylight left, so I looked ahead to the day (hopefully next weekend) when the wings will come off the stands. I’ll need to build a cradle/cart for them, the design of which I’ve been mulling over for a couple weeks. I decided to use the remaining daylight to cut two pieces of MDF that will be used for the ends of the cart. Then I spent some time drawing the layout of the end pieces; I can now set these aside and come back to them with a lot of the grunt work done already. I’ll still need to cut out the curved sections where the outboard ends will sit; the inboard ends will rest on the spar protrusions:

IMG 5270

IMG 5273

One modification I’m making to the Van’s design is to add a “pocket” between the two wings. My main reason for this was so I could store the bottom skins, though it may also be good for storing fuselage skins when they get here, depending on how big they are. I think this will help save some space in the shop.

Posted in Ailerons, Wings | Hours Logged: 6.5

Aileron brackets, attempted wing skin riveting

Well, we tried riveting the skins, but it didn’t go so well. More on that in a moment. I had a head start by myself – Josie had to work a little late again – so I decided to assemble the aileron hinge brackets that I primed yesterday. But first I wanted to practice some double flush riveting, since I have yet to use that technique at all. I’d done some research ahead of time, mainly wanting to learn how to properly size rivets for this technique. Not too surprisingly, the length spec is a bit shorter to allow for the countersink to be filled.

Out in the garage, I cut up one of the extra fuel access plates I had lying around and used those as a double flush test. My first attempt, I still used a too-long rivet and ended up with quite a bit of a head sticking up:

IMG 5274

So I made another hole, countersunk, and tried again with the next shorter rivet size. Much better, though still sticking up a bit:

IMG 5276

Realistically, that’s fine for this task; the plans call for normal shop heads, so even though I’m going for the double flush technique, having a bit of a shop head sticking out isn’t a huge deal. And sure enough, the rivets in the brackets came out looking quite nice:

IMG 5279

After shooting/squeezing the remaining rivets, I had four finished brackets:

IMG 5281

IMG 5282

And then it was time for the real fun. After much reading, I’d decided to back rivet the wing skins; my logic was that this only really required a skilled person on one side of the work. Seemed more likely to turn out some nice-looking rivets. Using this technique require the use of a ridiculously long double offset back rivet set:

IMG 5285

Oh, and as a random aside, here are the dogs watching from inside the house, wearing their ear muffs. Yeah, we have those:

IMG 5289

Unfortunately, as alluded to earlier, the riveting didn’t go so well. Here’s my first attempt, with the rivet already starting to lean over. And that was after I felt like I was beating the thing to death with the gun:

IMG 5290

I found a problem almost immediately. See, on the other side of the skin, Josie is holding this big five-pound bucking bar against the flush head. It came with some kind of coating on the faces of the bar, which for some stupid reason I thought was supposed to stay on, but after seeing how the rivet was making a dent in it, I realized I was really wrong. With that soaking up some of the impact from the rivet gun, no wonder things weren’t going well. So I peeled the coating off the bucking bar, drilled out the rivet, and tried again.

Still didn’t go right; despite banging on the rivet way more than I felt should be necessary, it didn’t form a good head and instead just folded over a bit. Ugh.

IMG 5292

Clearly I need to do some more research on this technique. Maybe I need to crank up the pressure at the gun some more. I probably should have practiced on some scrap before going to town on the wing; the way thing are going, I might end up with an “oops” NAS1097 rivet in my very first hole.

One thing is for sure, this back riveting technique seems just as fraught with peril as just shooting these things the normal way. Seems pretty awkward to me as well. I might even abandon it entirely if I keep having issues during the next work session…

Posted in Ailerons, Wings | Hours Logged: 1.5

Aileron stiffeners

So yeah, still no more riveting activity. Josie has been under the weather the last couple days, and as much as I’d like to go shoot some rivets, it’s not worth pushing her to help when she’s tired and/or not feeling well. No rivets is better than bad rivets. So I took last night off and then started tonight with some general housekeeping – first tidying up the area and then working up a materials list for the wing cart. Then I jumped ahead to working on the ailerons.

Task #1 is making a bunch of stiffeners, 32 to be exact. The good news here vs doing this for the elevators is that all the stiffeners are the same, instead of having various lengths. But like all the other stiffeners, they come in long angle pieces that have to be cut down to size and trimmed:

IMG 5297

I started out using the bandsaw to make the taper cuts at the ends, but I was about halfway through when a loud thud erupted from inside the thing. Seems the blade broke – maybe I shouldn’t set it so tight. But no worries, I had a spare blade to swap in! Except it turns out I bought the wrong length blade. So I finished up the taper cuts using snips.

I almost quit for the night at that point – it was getting towards 11 – but I decided to go ahead and fire up the bench grinder to clean up the edges. I’d figured on maybe doing some of the work and then stopping, but of course I just ended up doing all the deburring, which took over an hour. But now I’ve got a nice set of stiffeners, ready to be match-drilled to the skins:

IMG 5300

Posted in Ailerons, Wings | Hours Logged: 3

Aileron stiffener match drilling and dimpling

Tonight I clecoed all the aileron stiffeners in place on their skins and match drilled:

IMG 5302

Then I deburred the holes and dimpled the stiffeners:

IMG 5304

I wasn’t quite ready to quit, so I found a small stupid job to take up a little more time. There are four aileron spar reinforcement plates to be made. There are four .040” alclad pieces already cut to size, they just need the corners rounded and the edges cleaned up:

IMG 5306

A little work on the bench grinder and they’re looking good:

IMG 5307

Tomorrow I think we really will get some riveting done. I’ll probably also make a Home Depot run this weekend to get materials for the wing cradle and also to make a bending brake for the ailerons and flaps. I built one before for the tail control surfaces, but apparently I left it in Atlanta. No big deal, it’s just some 2×6 lumber and door hinges.

Posted in Ailerons, Wings | Hours Logged: 1.5

Aileron stiffener priming, wing skin riveting

Finally got some skin riveting done! But first some good news – I flew again with Joy in the Citabria this morning and after the flight, she flipped to the back of my logbook and endorsed me as a competent tailwheel pilot. I’ll still be flying with her though – she requires 15 hours dual before I can solo her plane. So I’m thinking that in addition to doing the usual pattern work, I’ll ask about some spin training and maybe even aerobatics. Anything’s better than just buzzing endlessly in circles around the airport…

Anyway, back at home, I again decided to take advantage of the nice weather, so instead of jumping right into skin riveting, I went ahead and cleaned, scuffed, and primed all those aileron stiffeners:

IMG 5309

Then we went to work on the skin rivets. We started off using the back rivet set, and I was able to set acceptable rivets, but only just so. Even the ones I set had the shop heads smearing a little off-center, despite me attempts to be really careful. We also had one rivet sitting pretty proud on the skin side; I dunno of Josie let off the big bucking bar for a second or what. In any case, I decided to ditch the whole back riveting thing. I felt that while it worked OK, it wasn’t conducive to getting consistently good results; if the best I could do while being careful was to end up with rivets where I said, “I guess that’s OK,” that doesn’t bode well for the rivets I’ll shoot after a couple hours of work.

So we switched to just using the usual mushroom set. I shot from the skin side while Josie bucked on the other side. It didn’t take long to get into a pretty good rhythm, though we had to take frequent breaks for her sake. She had a harder job than me contorting her arm to hold the bucking bar, especially inboard with the closely-spaced wing walk ribs. But we didn’t have any bad rivets that needed to be drilled out, which is a much better record than we had with the back riveting.

We got all the rivets on the left inboard skin done, and about half on the outboard skin, before deciding to call it a night:

IMG 5311

I think we should have no trouble getting the rest of these things set tomorrow. Hopefully if we get an early start I’ll have time to go get the materials for the wing cart and at least do the work that requires daylight. The fun part about the wing cart is that I’m going to reuse the lumber from the wing stand bases – which means I’ll have to take the wings off the stands and set them aside somewhere while I build the cart. We’ll see how that works out…

Posted in Ailerons, Wings | Hours Logged: 4.5

Aileron dimpling, brace countersink, and much more

I didn’t really get started in the garage until 1 or so, since I flew with Joy again this morning. (and beat the plane up a bit, but that’s another story…) I also had a prospective builder who wanted to stop by, see the project, and get his hands dirty a bit. I was getting started countersinking the flap braces when he showed up, so I went ahead and finished those in between talking about all sorts of build-related stuff.

Countersunk braces:

IMG 5396

From there, I got him to help me dimple the aileron skins, so they’re ready to have the stiffeners back riveted now, and then I can do the final bend of the trailing edge, assuming I ever get around to building a new bending brake:

IMG 5397

After that, knowing that for me riveting was the most mysterious skill to me before I started building, I took some time and drilled a couple of pieces of scrap for my friend to practice riveting on. He squeezed a few, both with my cheap squeezer and the totally-not-cheap Main Squeeze, then shot a few with the rivet gun. So now at least that mystery has been assuaged a bit for him. Not too long after that, he had to go, so it was back to work for me.

Next I cleaned, scuffed, and primed my replacement spar reinforcement and aileron bracket angle:

IMG 5393

Then I sat down and deburred all the rivet holes on the flap braces and aileron gap fairings. Yay, more deburring!

Unfortunately, it was while doing this that I cast a critical eye on the trims I made on the flap braces. When I made these cuts, I convinced myself that I was leaving sufficient edge distance between the cut line and the inboard most rivet hole, but upon looking at them again tonight, they just didn’t look right. So I looked up the real specs, measured, and…yep, I don’t have sufficient edge distance here. Time to put in an email to Van’s, I suppose. This might be an OK location to get away with this, but it’s not a call I feel like I should make. Worst case, replacements are $27 each, and maybe since my fuse kit is shipping this week they could just crate the replacement braces in with that. We shall see…

One of the edge distance offenders:

IMG 5403

Well, at least I can clean and prime the aileron gap fairings tomorrow. I’ll hold off on the flap braces for obvious reasons. I also have the new aileron hinge stuff to rivet, and all the aileron stiffeners.

Posted in Ailerons, Wings | Hours Logged: 4.5

Flap brace priming, aileron stiffeners

Didn’t get started until late in the afternoon, between flying in the morning and taking the dogs for a walk in the park in the afternoon. Once we got back home, my first order of business was to get the flap braces primed, since tomorrow’s weather is looking iffy. So I got those scuffed and cleaned and then went to work shooting primer once they were dry. I’m really liking the rig I came up with for holding parts upright while I prime:

IMG 5411

Once that was done, I went to work back riveting all the stiffeners to the aileron skins. I had to get Josie to come out and help me get to the rivets way back near the bend in the skins, but most of this was easy solo work.

IMG 5413

I also set all the rivets between the aileron gap fairings and the skin. I don’t see where they rivet in assembly with anything else, so no reason not to go ahead and get those rivets done.

Tomorrow I’ll hopefully be able to run to Home Depot to get materials to make a bending brake, then I can finish the trailing edge bend on the ailerons. I’ll also probably rivet the flap braces to the rear spar. I’ll have to shoot all those rivets with the gun, as the brace prevents access with a squeezer.

Posted in Ailerons, Wings | Hours Logged: 3.5

Aileron work surface, bending aileron skins, spar prep

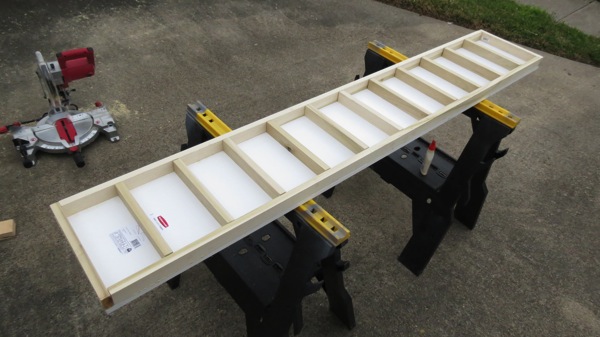
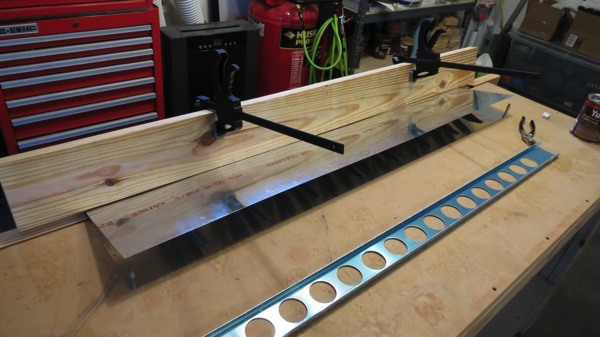
Well, today turned out to mostly be a construction day. I set off for Home Depot with a bit of a shopping list and came home with quite the assortment of lumber. The first thing I wanted to get done – which I’ve been planning for a while now – is a work surface for building the ailerons and flaps. The instructions specifically mention using a good flat surface when building these parts, lest one accidentally build in a twist. Problem is, my workbench tops are not flat, they both have a bit of bow to them. After some research, I went with an idea I got from VAF to construct a work surface. The basic idea is to use two pieces of MDF and sandwich pieces of good straight hardwood between them. The result is a very stiff unit sort of reminiscent in construction to a hollow core door.

In lieu of MDF that I’ve have to cut – which I hate doing, it generates ridiculous amounts of fine dust – I bought two 12”x6’ veneered MDF shelves, along with a few pieces of 1×2 poplar (and I spent a fair amount of time going through the pieces of poplar to find really good straight ones). Once home, I cut two long poplar pieces to go lengthwise on the shelves, then cut the rest of what I had into short cross pieces. Then there was a lot of measuring, drawing layout lines, and so forth, until I finally got to start putting stuff together. The shelves and poplar pieces are joined using wood glue and finishing nails. Here’s the first shelf with all the poplar nailed/glued in place, just before I put the other shelf on:

IMG 5416

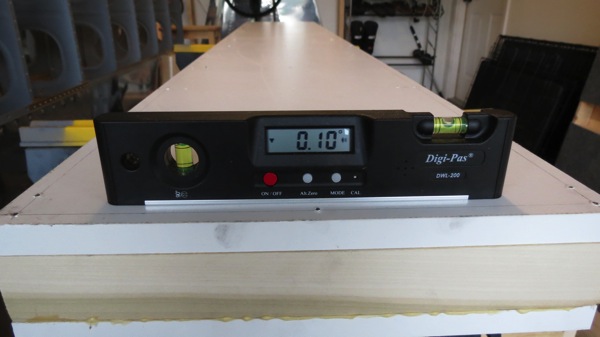
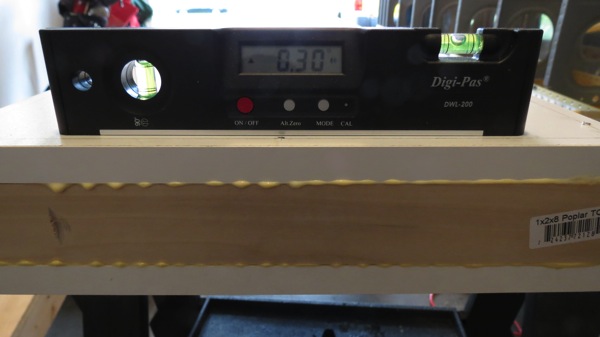
After nailing/gluing the second shelf to complete the sandwich, I put the finished unit on the sawhorses and used a digital level to check for twist:

IMG 5418

IMG 5419

I figure .2° of twist is an acceptable margin of error. And before anyone feel compelled to comment that it’s actually .4°, remember that the level was rotated. so the sign of one of those numbers has to be inverted before comparison. So it’s not .3 – -.1 = .4, it’s .3 – .1 = .2. Anyway, sorry for the math lesson.

With that done, I moved on to putting together the bending brake. I’d already cut the 2×6 I had into two lengths for this earlier, so now all I had to do was install the hinges to make the brake. I didn’t get any pictures of the brake by itself, because I was so eager to use the thing that I recruited Josie to come out and help me complete the skin bends. Here’s a 100% staged photo of the bending process:

IMG 5421

Note the two large clamps on the top half of the brake. These were necessary in order to get sufficient leverage. That is, I couldn’t get the skin to bend simply by pushing on the board itself. In fact, to get the bend done, I was pushing down on the ends of those clamps with most of my (considerable) body weight while also leaning into the top of the board. If you’re wondering if it feels wrong to put that much force into a carefully-constructed aircraft part, then you’re 100% right. Funny thing is, I did this same thing with the elevators and rudder and I don’t remember it being this bad. I think maybe those skins were thinner than the aileron skin, but who knows.

Anyway, after finishing both bends, I clecoed the aileron spars into place so I could check the bends. The plans say the skins should be straight right up to the bend, and the bend itself should have a 1/8-3/32 radius. My bend radius actually came in a hair under the minimum (5/64), but I imagine that should be fine. It’s not as if I’m off by a huge degree. And the skins right up to the bend do look nice and straight:

IMG 5426

IMG 5428

After that, I removed the spars and went to work preparing those. The next step in the plans is to clamp the spar reinforcements into place and match drill with the spar ends, then clamp the hinge points into place and drill their mount holes to full size. I meant to get a photo of this assembly, but I got carried away and tore everything apart for deburring before I remember about the photo. Whoops. I’m sure you’ll get to see it at some point down the road.

(Somewhere in the middle of all this I remembered that I was going to rivet the flap braces today. I got so carried away with the ailerons that I forgot. Guess I’ll backtrack to that maybe tomorrow night.)

Anyway, that’s it for tonight. Tomorrow my Stewart Systems epoxy primer is supposed to arrive, which is good, since I want to use that on the aileron counterweights. If I haven’t mentioned it before, the counterweights are galvanized water pipe. I want to take particular care to avoid having any direct contact between the steel pipe and the aluminum skins, to head off any possible galvanic corrosion. Probably overkill, but hey, it’s a primary flight control. Plus it’ll be a good thing for me to try the epoxy primer out on.

Update: I did a bit of research about the trailing edge bend radius. It seems that the bend radius has a significant effect on control forces; a larger radius reduces forces, whereas smaller increases them. Similarly, if the skins are slight convex up to the bend, this decreases forces, and concavity would increase forces. Some reports are that any significant concavity can lead to the ailerons being so sensitive as to be unpleasant…I’ll be paying close attention to that when the ailerons come together for good. But my slightly-undersize bends err on the better side, I think. It sounds like I can always increase the radius a bit by tapping on the bend with a piece of wood to swell it a bit, but I’m not going to bother with that unless flight testing makes me feel that the roll forces are too much. Even then, I think it’d have to be pretty bad for me to go monkeying with the ailerons.

Posted in Ailerons, Wings | Hours Logged: 5

Right aileron match drilling

Finally back to work. It’s been a hectic week, between getting a flat on my car and dealing with various other annoyances. The good news is that we have no plans over the weekend – I’m not sen flying tomorrow – so I should be able to get in some good work.

Anyway, tonight I moved ahead to aileron match drilling tasks. First the nose ribs are fluted to straighten them, then they’re clecoed to the spars and those attach holes match drilled. Next the ribs are clecoed to the aft side of the spar and match drilled as well. I did all of these tasks on both ailerons together, since they were simple and didn’t take up a lot of work space. Next, though, the whole aileron gets clecoed together, so I put the left side parts away and focused only on the right aileron.

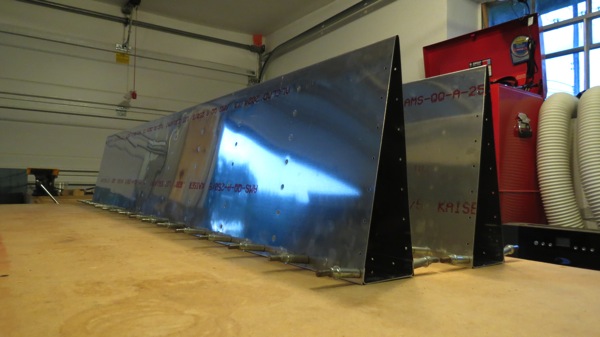
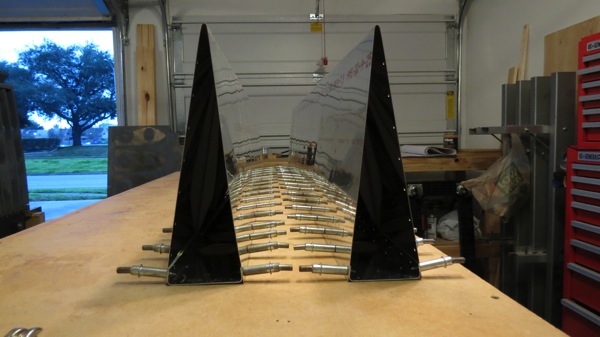
First the trailing edge skin is clecoed to the skeleton, and then the counterweight goes in place under the nose skin. Here’s the counterweight sitting in place just before I clecoed the nose skin on (it’s just steel water pipe):

IMG 5432

And then with the nose skin in place:

IMG 5433

IMG 5436

Then there’s a lot of match-drilling of stuff, with a few extra tasks. Most notably, the holes between the two skins and the bottom of the spar are drilled out to #30; these will get flush blind rivets as the last step to closing out the aileron. The real fun, though, is drilling the nose skin to the counterweight. There are holes all along the nose that are used as a guide to drill to the counterweight; these holes will get blind rivets as well. The prepunched holes in the skin are #40 but the final holes need to be #30. In order to make things easier – drilling through steel is a good bit tougher than aluminum – I first drilled all the holes to #40, clecoing as I went, then went back and enlarged all the holes to #30. Finally, the trailing edge skin is removed and a long #30 bit is used to drill a hole through each nose rib into the back of the counterweight.

Finally, it all comes back apart. Time to set this stuff aside and get going on the left aileron:

IMG 5437

Unfortunately, it looks rainy this weekend, so I don’t think I’ll be able to get any priming done. Maybe I can at least tinker with the spray gun a bit to get the hang of setting it up. Even if it’s rainy, I could probably set up just inside the garage door to shoot some thinned latex paint as a test run. I guess maybe I could prime in the garage like that too if I had to. If not, priming might end up being a roadblock here. At least daylight saving time will be back soon, which will give me some more flexibility to prime after work if need be.

Posted in Ailerons, Wings | Hours Logged: 2

Primer testing, aileron prep

The weather today turned out better than I expected, though far from perfect. There were sporadic showers through the afternoon, but in between it was ice and sunny out. So I managed to get in the spray gun practice that I’d wanted to do, which took up a lot of the day.

First I just filled the hopper with water and practiced spraying it against the side of the house. This was just to get familiar with the flow and pattern controls, and that didn’t take too long. Next I got some latex paint I had sitting around and thinned it to the recommended viscosity from Stewart (25 seconds in a viscosity cup). Pretty thin stuff. Then I went to town spraying the latex paint on some cardboard and the random sheet of plywood I use as a backer when I prime. This let me see how I could control the atomization of the paint with air pressure, but was kind of unsatisfying in terms of seeing how the paint was going on. So I scuffed a couple of pieces of scrap aluminum and shot paint on them. That was actually disappointing; the latex paint wouldn’t flatten out at all, and the coverage ended up spotty with tons of fisheye spots.

I wasn’t sure whether this was a problem with latex on aluminum, or me having not been particularly thorough about cleaning my test patches. So I decided to just go ahead and mix up a small batch of primer and shoot it on some more test patches. This time, I cleaned the patches thoroughly, using the EkoEtch stuff I got from Stewart. I also gave each patch a final wipedown with acetone before starting to prime.

I was relieved to see that the primer went onto the aluminum quite nicely, just about as easily as the rattle can stuff does. It did take a little experimentation to get the flow control at a place where I got good coverage; I overdid it on one patch and got some lovely runs. The other ones ended up looking halfway decent, though:

IMG 5441

As you can see, I still got some orange peel texture, so I still need some practice, but overall the coat looks good. I especially like that it has a sort of semigloss finish; between that and the color, I think my idea of just using this as the topcoat for the cockpit interior is going to work great. I’ll give these patches a day or so to dry and then abuse them with solvents and sharp objects to get an idea of how durable the finish is, but with it being an epoxy primer, I’m pretty confident it should be plenty durable.

With that done, I moved on to match drilling the left aileron. This went a lot faster than the right one since there was a lot less time spent scrutinizing the plans to ensure everything had gone together right. After pulling the aileron apart, I got started deburring the rivet holes in the ribs, then I decided to get the counterweights countersunk for their flush rivets. That was a little more challenging than normal countersinking, since I was working on a piece of pipe. I cut a chunk of 2×4 at an angle and attached both halves to a base to make a sort of holder for the counterweight pipe. The holder was clamped onto the drill press table with the countersink cage in place. Turned out to be a pretty nice setup:

IMG 5447

I got Josie to come help hold the pipe (it is 4+ feet long after all) while I ran the drill press. We made quick work of the countersinking this way:

IMG 5448

After that, I countersunk some flush rivet holes in the spar reinforcements, did a bit more deburring, and called it a night. Tomorrow I should be able to finish deburring and dimpling all the parts, I think. Too bad the weather will be so-so again, but maybe I’ll be able to get in some priming. It’d be nice to be able to start assembling the ailerons this week. If I can’t prime, I guess maybe I’ll move on to messing with the flaps.

Posted in Ailerons, Wings | Hours Logged: 6