Aileron trim bracket installation

As alluded to last night, tonight I finished installing the aileron trim components that rivet to the inboard seat ribs. These parts were fitted to those ribs a while back, but never actually riveted in place. The left-hand bracket, where the trim servo will mount, also needed to have the four attach nutplates installed, so that was the first order of the night – drilling all the holes to final size, deburring, countersinking for rivets, and riveting the nutplates. Then it was just a matter or riveting both brackets in place. There were more rivets than normal, since I mis-drilled the right-side bracket originally, and added a doubler for reinforcement.

Here’s an overview of the trim system, with the servo and actuating rod temporarily in place:

IMG 6690

In this view, the front of the plane is towards the top of the photo, rear to the bottom. The trim system is a simple spring-bias setup. The control column will pass above the actuator rod here, from front to rear. Two springs will attach to the bottom of the column, one going left, one right, with the outboard ends of the spring attached to the actuator. As the servo moves the rod, the springs will apply force to the column in the same direction, providing a slight roll input to counter any imbalance, for example if one fuel tank is fuller than the other.

Next up, I get to rivet the outboard seat ribs to the bottom skin, and then it’ll be time to start assembling the mid side skins + armrest assemblies. I’ll also want to probably go ahead and order my fuel pump and filter, so I can go ahead and mount them and fabricate fuel lines before the forward fuse is closed up. It’ll be much easier without the forward side skins in place.

Posted in Fuselage | Hours Logged: 2

Joining the seat rib assembly

Pretty short night of work tonight. I started off by shooting those last two rivets in the mid-cabin braces. Getting those done was mildly tedious, but not too bad overall. Definitely not the best rivets I’ve ever shot, though. Then it was time to bring over the seat rib assembly and cleco it in place. The first rivets joining the assemblies go through the inboard seat ribs and the front seat ramp brackets. I thought these would be a royal pain, since most of them sit really close to the spar web, but they actually went quickly. It took me a bit to figure out how to shoot them, though. I ended up using the single-offset rivet seat, with some masking tape to keep it from rotating in the gun as I shot.

Next, I clecoed the outboard seat ribs, forward and aft, into place. These attach to the rear spar bulkhead with two rivets and one bolt each. The bolt goes through the rear spar attach bars, along with a spacer that I made probably a year ago. I didn’t torque the bolts yet, even though they’re surely installed for good now. This is because my tubes of torque seal have dried up beyond use, and my personal policy is to mark every fastener as soon as it’s torqued – this makes it easy to determine anything that hasn’t been torqued properly. I should have some more torque seal in a day or two.

In the meantime, there are a few more minor items to rivet to the seat rib assembly, and then it’s on to assembling the mid side skins and armrests. I’ll want to prime and paint those, so they’ll have to wait until this weekend, but I also still have the electric aileron trim brackets just clecoed in place – I think I’ll dig out the instructions for that kit and finish up its installation before I make that area any less accessible.

Here’s a photo of the joined cabin floor assembly:

IMG 6688

Posted in Fuselage | Hours Logged: 1.5

Longeron riveting, center section join

I started out tonight by finishing attachment of the lower longerons to the forward floor. Last time, I slipped them in place, clecoed them, and installed the flush screws that go inside each gear tower. Tonight, I installed the four bolts at the forward end of each one (which go through the lower engine mount weldment as well) and then shot all the rivets to the forward floor. Most of these were easily done with a squeezer, but the ones near the gear towers were significantly less fun. In order to get decent access for using the rivet gun, I opted to roll the forward fuse assembly on its side:

IMG 6679

Even then, it was still challenging, but I only fouled up one rivet to the point that it had to be drilled out.

Next, I set about cleaning off a workbench to move the forward fuse assembly to. The next steps were to first attach the center section assembly, then the seat rib/floor assembly, which meant the board on the sawhorses was going to be too small. Better to move the assembly yo the larger table before adding the heavy center section, I figured. I also figured that I’d be able to get the center section attached and at least cleco the seat rib assembly in place for a photo op, but I severely underestimated the annoyances of attaching the center section.

After moving the forward fuse to the workbench, I set the center section in place and clecoed it at the bottom flanges. From here, I was to attach the mid-cabin braces, using a combination of rivets and bolts (one bolt per brace). Fortunately, I did the bolts first, because, well, the matching holes in the braces were way undersize for the called-out AN4 bolts. They looked about the right size for an AN3 bolt, but this seemed worthy of some quick research. Sure enough, they really are supposed to be AN4 bolts; the holes in the braces need to be drilled to final size, for whatever reason. So I went and removed all the clecos and took the center section right back off again. This allowed me to confirm that the matching holes in the spar carry through were sized for AN4.  After drilling the brace holes to the proper size and deburring them, I once again set the center section in place.

Inserting the bolts into the holes was easy enough. Gaining access to install the washers and nuts was…not. This required getting my hand in between the forward and aft web of the center section. Access from the ends was blocked by the spacers I installed way back when to maintain proper alignment in the center section. There’s a hole in the center for the control column to pass through, though. It was just barely enough for my meat paws to fit in, and get the washers and nuts installed, but I was highly skeptical of my ability to get a wrench in there to hold the nuts while I tightened the bolts. I ended up removing the upper bolt in each spacer, allowing me to pivot it out of the way while I held the wrench and torqued each bolt.

Next were the rivets attaching the upper flange of each brace to the center section. There’s a -4 rivet and two -3 rivets in assembly with a nutplate in this location. I’d previously countersunk the spar web for NAS rivet for the nutplates, which was dumb, because I have no NAS rivets long enough for this location. So I had to dig out the countersink cage and enlarge the countersinks for regular old -3 flush rivets. Then I got this set of rivets squeezed.

That leaves one more rivet on each brace, which goes through the same flange as the bolt, and into the spar web. Best access to buck these will probably be through the ends of the center section, which means removing the end spacers…again. By the time I came to this realization, it was nearly 11:30, so I decided to quit for the night. With the spacers out of the way, I think access for bucking these won’t be too bad, though I will have to do it basically blind. But once they’re done, I can add the seat rib assembly…and then this thing will really be taking shape. There will be a lot of two-person riveting in the near future…

Here’s the forward fuse with the center section joined:

IMG 6681

And a kind-of random close-up of the rivets joining the upper portion of the brace to the center section:

IMG 6684

Posted in Fuselage | Hours Logged: 3

Priming and painting

Aside: this actually covers work done both yesterday and today. Yesterday it was super windy, and so I scaled back my priming goals and decided to just get the longerons done. We also hosted a class at our house than ran super long and took up more of the day than I expected, so the longeron priming was all I got done yesterday. And for some reason, I was really tired that night, and fell asleep without even doing my write-up, which is…unusual.

Today, however, I had nothing else to do but work on the plane. Unfortunately, it was still pretty windy, but I decided to press on and at least get the forward fuse subassembly primed and painted. I quickly surmised that this was going to be a more complex endeavor than I’d originally thought. Way back when I riveted the gear towers in place, I’d only primed the area under the towers, figuring the rest would get scratched up along the way. As I considered the annoyance of trying to prime around the firewall and gear towers, I kind of regretted that decision. But oh well.

One decision I made was to not paint the inboard gear weldments. For one thing, they’re already finished with a nice durable powder coat, and for another, they have lots of nooks and crannies. Most importantly, they’re attached with bolts and thus removable. So off they came. (not actually that simple, since they have 18 bolts each!)

Next, I masked off the exposed portions of the firewall. I don’t want the firewall painted, since its function is to contain an engine fire. If that happens, it’s going to get super hot, and anything not temperature-resistant on it will burn, outgas, or maybe both. I don’t want to find out that the paint emits noxious fumes or anything.

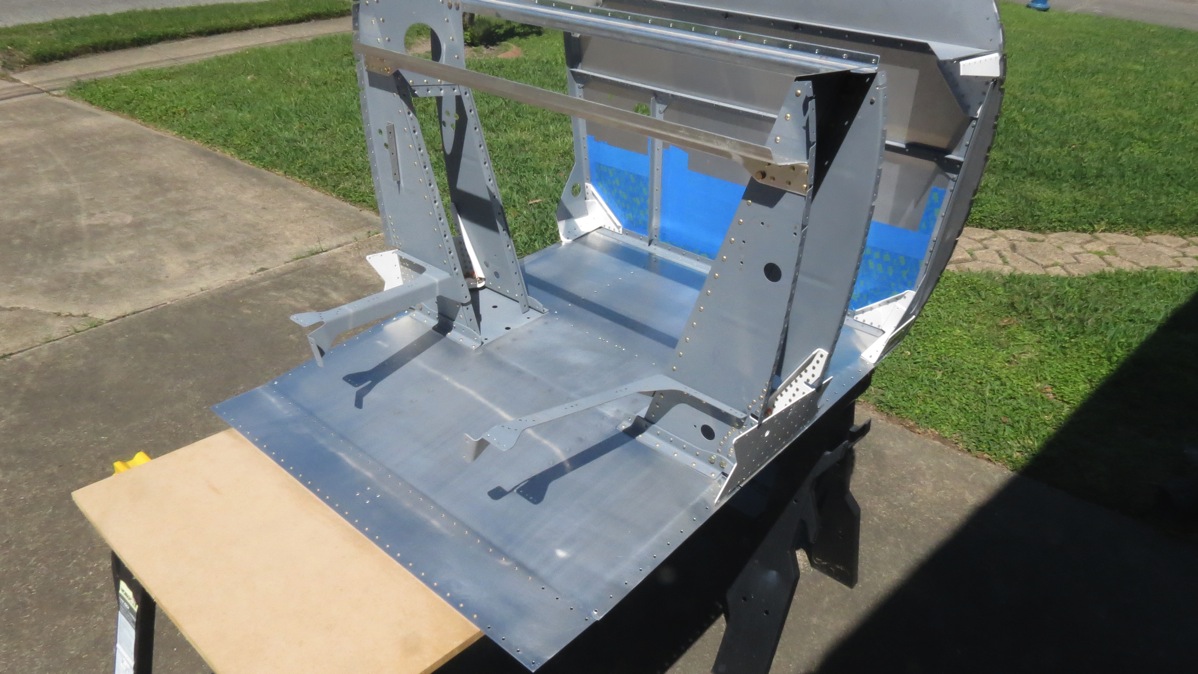
Then it was time to clean and scuff the floor for priming. Normally, I do this with degreaser and water, but if I did that here, it would take days to dry. Instead, I first used a blow gun to get rid of accumulated dust, then wiped down with a dry cloth before scuffing with a maroon scotchbrite pad. I followed this with another blow-off, and several rounds of acetone wipedowns. I figured that would be roughly equivalent to my usual prep (which, honestly, is probably overkill for self-etch primer).

Here’s the assembly after scuffing, just before priming:
IMG 6667

After shooting the primer, I went inside to have lunch, giving the primer time to set up prior to spraying the top coat. As I’ve probably mentioned before, I’ve decided to go with a granite-texture spray paint for visible interior surfaces, in lieu of more expensive two-part topcoats. I figure this stuff will hide damage well, and be easy to touch up if necessary. Plus I don’t think it’ll look bad, either. A nice bonus is that the gray 7220 primer makes for a nice base coat under the gray granite paint.

Spraying that stuff didn’t take too awful long, but I knew from experience that it would take a fairly long time to dry to the touch, so I decided to move on to other things. I’d intended to also paint the forward baggage bulkhead pieces, which are already primed, but when I tried to set up my sawhorse painting jig, the wind blew it over! Well, so much for that.

It then occurred to me that there were some visible areas on the center section assembly, so that became the new goal. These areas were small, but I wanted to ensure that I didn’t get overspray in places it shouldn’t go – for example, the close-tolerance bolt holes where the wings will attach. Any paint in there would be a problem, especially this textured gunk. So I spent a decent amount of time carefully masking the spar carry-through area, so I could only actually spray the bulkheads.

After this, I took another break to watch the MotoGP race (new season has finally started!), and after that, I figured the paint ought to be good and dry, so I went out to bring everything in from the driveway and wrap things up for the day. But first, I had to reinstall those gear weldments (and all 36 bolts).

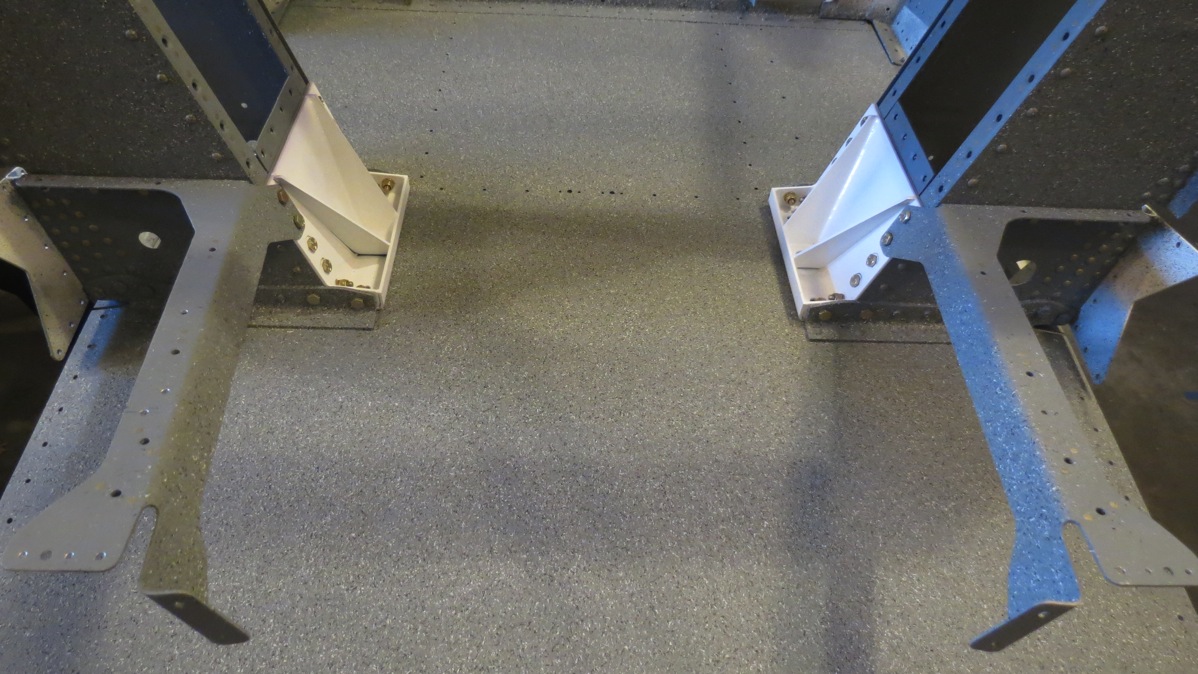
Here’s a look at the painted floor area:
IMG 6675

Note that some areas are still bare primer; for example, the tops of the mid-cabin braces. There will be covers in both those locations, so there’s no point spraying paint there. Similarly, the side of the gear tower below the braces won’t be visible, so no paint there either.

Another angle, showing the nice contrast of the gear weldments:

IMG 6676

So that’s it for the weekend. I have enough parts painted now that I can move forward with assembly this week; the next tasks are installing the lower longerons, then joining the center section and seat rib/floor assembly to the forward fuse. Once that’s done, I think the next step is assembling the mode side skin/armrest assemblies, which will require some more priming and painting. Fortunately, future priming and painting should be much simpler than today’s work.

Posted in Fuselage | Hours Logged: 7

Longeron prep

So my goal for tonight was to get the upper longerons trimmed and notched at the aft end. This seemed like a fairly simple thing, but it was actually a bit tedious, mainly due to me being reeaaallly careful to not damage or otherwise ruin the longerons.

I’d previously marked the notch locations and the aft trim point, but after examining the plans for the aft trim, I realized the cut was a bit more complex than I’d thought. Instead of simply cutting the angle to a certain length, I have to cut the upper side of the angle back to allow for the vertical stab spar to nest against the aft most bulkhead, while the outboard sides protrude aft a bit further, to the aft end of the aft side skins. At least I think that’s how far back they’re supposed to go; the plans weren’t especially clear here. They show the outboard edges protruding past the bulkhead flanges, so I figure the end of the skin is a logical trim point.

Anyway, I wiped off my previous cut marks and clecoed the aft most bulkhead into place so I could draw new cut lines:

IMG 6658

The cut line for the upper side is visible here; I measured the aft side skins to figure out where to mark the outboard cut lines. Next, I marked locations to drill holes for the corners of the cuts, to make nice rounded inside edges. I drilled the holes on the drill press, after recruiting Josie to come out and hole the other end of each longeron (they’re 16’ long, after all). Then I roughed out the cuts using a hacksaw, before finishing with files to smooth everything out.

Here are the longerons with both aft bulkheads clecoed in place, along with the horizontal stab attach bars:

IMG 6660

A detail view of one of the notches to accommodate the stab attach bars:

IMG 6663

And a detail view of the trimmed aft ends:

IMG 6665

While I was working on this stuff, I found a number of rivet holes in the longerons that either weren’t deburred at all or were just done badly. So after finishing up the trimming and notching, I inspected both longerons and touched up holes as necessary. This should put me in good shape to get some priming done this weekend – and the weather looks great to boot.

Posted in Fuselage | Hours Logged: 2.5

And more dimpling

Actually, that should be it for dimpling for the time being. After reading forward in the instructions last night, I decided that my plan to delay dimpling the aft side and bottom skins was a good one – so that’s what I’m going to do. Tonight I just dimpled the mid side skins, and got Josie to come out and help me dimple the forward edge of the bottom skins on the seat rib assembly. That just leaves notching and trimming the main longerons, and then I get to do a whole bunch of priming before I get to remember how to rivet again.

Posted in Fuselage | Hours Logged: 1

More dimpling

Moved on to dimpling larger parts tonight. Before dimpling any of the skins, I rolled the overlapping edges on the forward and mid side skins, as well as the aft edge of the seat rib/floor assembly. The aft side skins and forward aft lower skin also need to be rolled, but they’re not easily accessible, and so I won’t roll them until I get them out for dimpling. I may even go so far as to hold off dimpling those pieces until I’m almost ready to assemble them; I’ll have to read forward and see how the assembly procedure goes to see if that’s viable. Mainly I’m concerned about the aft side skins; I’ve been storing them side-by side, slid behind some stuff on one wall. I figure they might be more prone to damage and scratching if I try to slide them in there after dimpling.

Anyway, next I moved on to dimpling the forward side skins. These are fairly complex; they include #6 flush screw holes, and -3 and -4 flush rivets, along with some universal-head 04 rivets. So I took care to mark all the location that weren’t getting dimpled, and for good measure I worked my way from large (screw) to small (-3 rivet) holes, just to prevent the possibility of me dimpling a hole with the wrong die.

Hey look, dimples!

IMG 6655

Hopefully this week I can finish dimpling and other prep tasks – one of the looming ones is to add notches in the main longerons to accommodate the vertical bars that the horizontal stab will attach to, and to trim the longerons to length. Obviously I don’t want to foul anything up there…

I’d like to be able to concentrate on priming parts this weekend so I can then move on to some final assembly work. I also need to think about ordering a fuel pump and filter assembly, so I can install those while the forward fuselage is still open and access is good.

Posted in Fuselage | Hours Logged: 1.5

dimple dimple dimple dimple

Not a lot to report today. Basically I dimpled everything except for the skins, which will require use of the C-frame. For the most part it was uneventful, except for some spots on the forward floor. On each outboard edge, where the lower longeron attaches, there are five spots that require flush rivets for clearance. One of these is at the aft end, which is easy to get to. The other four are right up next to the gear towers, presumably to provide a flush surface for the gear mounts. These are annoying to get to, because the gear tower and the gear weldment make access difficult.

There’s no way to get a squeezer onto the holes to dimple. There’s no room to use my vise-grip dimpler. The skin is way too thick for the pop-rivet dimple tool to work. I eventually worked out a method using the pop rivet dimples dies and a squeezer with a no-hole yoke (to get into the tight area). The resulting dimples aren’t great, but are acceptable. This is a spot where I would have been better served to depart from the instructions and countersink the flow instead of dimpling. The material is plenty thick for countersinking, and in fact the holes at the aft end of the floor, where it mates with the center section bulkheads, are countersunk for flush rivets. Unfortunately, in the case of these holes, I already countersunk the lower longerons at those locations, so my choices were to either dimple the floor or replace the longerons. Oh well.

Next up, I get to roll some skin edges and then do a lot of dimpling with the C-frame, followed by priming. Which reminds me, I need to restock on primer. Hopefully the weather next weekend is good, so I can get some priming done. It should be especially fun to clean and prep the 16’ longerons…

Posted in Fuselage | Hours Logged: 2.5

Deburring DONE

Finally…a weekend without lots of other stuff to do. Last weekend my brother was in town and I helped him with some work on his car. The previous weekend was entirely spent doing suspension work on my car. Before that…well, I guess I was just lazy. We did actually have an afternoon engagement today, but for once I committed to doing some work before and after.

I started out with another bit of cleanup – there were still tools and other junk lying around from the car work weekends. Then I got to work deburring. The only large pieces remaining were the forward and aft side skins, the latter of which are rather large and cumbersome. I also had the two aft most bulkheads and the heavy skin that attaches to them, and the tail spring weldment. I also enlarged a hole in the bottom of the aft bottom skin; this will provide access to the tail spring attach bolt once the plane is together:

IMG 6648

On each forward side skin, there were two tabs that needed to be removed. This is another one of those procedures that seems random to me – the instructions refer to these as “indexing tabs,” but I don’t recall using them index anything. I presume this is a leftover bit from the early RV-8 kits that weren’t prepunched or something like that. Anyway, I used a straight edge to lay out cut lines parallel to the lower edge of the skin:

IMG 6651

Then I made rough cuts with a cutoff wheel, and finished with a series of files:

IMG 6652

And I’m pretty sure that I now have everything deburred, a task I can jokingly say took me three months to do. Next up, I have lots of dimpling to do, as well as priming certain parts. I’m going to try and paint all the interior parts before final assembly, to avoid the obnoxiousness of trying to spray paint inside the confined space of the fuselage. We’ll see how that works, I guess…

Posted in Fuselage | Hours Logged: 3

Mas Deburring

Got back to work deburring tonight. I took care of the last of the parts from the seat pan, then moved on to working on the forward cabin assembly. It took quite  a while to finish that, since not only are there lots of holes, many of them are located in tight spots and require some creativity to get to. It should be lots of fun to rivet in some of these areas.

I need to check all the loose parts, but I think all I have left to deburr are the aft side skins and a couple of bulkhead assemblies from the tail. Then I get to do a bunch of dimpling, followed by a bunch of priming and pairing, but then I can start assembling stuff…I think…

Posted in Fuselage | Hours Logged: 1.5