Fuselage

Panel labeling done

Oh look, another multi-day entry. This isn’t actually how I’d intended to do this, but I went to bed last night and completely forgot about writing this up. So yeah, anyway…yesterday was all about getting everything finished and topcoated. This involved a series of short work sessions over the course of the morning. First up was cleaning and relettering the main panel, then shooting the first coat of clear on it; at the same time, I shot the initial clear on the throttle quadrant parts from yesterday.

After giving those items a bit of time to flash, I moved them out into the sun in the hopes of speeding the curing up a bit. Unfortunately, while doing that, I saw that I’d gotten a little heavy with the clear on the quadrant parts, resulting in some crinkling. Those were going to need some more attention, unfortunately, but for the time being I left them in the sun and went back to shoot two-part clear on the switch console and panel wings.

While those were curing, I went back to the quadrant parts. My first thought was to try color sanding the clear to remove the crinkles; maybe there was a slim chance I could get away with doing that and then adding two-part clear on top. Unsurprisingly, that wasn’t the way things went; while I got the surface smooth by sanding, the clear was overly dull and even sanded through in a few spots. I decided to approach these by shooting yet another black coat on top, then just directly topping with two-part clear. There’s really no reason to add the intermediate single-part clear here, other then to be consistent with everything else…I didn’t think it was likely to affect the final finish.

So then there was just some more waiting for the black paint to set up a bit, before I finally went back and shot the two-part clear on the remaining parts – namely, the main panel and those pesky quadrant parts. By this time it was approaching midday and starting to get good and hot outside, so I switched to indoor activities for the rest of the day. I really wanted to start reassembling things, but it seems like poor judgment to not give the clear coat more time to cure – the can says it needs 24 hours to fully dry. No point in putting all this work and then mucking up the finish out of impatience.

So I picked back up around midday today, starting out with reinstalling all the switches in the console. I also spent some time last night thinking about how I wanted to color-code the switches. Way back when, I added colored switch covers which I wanted to use to visually differentiate things in addition to the labeling. So after getting all the switches back in place, I added the covers for good measure:

What I basically settled on for a system (and I use that term loosely) was:

  • Yellow: lighting
  • Red: things that shouldn’t normally be on – in addition to the alt feed above, the start arm switch also gets one of these
  • Blue: fuel pump (because 100LL is blue) (not seen above)
  • Green: ignition (because green means GO) (also not seen above)
  • White: everything else
After doing the switch console, I also reinstalled the switches and other component in the panel wings, but didn’t get a photo of that. Then, for the real fun, I went to town putting the avionics back into the main panel. Nothing complicated here, but it made for a nice progress pic:

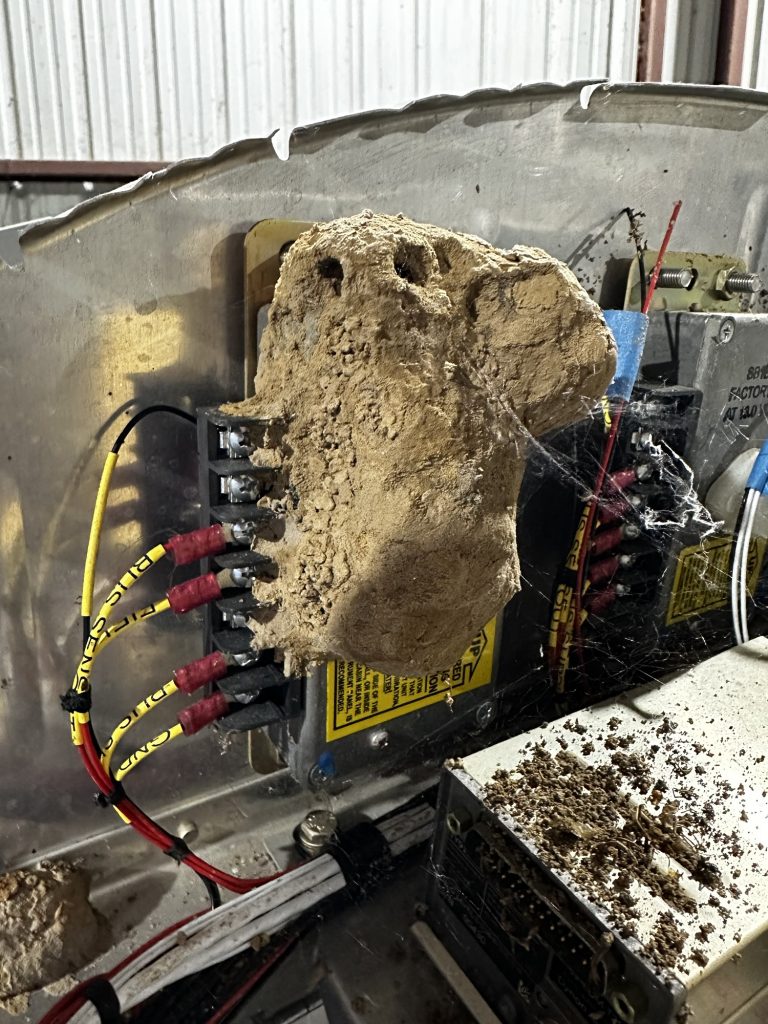
Finally, I started thinking about other admin tasks before replacing the panel. The first things I wanted to look at were the gear tower brake lines. I want to modify these to use different holes in the floor, in order to better work with connecting to the fluid passages in the gear legs. I also need to remove and clean these anyway; I unwisely left them uncovered and they’ve got mud dauber nests that need to be cleaned out. All of this is best taken care of now, with the panel not in the way and the fuselage not on the gear. Unfortunately, full-size combination wrenches are too big for working down in the bottom of the towers, so I’m going to need to pick up some stubby wrenches before I can keep going here.

So instead I turned to remaking the network cable between the baggage bulkhead and the main panel. Previously, I made this too short, not allowing for sthe same service loop length that I have with the main harness. So I got to dust off my electrical stuff and remember the pinouts for a Skyview network cable.

All in all that made for a pretty good day’s work. Tomorrow I may do some more cleanup behind the panel (everything is dusty from sitting out uncovered) and maybe start working on installing the wear plates and other preliminary stuff for the gear. I think I also need to pull the gear legs themselves out and flush out those passages – if I recall correctly they got uncovered at some point and got some mud dauber attention. Better to clean that out before I install them…

Posted in Fuselage, Panel | Hours Logged: 5

Random prep things

So nothing really worth sharing photos of today, but I got to working on some of the punch-list items prior to installing the gear. First up was actually pulling out the gear mount hardware – I knew that some of these pieces that are bare metal had a bit of rust, which I wanted to remove. So I spent a bunch of time with a wire wheel going over everything and getting the scale off. There were a couple spots on the wear plates that required more attention than that – I seem to recall knocking some mud dauber nests off of these a while back, and it seems that the residual mud from that caused a bit more corrosion. In those spots, I ended up needing emery cloth and a hardwood block to get things smoothed out.

Next up, I went back to looking at various lines. After taking a second look at the gear-tower brake lines, I was able to get them out using the wrenches I had on hand, though the stubby set I ordered will still come in handy for reinstalling. I also did some research on routing the connecting lines between the bottoms of the gear towers and the top of the gear legs – I was thinking I might need to modify the gear-tower lines to exit the floor in a different spot, but it looks like that won’t be necessary. That’s a nice touch and will save me some work.

After that, it was down to the fun of starting to clear out mud dauber nests from these lines and fittings. So far I’ve had good success by breaking up as much as I can manually, then soaking the affected area in a bucket of water to soften the remains, and finally blowing things out with compressed air. That at least gets rid of the blockage, but still isn’t going to do the cleaning job I want – so I ordered some brushes from Amazon today, which I’ll be pulling through affected tubes (sort of like cleaning a rifle) in order to remove any residue.

One final bit – I also cracked open the gear leg crate and pulled the legs out. I taped off the brake line passages a while back, but thought I remembered one or two of those bits of tape falling off and the mud daubers getting in – and sure enough, it looks like there’s some residue. So the legs are going to have to get the same cleaning routine that I’ve been giving everything else. And I’ll be a lot more careful to cap off any open lines in the future…

Posted in Fuselage | Hours Logged: 2

Tail spring refinishing

More punch-list type stuff today. This isn’t strictly necessary for the gear installation, but it’s been bothering me for a couple weeks now. A while back, after having continuing issues with the tail spring rusting, I gave it a good thorough cleaning and than shot epoxy primer on it. I figured that ought to stop the rust for good, but…nope. I noticed some rust spots poking through a month or so ago. Turns out I should have topcoat the thing instead of just leaving bare primer…

So I figure I’ll give it the same flat black + two-part clear that the panel parts got. But first, there’s another bout of cleaning needed, and that was today’s work – going over the entire thing with a wire wheel until all the old primer and traces of rust were gone. I’m also going to scuff and paint the tailwheel fork, which is powder coated white, but that should just need a good scuff before adding paint.

Tomorrow I’m going to pick up some rust conversion primer to use as a base coat, and my plan is to try and get all this stuff repainted this weekend.

Posted in Fuselage | Hours Logged: 1

Finishing tail spring refinishing

More good progress this weekend. Over the course of yesterday and today, I finished redoing the tail spring and other related parts. Saturday morning was primer, Saturday afternoon was flat black, and this morning was matte clear coat. Everything turned out looking really nice and I really hope this is the end of rust issues forever. I’m giving the paint some more time to cure fully, but once that’s done I think I’m going to go for a final-assembly approach here – by which I mean greasing the mating surfaces between the spring and socket, as well as the fork swivel and wheel bearing, with everything getting torqued down.

The other thing I worked on today was some mud dauber nest eradication. I bought a small nylon brush set from Amazon with a long tail, with which I was able to thoroughly brush out the inside of lines that had been harboring nests. All in all I took care of both sets of brake lines (upper and lower) along with the fittings, plus a fuel line for good measure. I also uncovered the brake line ports in the gear legs and gave those a good interior cleaning, as well as scrubbing down the outsides of the legs. And of course, everything got capped off afterwards to prevent any further nesting activity.

Finally, I cleaned out the inside of the fuselage. There had been some tools in there, along with other random debris (wire insulation, aluminum chops, etc), and I wanted things pretty tidy before I lift the nose in order to get the gear legs attached. At this point, I think I’m ready to open up the access holes for the outboard wear plates and get both sets of wear plates bolted in. Once that’s done, I should be ready to lift the nose and bolt these things in place.

Posted in Fuselage | Hours Logged: 3

Tailwheel setup

Just another short session in the shop tonight. I went ahead and reinstalled all the tailwheel stuff I got repainted over the weekend, and as mentioned previously, I treated it like final assembly, complete with greasing everything as needed. When that was done, I couldn’t resist grabbing the steering link out of its box and getting that installed as well. The link is pretty easy to set up, just requiring a bit of length adjustment to ensure that the rudder and tailwheel are centered at the same time. It all looks pretty slick put together, and it’s fun to waggle the rudder and make the wheel swivel at the same time:

I also opened up the access holes on the forward bottom skins for installing the main gear wear plates – just need enough room to get a 7/16” socket in there. Hopefully tomorrow I can install the wear plates, and…maybe…even hoist up the fuselage and see about installing the legs themselves…we’ll see.

Posted in Fuselage | Hours Logged: 1

Main gear install, part 1

It’s another one of those nights…I came into this one expecting to spend maybe a couple hours total in the shop and finish the evening with an airplane sitting on actual gear legs. It didn’t quite go like that, but not in any sort of horrible way or anything, just the usual unexpected stuff cropping up.

The first step was to get the inboard and outboard wear plates installed. These bolt up to the bottom of the fuselage, in assembly with the longerons (outboard) or gear element (inboard), and are the upper surface on which the gear leg rests. This is also a two-person job, since it requires one person outside holding the bolts while the other is reaching inside and tightening the nuts. No big deal once I recruited Josie’s help, though.

At this point, I thought I was ready for the fun part, to the extent that I went ahead and lifted the forward fuselage up nice and high using my engine hoist attached to the engine mount. Then, once I had it up nice and high…I remembered I needed to insert the outboard bracket bolts from inside the fuselage first. Well, I didn’t need to necessarily, but why not go ahead and get that done now? As it would turn out, it was a good thing I didn’t skip this.

This is a point where I’m diverging from the plans. These outboard bracket bolts are a very critical part of the gear mount, and their installation requires actually torquing them to a fairly low value, so as to not deform the outboard brackets. They also require periodic retorquing to ensure proper clamping of the gear leg. The plans call for all of these bolts to be inserted from below, and nuts installed above – which leads to many RV-8 owners providing horror stories of figuring out contortions to get a torque wrench inside the crowded gear towers each year at annual.

One way to avoid this is to simply reverse the bolts and inserting them from above, allowing the nuts to be torqued from below. The problem is, the bolts still need to be kept from turning at this time, so you’d still need to get inside the towers. For this, someone came up with a novel solution, namely little steel C-channel clips that slip over the bolt heads and then engage the weldment or a nearby nut inside the element to hold the bolts. I bought a set of these clips some time ago.

Anyway, after lowering the fuselage again, I got to work trying to install the bolts along with the clips, and quickly ran into issues. At first I’d fitted the clips to the bolts before hand, but I could see that they’d be interfering with other nuts while driving the bolt in. Whoops, guess I’ll have to lay the clips down in the channel and then slide the bolts into them. Except I couldn’t get any of the clips to line up with the holes – at their size, they all interfere to some degree (some worse than others) with the surrounding nuts and/or structure.

Bottom line, there’s no way these clips will work as provided. The question now is, do I modify the clips to fit properly, or just ditch them entirely and go back to the factory setup? That’s not a decision I want to make off the cuff, so I quit for the evening and retired inside to do some reading and thinking.

Update: Well, I don’t feel so bad about tonight. Found a build log I’d looked at previously for the bolt clip info, and now I see a couple relevant details: First, he specifically mentioned needing to modify the clips to fit. Second, he says he spent five hours modifying the clips and getting the bolts slipped into place. Here’s hoping I don’t need quite that much time…

Posted in Fuselage | Hours Logged: 1.5

Main gear install, part 2

Tonight’s goal was to see about figuring out those outboard saddle bolts and the anti-rotation tabs. I started off with the one that just barely wouldn’t sit on the hole – that is, the easiest one. Just a bit of time on the bench grinder removed enough material for it to clear the adjacent nut, and I was able to get the bolt started. But as I tapped it into place, it stopped about halfway in, and…I saw that there was a nut in the way, from one of the batch of screws around the base of the gear tower. So I had to pull the bolt back out and remove that screw as well – but after that, I finally got the bolt installed.

With that lesson learned, I removed three more screws – one that would interfere with each bolt, and then it was just a matter of modifying the other three tabs. Two of them needed a decent amount of material removed, to the point that I sliced off a portion with a Dremel cutoff wheel before fine-tuning with the grinder. In the end, though, I got them all in, and with only a minimum of drama. I’m glad it went faster than the five hours the other guy said he spent on this.

To commemorate the occasion, I figured out a contortion that allowed me to both shine a flashlight on a pair of bolts and also point my phone in there, to illustrate the tab installation:

I haven’t yet reinstalled those four screws I took out, just on the off chance that I might need to remove the bolts yet again before this is all said and done. There’s also one more chore to do before actually installing the legs, which I’m glad I thought about last night. Since the legs include the brake passages, NPT-AN fittings need to be installed at the upper and lower ends of the legs. The upper fittings will be 90° elbows, and I don’t think there will be enough room to turn them with the leg in place – so I’d better install the fittings first. Fortunately, I found them on Amazon and they’ll be here tomorrow, so no delays from this.

Speaking of tomorrow, we’ve got other stuff going on, but maybe Friday evening we can get these things hung…

Posted in Fuselage | Hours Logged: 1.5

Main gear install, part 3

Another composite posting here – this encompasses work from the last couple days. Productivity is kind of difficult when we’re getting highs up near 100…at least on the weekends I can get an early start art and beat the heat a bit, but weekday evenings just end up being sweat-drenched affairs. Anyway, with those tough close-tolerance outboard bolts installed, the next prep step was installing the upper brake fittings on the legs. Those came in as expected, along with the thread sealant I needed, so I got those installed.

I also went ahead and pulled out the main wheels, tires, and tubes, and set about assembling those. Aircraft wheels are an interesting affair; they split down the middle and get assembled into the middle of the tire-tube combination. Also, the only experience I had with inner tubes was with bicycles as a kid, so there was a bit of a learning curve here. All told, though, it was pretty straightforward. I think I spent about an hour on the first one and 15 minutes on the second.

That left today for the real fun. My shiny new engine hoist did its duty in raising the front of the plane, and I got to work underneath. I was expecting it to be a two-person job to get each leg in place, but it turned out to be pretty easy to manage alone. About the only hangup I ran into was forgetting to grease the inside of the first saddle bracket I installed, requiring a bit of backtracking (the grease is just for corrosion prevention). I only had to recruit Josie’s help for actually torquing the inboard bolts, since that requires one person holding the bolts from beneath while the other tightens from above.

The final step was really the most tedious – torquing the critical outboard bolts. These nuts are to be tightened until the gear leg is clamped between the saddle and the wear plate, and then the nuts get gradually torqued, increasing 5 in-lbs at a time, until the final torque of 240 in-lbs is reached. So basically it’s a repetitive process of turning each nut, adjusting the wrench, and repeating – about 20 times per side. The desired result is for the brackets to sit clear of the wear plate by about .030”, which worked out fine for me.

At this point, it was another one of those times to go through an assembly step for the sole purpose of motivation, ie seeing something especially airplane-like. So I got out some hardware-store temporary bolts I’d bought previously, bolted the axles onto the legs, and then installed the wheels. Then I had the great fun of rolling my airplane fuselage out onto the ramp for a photo op. (not to mention a good thorough sweep under where it’s been sitting for some time)

The wheels aren’t going to stay on, though – as fun as it is to have them in place, it makes the fuselage sit even higher than it already does on the legs alone, and the wheels will have to come off for stuff like brake setup and so forth down the road anyway. So my plane is to build some temporary shop wheels to go on the legs. I’d originally thought about using dollies, but I think I can build something that’ll take up less space while still providing large enough wheels to go over the lip to the ramp if I need to move the plane. I’ve already got a loose plane in my mind, I’ll just need to snag some parts, maybe while we’re out tomorrow.

In other news, I got to looking at the engine some more today, mainly thinking about what I might want to do prior to hanging it for the first time. Seems like it’s probably a good idea to get some of the rear-mounted accessories in place, like the prop governor and standby alternator. This also includes the ignition coil mounts, and this is where today’s fun came in. When I ordered the CPI2 system, I specified one magneto coil mount for the lower spark plugs and a mount for the top of the engine case for the upper ones. Unfortunately the fuel injection lines on top of the engine are going to interfere with that case top mount, so I need to get with the SDS folks about ordering a second magneto mount. I also need to get some retaining clamps to actually hold the magneto mount plates to the engine – got to figure out what I need there.

Basically, my short-term plan is to reinstall the interior brake lines, then fabricate the short ones to connect to the upper gear legs. I may go ahead and do the rest of the interior plumbing, including mounting the pedals, but I’m not quite sure about that. Once I get to a stopping point on the brakes, I’ll probably be getting that engine hung for the first time.

Posted in Fuselage | Hours Logged: 3.5

Shop wheels, engine accessories

So, here we are, back at it. Vacation is over (well, vacation #1, at least), plus some other personal stuff, and I’m also having to deal with this super-hot Houston summer. This is actually work I did yesterday, too, I just forgot to write it up before going to bed.

Item #1 was to replace the actual main wheels with some smaller (and disposable) wheels to use for moving around the shop. This lets the fuselage sit a little lower, while still retaining the ability to go over the sliding hangar door tracks if I want to roll the fuselage outside. The wheels were removed from some heavy-duty casters I got at Home Depot, and the lumber is just scrap I had lying around.  Pretty straightforward setup, just took a bit of time to drill the mount holes and get everything assembled:

Next up was removing the engine and mount from the fuselage to give me some room to start working on accessories, as well as getting into firewall planning. Sliding this whole assembly off the fuselage and onto the fixture I made is really easy; all told I think it took maybe 20 minutes. The fixture is super stable, though a bit cumbersome to move around with all the weight on the casters. Gets the job done, though:

I decided from there to try the easy accessory first, namely the main alternator. The boss mount went on easily, as did the alternator itself and the belt tension adjustment bracket. Then I tried adding the V-belt I’d bought with it, and…it’s too short. B&S specifically mentioned using the shortest belt possible to pull the alternator tight against the engine, since RV cowls tend to be tight. I intentionally bought the shortest one they recommended, knowing this might happen, so it wasn’t a huge surprise. I’ve already ordered the next-longest one from Amazon, and it should be here tomorrow.

I also did a bit of working on where I wanted to mount the battery box. I already know I want to mounted low on the right side of the firewall, but I hadn’t really got into the exact location and orientation. I’ve seen several folks suggest mounting the box sideways, so the battery is removed by sliding out the side, as opposed to from the top. I’m not really sure I can make this work, though – if I orient the top of the box outboard, the the firewall flange interferes with sliding the battery out. This will only get worse later on when I add the hinge for cowl attachment. So maybe upright is the right way to go; I’ll just have to think through where to put the contactors and battery bus so they don’t block battery removal. I didn’t get very far with this before the midday heat drove me inside, though.

One interesting thing I found from some battery-box research was someone with the box sideways, but the top facing inboard – an interesting idea. I’m not sure this is great for me, though, as I suspect the prop governor on the back of the engine will interfere with removal. I might just have to rehang the engine once I get the governor installed to see how that works in practice, though. I’m a little intrigued by the idea, but also skeptical…

Posted in Firewall Forward, Fuselage | Hours Logged: 3

Removing and cleaning skins

Tonight as just laying the groundwork for getting back into wiring-related work. The first step for that was getting the forward upper skin and baggage door removed. I last installed these when I was getting started on the cowl, and because of the way the upper right firewall sort of floats relative to the baggage door, I made liberal use of duct tape to hold everything in place.

Problem is, that was…checks notes…oh wow, almost two years ago. Unsurprisingly, the duct tape did not come off cleanly:

Handling the residue wasn’t too awful, though. I put an old towel over the affected areas, wet it liberally with acetone, and left it to soak for fifteen minutes or so. After that, the residue scraped off easily with a plastic razor. Some scrubbing with an acetone-soaked rag took care if the final cleanup, and things were looking nice again:

I repeated that step on some other parts as well, though I still need to clean up the actual forward upper skin.

And of course, this being Texas, opening up the area behind the panel exposed a few mud dauber nests that needed to be cleaned up, like this rather impressive bit of engineering that was attached to one of my voltage regulators:

That was it for tonight – next I can maybe move on to more practical work.

Posted in Fuselage | Hours Logged: 1