Firewall Forward

Battery mount progress

OK, so first order of business this evening was to get the roughed-out mount drilled to the firewall. The challenge here was figuring out some way to hold the plate in place while drilling the first hole. I didn’t even need it to be held tightly – I figured if I could just make a starting dimple in the plate at about the right location, I could then finish the hole off the airplane and use that first hole as a reference.

Eventually I ended up using one of the most important tools in anyone’s toolbox – that’s right, duct tape. The lower right corner of the mount plate rests on the rudder anchor block, so the tape really only has to keep the mount from rotating counterclockwise around that reference point. Two strips do the job just fine:

The rest of the holes were pretty easy; in all cases I initially drilled #30 to match the existing hole size in the firewall, then I went back and enlarged each hole to #12 for an AN3 bolt.

Next up was adding the mount points for the contactors. The basic idea is to mount these as high as possible, which will then enable the battery box to also be mounted as high as possible, and in turn ensure plenty of clearance between the box and the nearby lower engine mount tube.

I did end up doing some ad-hoc replanning here, though. My initial plan was to add a second .063” sheet here, which would give me enough thickness to insert flush 1/4” screws from the back of the mount; these would be then secured with jam nuts and lock washers, creating the same sort of “fake studs” I used for the avionics stuff on the baggage bulkhead.

I’ve never really liked that idea, though, and as I looked at everything I decided that things could be really simplified here if I just didn’t insist on having the mount actually sit flush on the firewall. If I could add some standoffs and space it off by 1/4” or so, then I could just use regular old nutplates and bolts to attach the contactors. So I decided to go that route, and instead of riveting a doubler here and doing some annoying countersinking, I just had to lay out four nutplates to match the mount holes.

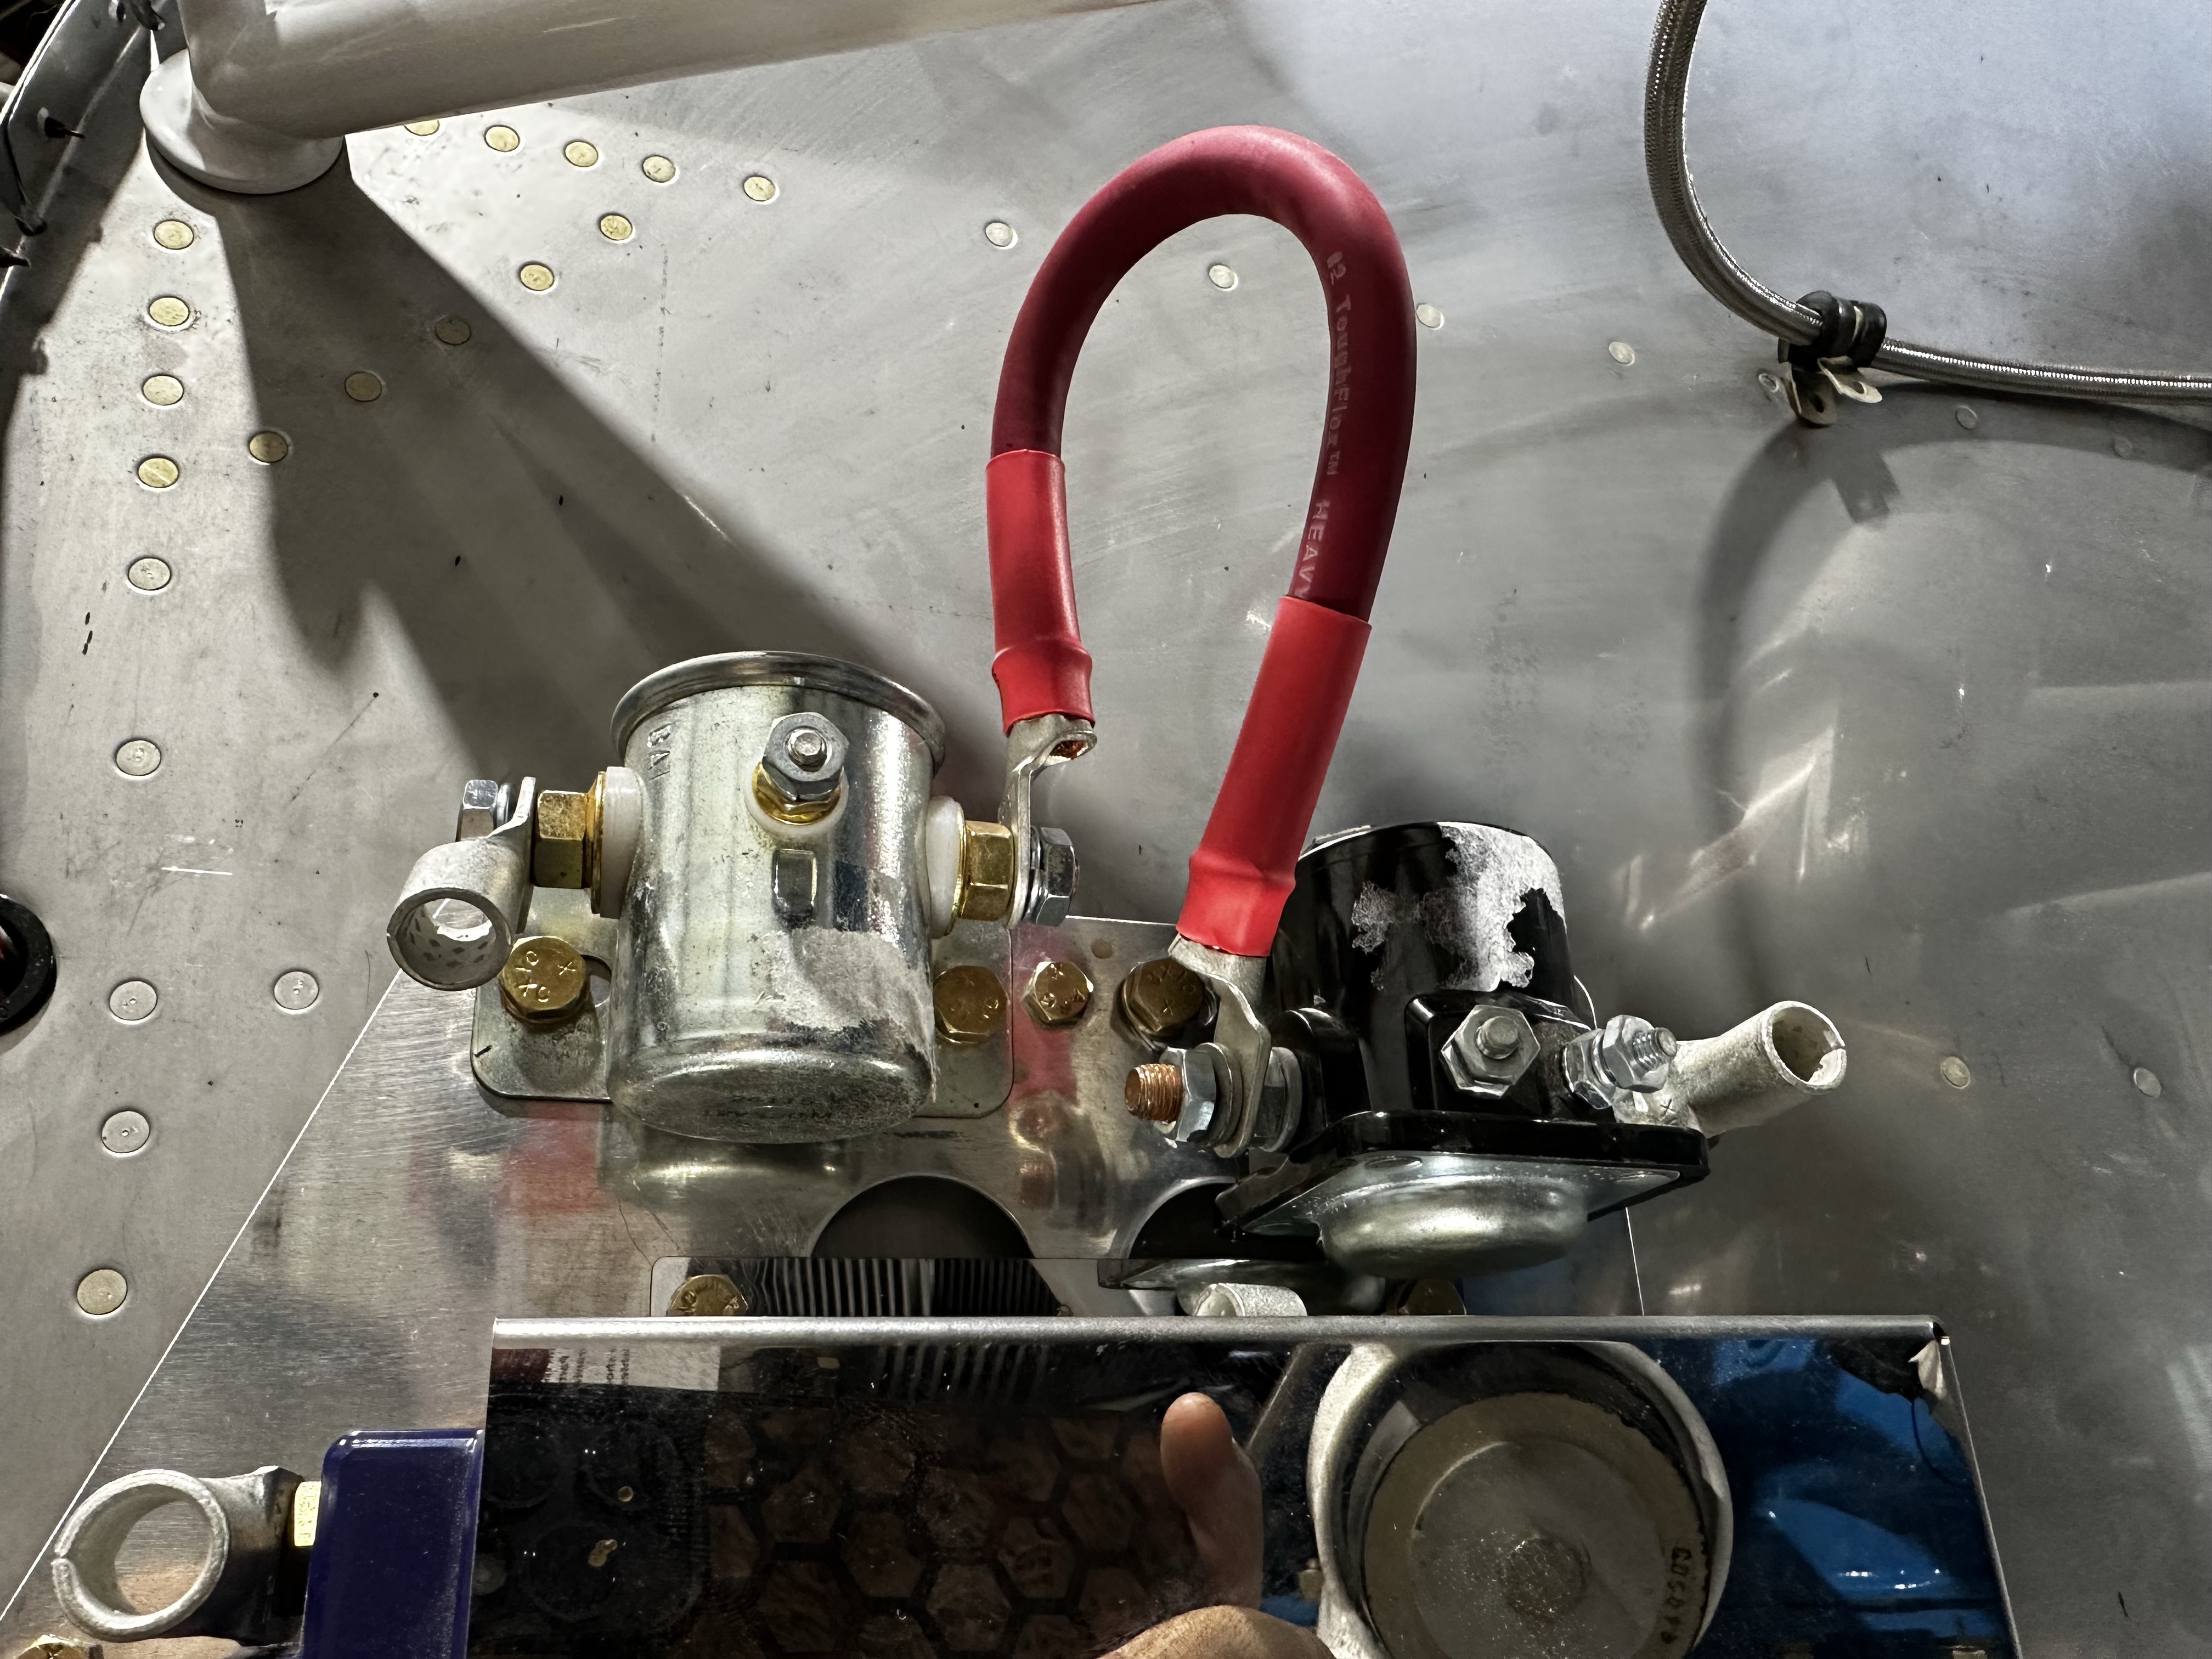
The final product is seen below. Note that there’s a bolt hole here for securing the plate to the firewall, flanked by the pairs of mount holes for the master (left) and started (right) contactors.

Next up is finalizing the battery box location and getting those holes drilled. Which has me thinking now – originally I was going to rivet the box to the mount, but now that the mount will be spaced off the firewall, I can go with bolts and nutplates there as well. That should simplify battery installation and removal – I was figuring on that requiring loosening the bolts for the mount plate itself, allowing the box to tilt and clear the firewall flange, but this way it’ll only require loosening the box bolts, which should be a little less unwieldy.

Anyway, hopefully tomorrow I can get that fit-up done, and then I’ll set about strategically removing significant material from this plate to lighten things up.

Posted in Firewall Forward | Hours Logged: 2

More battery mount progress

So…let’s start with the fun part. Tonight I actually started over from scratch with the battery mount. I guess it’s a good thing I bought two pieces of .063 for this work. Basically, the problem I ran into was that my late-breaking idea to put spacers between the mount and the firewall caused other issues.

The first thing is that this pushes the mount closer to the lower engine mount tube, increasing the chance that the battery box might interfere…and I can’t easily verify this without remounting the engine (again). This problem is compounded by the decision to use bolts to attach the box to the mount – originally I had the box sitting pretty close to the contactors, but this layout would cause the starter contractor to interfere with the attach bolt for the box. Fixing this would require moving the box lower – which would again increase the chances of interfering with the engine mount tube.

With that in mind, I decided to change things up a bit. Instead of putting the contactors above the battery box, I’ll put them below it. This pushes the battery box higher, providing more leeway between the box and engine mount. It’ll also allow for some nicer routing of other cables – I’m going to move the ANL fuse holder and ammeter shunt down to that lower mount tube as well, which will allow for a very short cable run from the contactor to the fuse holder. This, in turn, will minimize the length of unfused cable, which is definitely a good thing.

So – back to building. The first step was to transfer the mount-firewall bolt hole locations to the new raw sheet piece. Then I got to repeat the exercise of tinkering with placement of everything until I liked the layout, and making the needed mount holes. This time, I started with the battery box attach points, then worked off of that to position the contactors. The rough layout can be seen below:

Next, it was time to start sketching up the actual outside of the mount. Here I basically just worked between the mount holes and tried to remove as much unnecessary material as possible. I got as far as rough-cutting the outline before calling it a night:

There’s going to be a fair amount more work to do here, easing up to the actual lines, smoothing out a bunch of rough cut sides, and so forth, but another good night’s work probably ought to do it. I’m not sure yet if I’m going to do any more lightening hole besides the large one outlined above – I can probably fit a few more in here and there, but I don’t want to remove too much material.

I’ve also got to order even more stuff from Spruce before I can finish this. I used my last few 1/4” nutplates with the previous mount iteration, so I don’t have any to install here for the contractor mounts. Guess maybe I’ll put together an order tonight, though to be honest I don’t need this stuff right now – it could wait a bit. Pretty sure I can at least mock everything up well enough to work up cables and such. Eh, we’ll see…

Posted in Firewall Forward | Hours Logged: 2

A bit more battery mount progress

Whew – it’s been a busy few days out here. We had evening events both Thursday and Friday, so no after-work shop time those days. Then I spent all day yesterday helping my brother move, and today was lots of housework, including finally giving in to the inevitable and mowing the grass. But I still made sure to squeeze in an hour for build stuff today.

Anyway, this evening’s work was just taking the previous session’s rough-cut edges of the mount and working them into their final lines, then cleaning all the edges up and making things nice and smooth. Not a lot to describe here, just repeated work with the Dremel cutter, then some filing to straighten out edges as needed, then smoothing with sanding discs. As usual, the old grooved flap wheel knocked off the burrs nicely.

So the outside edges are now done. Next up will be cutting some lightening holes, which should be relatively easy work – that’s just using the circle cutter, unlike this complex layout work.

For a photo op, I temporarily mounted the battery box plus the contactors, though now that I review this photo I see that it shows basically none of the actual mount:

651DE398 7E2D 4D21 8E89 8A5AA55E143F

At least I had the smarts to flip the thing over and get a pic of the backside too, which actually shows off tonight’s work:

30DE0CC5 37F0 485C B4E7 6323FD276766

The one “20/20 hindsight” thought I’m having is that I probably would have been better off avoiding all those fancy concave cutouts between/around the mounting holes. It would have saved a lot of manual finishing work, and I probably could have saved just as much weight by way of additional/larger lightening holes. Oh well, that ship has sailed now.

Posted in Firewall Forward | Hours Logged: 1

Battery mount finished (well, mostly)

Tonight was just putting the finishing touches on this mount, or at least most of them. I wanted to get all the lightening holes cut, but I can’t “finish” finish it until I have the nutplates I’m missing, and I’m going to wait until I also know the mount bolts I need so I can combine Spruce orders.

I did spend some time thinking through the layout of the holes, and I ended up massaging the large hole behind the battery a bit, and then laying out just a few smaller holes in the area below the battery box. There wasn’t any room for useful holes anywhere else, at least while still leaving what I felt was enough material. Probably this thing is way beefier than it needs to be, but such is the nature of eyeball engineering – better safe than sorry.

Anyway, the large hole got cut with my hole cutter, but the smaller ones I did with a large step drill. The hole cutter is nice, but I don’t have quite the precise control over hole size that I get with the step drill. All that step drilling generated a pretty big pile of aluminum fuzz:

And here’s the mostly-finished mount:

So now I’ll set this aside and do the rest of the firewall stuff, which at this point is limited to the manifold mount holes and the eyeball passthroughs for the control cables. Hopefully by this weekend I’ll be hanging the engine…again…

Posted in Firewall Forward | Hours Logged: 1.5

Control cable penetrations

So the battery mount is set aside for a while. That left two more firewall tasks, one simple and one less so. The first was just drilling the two mount holes for the oil/fuel pressure manifold – that was easy enough. The second was finishing up the holes for the three control cable penetrations.

For these cables, I decided to go with steel eyeball-type mounts. These provide a nice sturdy seal, but also allow for some finessing of the angle at which the cable goes through firewall. The fun, though, is that each of these requires six screw holes around the perimeter, in addition to the actual passthrough hole. The eyeballs come with nice drill templates, but they assume that you’re starting from scratch – that is, you’d use the template to make the six screw holes as well as the center of the pass through, then drill them all. Well, I had two 1/2” prepunched holes, and one 1/8” one…so I couldn’t use the templates as provided.

After exercising a decent amount of brain power figuring out an approach for this, I hit upon a solution, which revolved around using the actual backer plate as a template. The first step was to open up the prepunched hole to just under 1 1/8” using a step drill, and then I could use that step drill bit to hole the backer in place, using the passthrough hole as a reference. Then I used a 5/64” drill bit to start a dimple through one screw hole, then finished that hole to 1/8”. That allowed me to put one screw in, plus the step drill for centering, and follow the same procedure for the other five screw holes.

This procedure worked out fairly well, except for one thing – using  step drill on the thin stainless steel doesn’t make for a really great hole. In fact, it tends to wrap the steel just around the hole, while also creating an enormous burr on the backside of the hole. I spent a pretty annoying amount of time reducing that burr to a manageable state, but in the end the hole still isn’t super clean.

I didn’t really like the idea of using this same approach on the other two holes, so I paused and did some research fro better ways to approach this. At some point, I realized that I had a much better tool for this – a knockout punch set I bought a while back. The only problem was figuring out where I’d put the thing…and I spent probably a solid hour hunting around the hangar (this time is not included in tonight’s logged build hours).

All that searching time paid off. One of the punches was the exact size I needed for the passthroughs, which was a nice bonus. I got the second and third holes punched, but stopped short of drilling the screw holes – I’ll leave that for another night. This photo shows how much nicer the punched holes (right and center) are compared to the drilled one (left):

There’s also one more bit of complexity, which my be visible above – the rightmost hole is really close to the firewall support angle, to the point that the punch took a small bite out of the angle. Because of this, the backer plate isn’t going to be able to sit flush against the firewall without some additional creativity. I have a plan, though – the angle piece is .063” thick, and I have plenty of .063” scrap, so I should be able to just fabricate a shim to go between the backer and the firewall; this will effectively make a full flat surface for the backer plate to rest on.

Posted in Firewall Forward | Hours Logged: 1.5

Cable penetrations done

Nothing too exciting tonight. I laid out and drilled the screw holes for the remaining two eyeball fittings and fabricated the aluminum spacer necessary to make the outboard one cooperate with the adjacent firewall angle. With that done, I got the backplates mounted, and went ahead and assembled the rest of the eyeballs in place. The last part is kind of extra work – they’ll have to come apart again when the control cables get installed – but this is as good a way as any to store the remaining pieces. Better this than to go searching for a bag of stuff in a month or so…

Also, I’m equal parts annoyed and amused that each fitting ended up rotated off the vertical in the same direction and about the same amount:

I guess now there’s not much left to do but to hang the engine again and start having some real fun.

Posted in Firewall Forward | Hours Logged: 1.5

Manifold setup; revisiting the battery mount again

Well, this update really started last night. Josie and I had things to do after work, but when we got home I decided to spend at least a little time out in the hangar. My main motivation was to figure out some hardware requirements and go ahead and get a Spruce order in. I started by re-hanging the engine, feeling good about no longer needing lots of access to the firewall.

Next I went to trial-fit the battery mount, and as soon as I had it mounted to the firewall, I realized I had a problem. Making the on-the-fly decision to locate the contactors beneath the battery was a bad idea; they interfere with the lower engine mount tube, and not in any sort of trivial sense. That nicely finished battery mount is unusable.

The good news is that I still have the unfinished first attempt, and after a little more trial fitting, I can make it work with the original layout. The one minor annoyance will be needing to remove the starter contactor to reach one of the battery box mount bolts. Not great, but also not a deal-breaker, and considering the only other option is to start from scratch again with the mount…yeah, I think this will be fine.

I gave up on getting the Spruce order together after this, though I did go ahead and order the spacers I’ll use between the mount and the firewall from McMaster-Carr. I’m pretty sure I have the right length bolts to mount this when the time comes, so it doesn’t look like anything I need from Spruce will be a blocker.

Tonight I did a bit more fitting and tinkering, but mostly I set the battery mount aside and decided to work on finalizing the pressure manifold. Here again, I ran into an issue – I need AN3-6A bolts to attach this, but…I don’t have any. They’re not even provided with the FWF kit. Something else to add to the Spruce order, I guess.

I did go ahead and get the AN fittings installed for the pressure lines, along with the plugs on the opposite sides of each fitting point, and the actual sensors. I also temporarily mounted the manifold in place, using too-short bolts and thin jam nuts. That’ll hold the thing in place until I get the right hardware”

Finally, I’ve been thinking through my passthrough fittings for the wiring and alternate air cable. Previously, I’d decided to go with the traditional Van’s approach, just running the wires through a snap bushing and covering the area with firewall sealant. That’s still my fallback plan, but I’m going to try making some DIY fittings instead. I found some stainless flange fittings on Amazon that I think I can modify to work here. If I can make these work, I’ll end up with a much more robust and gas-tight fitting. So we’ll see how that works out…

I guess in the meantime here, while I wait on parts, I might start working on the case top ignition coil mount. I can’t pull the ignition harnesses through yet, since I’m still figuring out the passthrough stuff, though. I’m sure there’s still random stuff I can work on in the meantime.

Posted in Firewall Forward | Hours Logged: 1.5

Battery mount v1.0, take 2

So…I’ve been holding off on moving forward with the battery mount, mostly out of an abundance of caution. I’d gone ahead and ordered some spacers from McMaster-Carr, and I wanted to do a real fit-up with those spacers and thus evaluate the battery placement in that position, before actually drilling the bolt holes. Those spacers came in today, so I got that final fit-up done.

The basic deal here is that I’m placing the battery box as high as it can possibly go. The placement I chose will put the top right bolt under the starter contactor – meaning that solenoid will have to be removed before that bolt can be loosened – but such is life. I could possibly have gone higher, but I’d have had to added washers between the starter contactor and the mount, and that sounded like way more of a pain to deal with down the road.

So I got that location plotted out, then went ahead and drilled the box mount holes. Next up was once again tracing around the various mount holes and laying out how to trim the mount down. I took a lesson from the last mount and didn’t go nuts with all the inside curves in an effort to shave off as much material as possible. This will make it a lot easier to finish the edges, and I think I can make up most of the weight by way of adding more lightening holes.

Before calling it a night, I rough-cut the outline on the bandsaw:

Next, I’ll get to finish the edges and round the corners, then it’ll be time to lay out the lightening holes.

In other news, the stainless flange fittings I ordered from Amazon were far too large to be useful, so no joy on making some cheap passthroughs (though at least I can return these). I looked around some more for something to press into service, but eventually decided to just cough up some $$$ for some passthrough kits that Spruce has. Even those will require some modification due to how close the passthrough holes are to the firewall edge, but I think it’ll be doable. Worst case, I can still fall back to just the snap bushings and a big blob of sealant…

Posted in Firewall Forward | Hours Logged: 1

Battery mount wrap-up

That’s right – finally I have a completed, functional battery mount. I ha a bit of a lull over the past week due to an ankle injury that I needed to stay off of, which meant avoiding lots of standing in the shop. But now things are better, and I had the day off, so it was time to get back to it.

The main fun was, once again, laying out the assorted lightening holes I wanted to make, and then actually cutting/drilling the holes. Only the largest one was made with my hole cutter; the rest were just done with a large step drill. After doing that, cleaning up the edges, and drilling for/installing the nutplates for the battery box, it was finally time to hang the thing on the firewall:

Then I got the battery and contactors mounted:

Which led to the real fun, starting to think more about electrical routing. I ended up breaking out all the assorted ring terminals I’d ordered, and just started installing the terminals in all the various spots they needed to live, in order to start visualizing how cables and stuff ought to be routed. I think I’m going to relocate the ANL fuse holder and amp shunt, but that’s part of also thinking about where I want to mount the battery fuse bus and the relay for the e-bus feed. I suspect I’ll just end up putting them on the firewall up high, but we’ll see where I land on that.

I did decide to go ahead and make some cables that didn’t need much thinking, but that only went as far as the short cable tying the two contactors together. Turns out I’m short on the large heat shrink I’m using on these cables…another thing to order from Amazon. I’ve got the tubing for the smaller 6AWG cables for the alternator and main bus feeds, but…got to think about that routing too. Also I’m still missing a spacer to install the standby alternator, so I can’t wire that up now either.

I have a feeling there’s going to be a lot of jumping around on this FWF stuff. I think my next move is to work on the stainless firewall penetrations, since I’ll want those in place before I do any more work on harness stuff. I guess I could also go ahead and fab the case top mount for the second ignition coil pack…and it kinda feels like I’ll need to start mucking with baffling at some point since that’s going to have a lot of effect on wiring routing…well, just gotta keep plugging away.

Posted in Electrical, Firewall Forward | Hours Logged: 3

Firewall penetrations, exhaust work

So this is a combination post for both today and yesterday. The reality is that I spent a lot more than three and a half hours on airplane stuff, but a lot of that was doing research and stuff inside…so due to my completely arbitrary decision to only count “shop time” when I accrue hours, that’s what the number is.

The first thing I worked on yesterday was the firewall penetrations. As mentioned before, I decided to ditch the plans method of using a plastic snap bushing cooped with sealant, in favor of nicer stainless penetrations. One concern with the penetration kits I bought was that they weren’t going to work as provided, due to how close the two firewall holes sit to the outside skin. So job #1 was to modify the mount flanges for to handle this. For now, I’m only working on the two 3/4” fittings – I also have a 1/2” one that’ll get used for the alternate air cable, but I’m not going to mess with that right now. Basically, I just cut one corner off each fitting flange. That leaves me with only three screws instead of four to secure these, but since they’ll be mounted with a layer of sealant underneath, I don’t think there will be an issue with proper sealing.

The more fun part of this was figuring out if the fittings were going to work. One downside of these new fittings is that they actually don’t accommodate as much stuff as the snap bushings. The snap bushings end up being maybe 11/16” ID, but these stainless fittings call for their ID to be lined with firesleeve to provide chafing protection – which reduces the usable space quite a bit. This isn’t an issue for the port-side fitting – it will only carry two power supply wires, one 6AWG and the other 10AWG. The starboard fitting is a different matter – the wire bundle there is already a decent size, and it doesn’t yet include the SDS ignition harnesses that need to be threaded back into the fuselage.

So I spent a whole lot of time today tinkering with that particular passthrough. Through trial and error, I verified that it was not possible to pass all my wires through the 3/4” fitting with the firesleeve lining in place. Well, that’s a problem. There’s a 1” fitting just like this one, but there’s not enough room between the side skin and the firewall angle to fit that – 3/4” is as big as I can go. I considered adding a 1/2” fitting below the first one, and splitting the bundle, but due to the way the flanges are laid out, it’d have to be probably 2” away from the other one. This would also cause problems for my cable management plans inside the forward baggage area.

It eventually occurred to me that I don’t have to use firesleeve inside the fitting – just something that works for anti-chafing. There will be an outer firesleeve sheath that provides actual fire protection; the internal bit isn’t really doing anything. I did an experiment where I just wrapped the wire bundle in silicone tape, which fit just fine, and I thought I had a decent solution – but this approach might make me hate myself down the road. It’s very possible I’ll want to add wires to this bundle down the road, and trying to remove and replace that tape in situ would be, to put it mildly, difficult.

What I needed was some chafe-resistant material that I could put inside the fitting, and have it essentially stick to the fitting, not the wires. After some thinking, I had the idea of putting some sort of tubing inside the fitting. Some time spent browsing McMaster-Carr yielded exactly what I needed – some thin-wall nylon tubing. With a little fine-tuning of the tubing OD, I should be able to press-fit a section into the fitting, thus providing my chafe resistance, while still leaving plenty of space for the wire bundle. In a sense, I’m ending up with something like one of those plastic snap bushings, but inside a far more fireproof fitting.

On the other hand, that means no more mucking with the penetrations until Yet Another Parts Order comes in. What to do now? I ended up completely switching gears. The build manual suggests starting the FWF layout with the exhaust, since it’s an immovable object that’s going to be emitting tons of heat – that is, it’s a pretty big consideration for routing everything else. I’d had the upper exhaust stacks on the engine for a while, but left the lower pipes off to keep them out of the way while removing/reattaching the engine repeatedly. Now that I’m (hopefully) done with that, I might as well go ahead and put those on, and start figuring out how the hangars and other stuff work.

It definitely looks a lot more airplane-like with the full exhaust system in place…even if it’s just sort of hanging in thin air for now:

I spent the rest of the afternoon wrapping my head around the exhaust hangar setup. There’s some bracketry that I’ll need to drill bolt holes in before I can actually work with the hangars…that’ll be another day. The other packaging consideration for the exhaust is the cabin heat muff – this is a somewhat bulky device that wraps around two of the exhaust pipes. Also, it’s kind of a royal pain to assemble, which is especially annoying when considering that the spot I temporarily mounted it today isn’t going to work…so I’ve got to pull it back off again.

That’s also a job for another day. Maybe tomorrow.

Oh, another consideration – before I do anything remotely final with the exhaust hangars, I probably need to drag out the lower cowl and at least hold it in place, to get an idea of clearance between the pipes and the cowl. That’s going to be fun, since I’ve sort of been using the finish kit crate as a table…actually the shop in general is in dire need of some cleanup and organization. Maybe that needs to be tomorrow’s job, instead of more building stuff.

Posted in Firewall Forward | Hours Logged: 3.5