Yep, time today for more fun with lights. I really liked the wingtip boards I got from Paul at Flyleds, and when he mentioned offering a combination landing/taxi light unit for RV leading edge cutouts, I was pretty excited. I ordered a pair of Whelen lights, well, several years ago, intending to use them here, but Paul’s stuff looks far superior. I even got to handle an example last summer, since he made it to Oshkosh.
I finally pulled the trigger and ordered the lights a couple weeks ago, and then it was time to wait for the long ship time from Australia. The package came in this past week, and today I set about assembling the kits. Overall, assembly is simpler than the wingtip boards – no soldering to worry about, just essentially installing heatsinks and lenses onto the prefab boards. Here’s everything that comes with the kit for two light units:

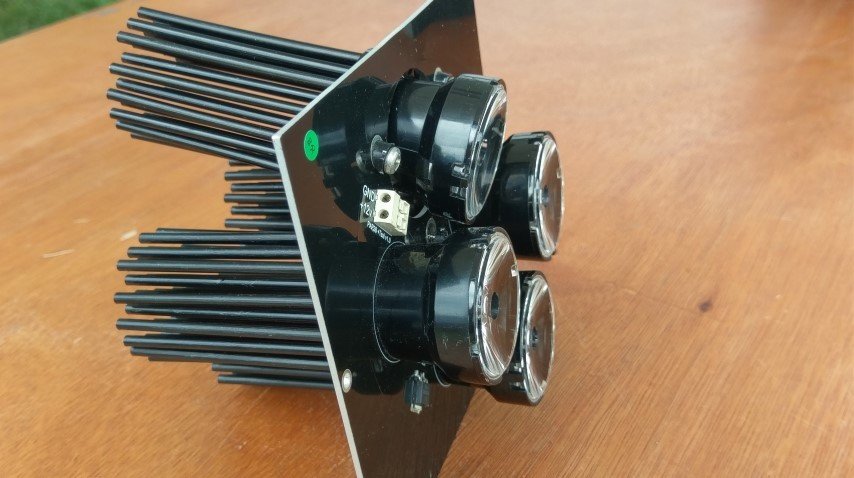
I was actually a bit surprised at the large boards when I first opened the box. I expected four cutouts, one for each light, but upon closer inspection the LEDs were already in place; three fixed to each of the large boards, one to each of the small boards, which will be the aimable taxi light units. And these LEDs are surprisingly tiny when you consider how much light they’ll be putting out:

Assembly mostly consisted of installing the lenses and heatsinks for each light. Additionally, the small aimable boards needed three nutplates riveted onto each one for eh mounting/aiming screws. This was actually a bit of a challenge, since some of the nutplates are the single-lug type. The rivets on these are really close together, which makes things fun. I’ve only ever riveted these with flush rivets, where at least you can position the squeezer to make some more room – but this kit includes round head rivets, and in that case there’ no choice but to center the rivet in the set. So I actually ended up shooting a bunch of these with the rivet gun.
Then it was on to the lenses. Here, a mounting cup snaps into place on the board, the heatsink is coated with some sort of thermal glue, and screws go through the cup and into the heat sink, securing everything together. Then the lens simply snaps into the cup. The instructions warn that this must be done very carefully; the base of the lens actually fits over the LED, so carelessness here can easily damage the LED. Which is exactly what I did on the second lens I installed – despite being super careful as I pressed it down to lock in place, one side locked and the other didn’t, which took off some of the LED.
It’s not super obvious from this photo, but the small clear plastic (I guess) dome on this LED has been scraped off:

Interestingly enough, the LED still lit when I put power to it. Maybe it’s salvageable, I’m not sure – I emailed Paul to find out. Hopefully I don’t need to order replacement parts, but we’ll see.
The rest of the lenses went on with no trouble, and then I installed the one aimable board to one of the large boards, and of course there had to be some testing. After basic function testing, and after it got dark, I went outside to do some real-world testing. In the following photos I’m aiming the light at a neighbor’s hangar, a little over 300’ away across the runway. I’m only powering the three landing light units on the large board, not the one taxi light unit on the small aimable board. Both photos were taken with identical camera settings (something like 15s exposure at f4.0).


So basically on the plane I’ll have two lights like this, which I think will provide, um, adequate lighting.
The one thing I forgot to do was to take a photo of the finished product, but it looks like this (photo from the Flyleds site).
Next up: some seat ramp riveting. I’ve been reading area in the construction manual. I wonder if I should consider ordering seats sometime soon…once I get the interior stuff done and start really finalizing the panel plans, I expect to spend a fair amount of time sitting in the plane chair-flying the panel. Probably better to just throw some pillows in there for that instead of expensive seats though…