Boy, it’s hot outside. Kind of hard to maintain motivation to get stuff done, but about the best I can do is just ensure that something is happening, even if it’s not much of something.
I started out the morning taking care of my final antenna location. Research indicated that going just aft of the bellcrank bulkhead was a fine place, so that’s what I chose for my transponder antenna. Just tabbed up another doubler and got it drilled in the proper location and orientation. So that concludes my antenna prep work for now, though I guess I could go ahead and dimple the doublers and the skin for eventual riveting.
OK, so what next? Well, I guess I can revisit the static system. I’ve done a decent amount of thinking on this the past few days; basically, what I need back here is to connect the two ports with tubing, and provide a T-junction for the line that will lead to the actual avionics. There are prepunched holes on the adjacent bulkhead for just this purpose, but…how to secure the tubing?
The official plans method is to just use zip ties, but that seemed inelegant to me. Adel clamps seemed a better option, but that would also require opening those holes up and installing nutplates. Which wouldn’t be the end of the world, but…well, something about that bothered me too. Eventually I hit one of my “stop overthinking this and just do something” points, and decided to just go with the zip tie method.
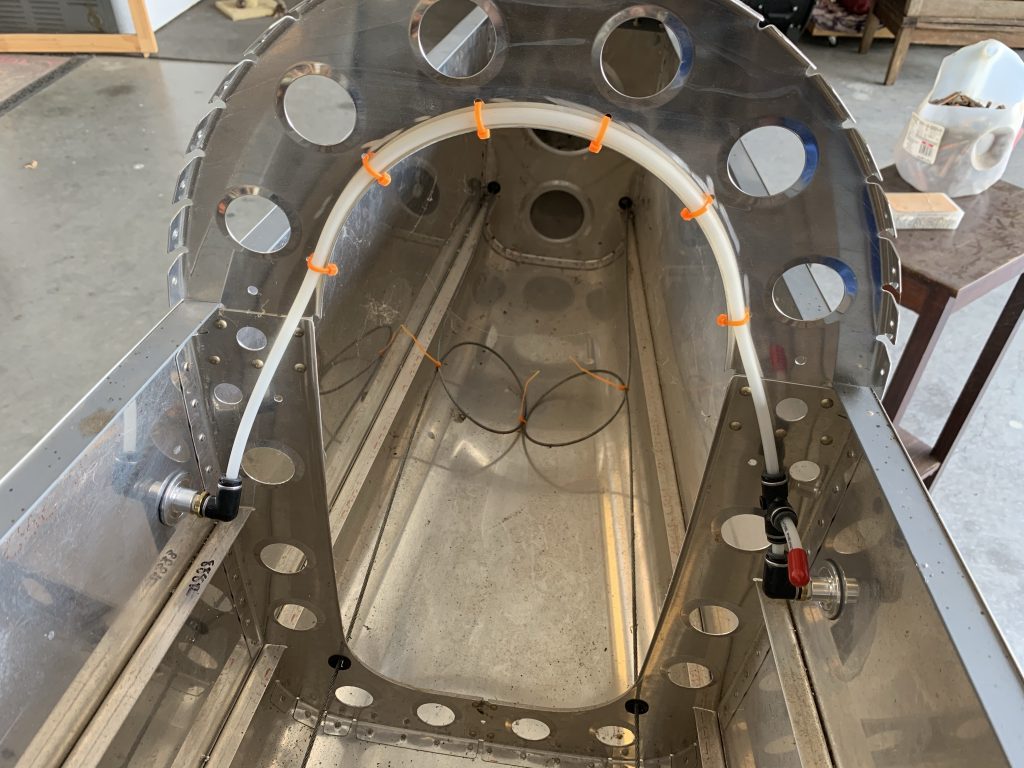
So here it is. On the left side of the fuselage (right in the photo), the T-junction is placed very close to the static port, the idea being that this will keep it more or less secured. I also cut a short piece of tubing to insert into the open end of the junction and capped it; this is to prevent the possibility of our ever-industrious mud dauber population from plugging it up.
OK…now what next? The thoughts occurred to me to maybe get my conduit runs done back here. What that meant for today was another period of staring at things and scratching my head. One topic was how to handle the conduit run into the tail. I spent some time looking at what other people have done, and it seems common to run a conduit down at the bottom of the tail, roughly on-center. But there aren’t any holes in the bulkheads for that, and it seems weird to make a whole new set of holes when there are preexisting ones, albeit not quite laid out where I want them.
Eventually, I decided that I’m not going to do conduit back here after all. My rationale with conduit is to provide routing through areas that are inaccessible, such as under the seat and baggage floors. And while the tail will be difficult to access, it won’t require removing permanent fasteners. And I’d still have to crawl into the tailcone even to access the forward end of my planned conuduit run. Finally, that planned run would result in a curved path, which would remove some of the convenience of trying to easily run new wires.
So yeah, I’m just going to install snap bushings in some of the existing holes, add a couple adel clamps where needed to support long runs, and if I ever need to add wires back here, I’ll just be crawling an extra foot or two into the tailcone to get it done.
There’s also the question of doing the runs under the seat floors. Here, I have some prepunched holes, though oddly not a matched set. The rear spar carry through has a 3/4” hole on either side, but the next bulkhead back only has one on the left side. So I’m going to want to add a hole there too, but that’ll be challenging. Put simply, there’s no way to get in here with my unibit – no room for a regular drill, and no way to chuck the unibit in my angle drill. I think what I’ll end up doing is buying a knockout punch set to get this done. Another thing that has to wait for stuff.
The other question is how to terminate those conduit runs. They need to go further both forward and aft of those two bulkheads if the ends of the conduit will be accessible. Neither termination spot is at a bulkhead, though, so I think I’ll end up making some small termination pieces that will rivet to adjoining structure. This might be one of the things I work on fairly soon.
Eventually, I got tired of all this head-scratching and needed to do something tangible again. So I took a look at the aft end of the fuselage, where there are four unfilled rivet holes on each sides. These are where the stock external rudder stops would have been attached, but since I went with the internal stop, I now needed to get these holes filled. The two aft pairs aren’t much trouble – they’re on the portion of the skin aft of the last bulkhead, and so can be easily dimpled for a flush rivet. The forward pairs, though, are in assembly with the forward flange on that aft bulkhead. I could maybe dimple those with my pop-rivet dies, but I find them barely adequate for a single sheet of material; two sheets of relatively heavy gauge seems maybe a bridge too far.
I the end, I elected to lightly countersink all the holes and install NAS1097 rivets. Since these have an undersize head compared to a regular flush rivet, I can countersink the skin without enlarging the hole. So now those are done.
Oh, I also spent some time thinking about wiring for the landing/taxi lights. A challenge to be dealt with here is that the terminals for the landing projectors are on the front side of the unit, but the terminals for the taxi light are on then back. I’d like to run these as a four-conductor bundle out to a Molex plug at the wingtip, but haven’t been sure how to do this while still making the light unit removable. I need some way to route the wires from the front two terminals to the back of the unit that doesn’t prevent removal. After a bunch of poking around, I have a plan now, involving snap bushings and some slight modification of the mounts. It’s probably better shown than explained, so that’s all I’ll provide for now. Also, it’ll be a while probably before I get that done – I need some smaller snap bushings than I have, and I’m not going to pay $8 worth of Aircraft Spruce shipping fees to get a pair of ten-cent bushings on-hand. They’ll get to wait until my next parts order.