CPI vacuum plumbing

Main thrust of the last couple of work sessions was to get that vacuum line for the CPI routed, with the general idea of wrapping up wiring-related stuff in behind the firewall. But before I got to the vacuum line, there was some more lacing to do. I’d briefly considered leaving the wiring run through the forward baggage compartment unlaced, since it’ll eventually be covered by some sort of plastic piece, but it was just too unruly for me.

Good thing I enjoy lacing so much, because it was kind of a pain in this awkward spot. Still rewarding to see things looking so tidy, though:

For the vacuum line itself, I dug out a bulkhead fitting I bought a while back for this specific purpose. After some careful consideration of the surrounding structure, I laid out the firewall hole just below the wiring fitting, drilled the hole, and installed the bulkhead fitting. I also laid out and drilled a larger hole through the forward gear tower wall, and installed a snap bushing for the vacuum line to pass through.

To route the line itself, I dug out some velcro cable ties I had lying around, and just used those to secure the vacuum line alongside the wiring harness. That should keep things tidy, but in a non-permanent way, and won’t leave any sharp zip-tie edges waiting to bite me in the future.

Finally, there was dealing with the line termination at the CPI ECU. Since I have the dual-ECU unit, I also have two vacuum ports, and so a tee fitting is needed. The fitting provided by SDS was kind of bulky, so I ended up positioning it outside the wiring harness, a couple inches away from the ECU, and routing the two stub lines above and below the harness:

In other news, I’ve been doing some thinking regarding FWF wiring routing. Way back when, I’d mocked up putting the amp shunt and main ANL fuse holder on an engine mount tube using Adel clamps. Since then, I’ve decided to add a second ANL fuse for the battery bus feed, plus I still have to mount a current sensor for that bus feed, the battery bus fuse block itself, and the E-bus alt feed relay. I haven’t fully fleshed this idea out yet, but I think I’m going to fab up a mount plate for all that stuff and mount it to the firewall with standoffs, kind of like how I did the battery box mount. Still got to think that one through some more, though, especially what the wire routing will look like.

Posted in Electrical | Hours Logged: 2

Finishing some harnesses

Today’s job was to get the inside harnesses done. To review, I was waiting on being able to route the coil pack and crank sensor harnesses from the engine bay back tp the CPI ECU. I pulled those through a few weeks ago, but had started working on other FWF stuff before deciding that it made more sense to finish the harnesses inside; that way I’d know exactly how much slack I had to work with to route stuff around the engine.

So I started out today by finishing cleaning up all the avionics I removed a while back, and reinstalling it all. Technically I only needed the ECU, but I kinda figured I’d do a better job with everything in place, so I just went all the way. Then I dug out the CPI manual and installed the various pins into the appropriate plugs.

That just left the part of the job that I (unironically) really enjoy: lacing up the harnesses. This is one of those things that you’d think would be tedious, but I just get sort of Zen about it, plus it’s satisfying to watch unorganized forests of wire turn into nice tidy harnesses. Now this entire area near to top of the right gear tower is done:

Well…mostly. It’s not technically electrical, but I do need to route an engine vacuum line to the ECU as well. I have a bulkhead fitting to install in the firewall, and I’ll need to also add a hole through the gear tower for that line. I imagine I’ll route it alongside the harness here, but not quite sure how. Lacing probably isn’t a good idea, as it’d probably kink the vacuum line and cause a problem. I might just break down here and use zip ties, even though they’re not my favorite thing. Gotta think about that one some more.

Posted in Electrical | Hours Logged: 2.5

Firewall passthroughs and baffle bracing…again

Nice to have a Friday off where I can get in some good work. Yeah, the theme is identical to last time, I didn’t feel like trying to come up with a more clever title.

First up was moving forward with that baffle brace. I made some measurements and marks on my cardboard template for some stuff I wanted to tweak, then laid out and made the first bend. The final piece will have two bends, but I decided I didn’t need that complexity for the template. A better idea was to just keep trimming it until it touched the baffle at the desired spot – mostly I just wanted a basic template for bending the metal later.

When I was satisfied with that, I started laying things out on the actual material. As before, I started with the two bolt holes, since they’re by far the most critical dimension. Then it was just a lot of measuring and drawing and so on, followed by a lot of work with the band saw/Dremel/files/etc.

Bending was even more fun. I should have been smarter about this; instead of camping the piece to a table with lumber, I clamped it straight in the vise. This was good in terms of holding the piece securely while I beat on it with a hammer, but it left some marks from the jaws that I’ll need to clean up. And of course the bending required some trial and error, with repeated fits on the engine until I was satisfied.

For the final act, I laid out and cut a couple lightening holes. This still will need to have the screw holes drilled in assembly with the baffle, but for now it sits in place nicely:

With that buttoned up, I turned my attention back to the firewall passthroughs. I popped into the local hardware store last week and bought some longer stainless screws, which I judged to be perfectly fine for this non-structural use. After drilling and preparing the screw holes in the firewall, attaching the passthrough just required coating the backside with fire stop sealant before actually putting the screws in. Getting the nuts on these screws wasn’t much fun, but I got it done. I did both the right- and left-side passthroughs, even though for the moment I’ll mostly be working with the right-side one.

Next up I got to fish all the harness wires through the fitting – very carefully, so as to not disturb the tape flags on each wire. I’d really rather not have to trace a circuit to figure out what a wire was if I lost a flag. I also went ahead and put the outer firesleeve stub in place.

The final bit of work for the day was to fish the CPI2 ignition harness wires through the fitting. Since these are pre-terminated on the firewall side, it’s necessary to fish them back into the cabin, and thence into the area of the avionics shelf. This was also a slightly tense moment, as I got to find out if the harness lengths I estimated when ordering the system were going to work. The good news is that everything reaches, though there’s a lot less slack than I might have expected.

As usual for wiring in progress, it looks messy now, but soon the routing and tidying will begin:

Next, I think I need to finish cleaning the avionics shelf and get it reinstalled in the fuse. That’s so I can finish terminated the CPI2 harness, then work on lacing that part of the harness up to the firewall. Then I’ll know exactly how much slack I have up front to start routing wires around to sensors and so forth.

Posted in Electrical, Firewall Forward | Hours Logged: 4

Firewall passthroughs, baffle bracing

So…what I’ve really been wanting to work on has been the firewall passthroughs for electrical stuff. Specifically, I wanted to get the fitting installed on the right side of the firewall so I could pull the wiring bundle through and start working on routing the ignition wiring back into the cabin.

When I looked at the fittings I bought, and read the instructions, I saw they specified #6 stainless screws for attachment, or stainless pop rivets. Given how tight things are inside the cabin where these fittings would attach, I really wanted to go the rivet route, and so I spent way too much time trying to find any 9/64” stainless pop rivets, to no avail. I also considered sizing up to 5/32” – a much more common size – but all the rivets I could find had too much grip length.

So I resigned myself to the screws. Before ordering from Spruce, I worked up a few other parts I needed, in a vain attempt to save on shipping. Critically, when it came time to place the order, I wasn’t sure the right screw length. But I thought to myself, “these are only going through two thin pieces of stainless, the shortest length is probably right.”

You can probably guess where this is headed. I got the attach holes for the fitting drilled into the firewall, grabbed one of my new screws, and…oh my, that’s way too short. The screws aren’t even long enough to get full engagement from a lock nut with no material in between, much less my two pieces of stainless and a washer.

Welp, time to move on to something else until I can grit my teeth and either order from Spruce again or just buy some hardware screws locally. Fortunately, I had another task I’d been thinking on – how to brace the baffles at the back of the engine. I’ve mentioned this a bit before – the baffle kit comes with a brace that attaches to the case bolts and holds the baffles in place, but I can’t use that because my ignition coil pack will be mounted there.

I’d ginned up a few possible ideas, none of which I liked much, but then a couple weeks ago I saw a photo with a brilliant solution. Instead of bracing from the front, using the case bolts, this person was bracing from the rear, using the top two bolts on the accessory case. The brace itself looked relatively simple to fabricate, and I’ve got some scrap .063 stock lying around that would be perfect for this.

The main challenge for fabricating and fitting this would be the work space – on the back of the engine, near the engine mount, and up at about my shoulder level with the plane on the gear. Visible here – with that annoying mount in the foreground – are the two bolts that will anchor the brace:

The first fun part if figuring out the spacing of those bolt holes, since obviously the brace has to be drilled to match them. Trying to measure this with all the stuff around was going to be a real pain, but after some more thinking, I came up with an idea: a simple shop-made measuring tool. I cut a couple strips of scrap, drilled 1/4” holes in one end of each, and a 1/8” hole in the other end. A cleco through the smaller hole acted as a pivot, and a third 1/8” hole in one piece anchored a final piece of stock. That final piece made a sort of “A” shape, allowing the tongs to be fixed in a relative position.

Then I just bolted the ends to the case, clamped my crossbar in place, and I had a template for those two holes:

Easy to measure this over on the bench, and…very nice of Lycoming to make the bolt hole spacing exactly three inches:

Using that measurement, I started working on a cardboard template. First step was to just locate the bolt holes and lay out the surrounding shape to clear the accessory case, then I did a trial fit to make sure that my bolt hole spacing and the surrounding shape would work out. Seems good to me:

That was the end of the night’s work. Next will be the more-fun task of roughly locating the two bends I’ll need to get this piece touching the baffle, and then will come the real fun of starting to replicate this thing in aluminum and getting it to fit right.

Posted in Firewall Forward | Hours Logged: 1.5

More cleaning, plus electrical planning

When we left off last time, I’d discovered a bounty of mud dauber nests after removing the forward upper skin. I decided to take a sort of thorough approach to cleaning this up, even though who knows how many new nests will get built this spring. To do this, I essentially tore apart all the avionics behind the panel – removing each component in turn, cleaning it off, and then finally removing the avionics shelf itself. Yup, pretty dirty:

From there I segued into…thinking a lot about what to do next. The routing for the ignition and fuel flow wiring through the baffles was the driver for doing the baffle work, and I’ve been looking at those, but I think I’ve got more stuff to worry about. Previously I’d just bought one two-hole wire grommet to accommodate the wires going through the baffles, and convinced myself that was fine, but after doing some more tinkering, I think I’m going to order another one. All in all, I need to pass through the four-wire bundle for the ignition coil, a three-wire shielded bundle for the fuel flow sensor, and two shielded four-wire bundles for the crank sensor. After some trial fitting I’m thinking I want to do one passthrough hole for each, rather than trying to combine them.

There’s also the question of routing the crank sensor wires through the baffles on the forward side. I think I’m going to just have to drill a hole and use a snap bushing there, unless I decide to route those wires under the cylinders…which would preclude the need for a second passthrough grommet as mentioned above, but would also put those wires down in the hot area near the exhaust. It would also sort of undermine the work I did to protect the wires from damage from a thrown alternator belt. But I dunno, the area where I’d need to drill that hole through the forward baffle is pretty tight…I’ve got to think on this some more, and probably eventually just tell myself to stop waffling and pick a direction…

Posted in Electrical, Firewall Forward | Hours Logged: 2

Removing and cleaning skins

Tonight as just laying the groundwork for getting back into wiring-related work. The first step for that was getting the forward upper skin and baggage door removed. I last installed these when I was getting started on the cowl, and because of the way the upper right firewall sort of floats relative to the baggage door, I made liberal use of duct tape to hold everything in place.

Problem is, that was…checks notes…oh wow, almost two years ago. Unsurprisingly, the duct tape did not come off cleanly:

Handling the residue wasn’t too awful, though. I put an old towel over the affected areas, wet it liberally with acetone, and left it to soak for fifteen minutes or so. After that, the residue scraped off easily with a plastic razor. Some scrubbing with an acetone-soaked rag took care if the final cleanup, and things were looking nice again:

I repeated that step on some other parts as well, though I still need to clean up the actual forward upper skin.

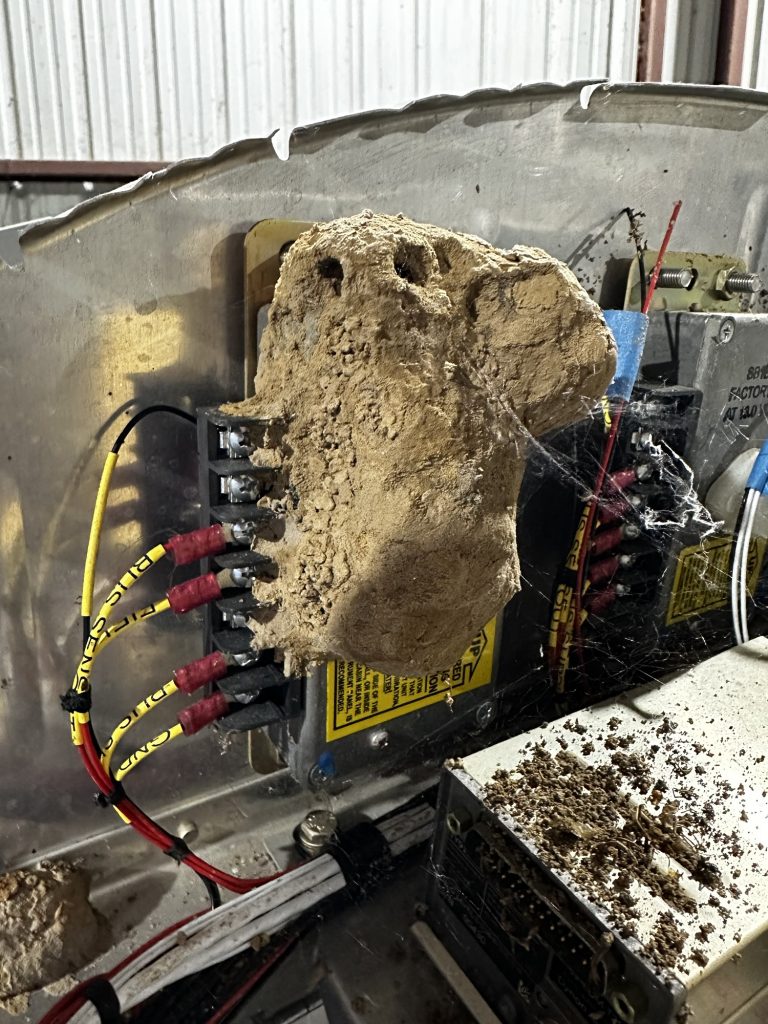
And of course, this being Texas, opening up the area behind the panel exposed a few mud dauber nests that needed to be cleaned up, like this rather impressive bit of engineering that was attached to one of my voltage regulators:

That was it for tonight – next I can maybe move on to more practical work.

Posted in Fuselage | Hours Logged: 1

Baffles: More trimming

This post starts eerily last the last one…in the day or two after that last session, I spent an hour or two working on finishing the trimming of the rear side baffles. Never wrote anything up about it, since I’d probably be doing more the next day…or the next…or…well, you get the idea. Also, I apparently didn’t take a single picture while working on those baffles. Huh.

Anyway, here we are today, where I picked up on the task of trimming the rear baffles, which runs along the aft side of the engine. I’d previously drawn a first hack a trim line, way back when I put paper clips on the entire assembly, but I decided to fine-tune that a bit before making my first cuts. Since I had the rear side baffles done, I could use those to mark where the intersecting pieces should be cut at the corners. Basically I marked those junction points and sort of made a freehand hack at tweaking the trim lines. I was, of course, pretty conservative while doing this – as ever, it’s a lot harder to put material back than to take it off.

That first trim was, indeed, very conservative – I still wasn’t able to get the upper cowl all the way seated. Things were much batter after the second trim – I was able to get the cowl in place and the pins installed. A peek through the oil door shows all those paper clips:

After marking yet another trim line, then doing all the trimming/filing/deburring/etc, I reinstalled everything for one more test fit. Now we can see how the baffles have the specified 3/8” clearance to the cowl – this clearance will later be taken up by the rubber seal material:

So that takes care of most of the baffle trimming. Wait, that’s not all? Afraid not. There will be another vertical baffle section just behind the prop hub, which will also need to go through this whole paper clip exercise too. And once that’s done, I’ll probably paper clip the entire perimeter and do one final clearance check all around, just for good measure.

I don’t think I’m going to do that right now, though. I think it’s time to finally remove that forward upper skin…along with what I’m sure will be some really stubborn duct tape adhesive residue. That stuff’s been on there for a couple summers now, and there’s no way it’s going to come off without some liberal application of acetone. But once that’s off, I can resume work on electrical systems, which I’m kind of looking forward to as a change from fiberglass and baffle fiddling.

Posted in Firewall Forward | Hours Logged: 5.5

Baffles: Let the trimming begin!

So…as I start typing this, it looks like I missed documenting some work a couple weeks ago. There was some time spent fabricating a conical gusset to close out the square corner I mentioned at the end of my previous post, but I guess I didn’t take any pictures. I’ll have to try and sneak them into a later post, I guess.

After doing that work, I almost let myself get distracted by the air intake snorkel, which has to meet up with the left inlet ramp…but then I remembered the main reason I’m in here, which is to get the baffles trimmed so I can work on FWF wiring. And so I moved on to working on that trimming work.

The basic deal is that the upper portion of the baffles need to be trimmed to provide 3/8-1/2” of clearance with the upper cowl. Later, rubberized seal material will be riveted in place, which will, well, seal against the cowl. This is a somewhat annoying task in any case, and more annoying in my case since I don’t have an RV-8-specific baffle kit. My baffles are intended for a side-by-side aircraft, which means there’s even more trimming to do than in a normal case.

Anyway, there’s a pretty universal approach to this trimming task, which involves putting a bazillion paper clips across the top of the baffles, then laying the cowl in place, then using the disturbed paper clips to see the contour of the cowl and work on trimming the baffles to fit. The pictures I’ve seen have people doing the entirety of the baffles at once, but this seemed overcomplicated to me, especially for the initial trim.

So I started with just the forward side baffles. These need the most trimming of anything; they need to match the curve of the upper inlet ramps, which means 1) removing a lot of material and 2) matching a surface that’s way more curved than the rest of the cowl.

Here’s a pic looking in the front of the cowl from my first fitting attempt. You can see that the top of the baffle is straight, unlike the curved ramp, and as a result only a small area of the paper clips have been pushed down. You might also notice the huge amount of open space to the right, between the cowl halves, The upper cowl is nowhere close to sitting in place:

After a couple iterations of trimming those forward side baffles, I decided that having hacked out most of that curved ramp area would make it OK to try fitting the whole thing. So I installed all the baffles and then put paper clips all the way around. In case you’re wondering, there are 190 of them. Yes, I counted:

The really fun part is that 15 minutes after taking that picture, I removed all those clips again, after marking the first conservative cut line all around… Also, because the cowl was back to not being anywhere near sitting in the right place, and especially because that made it hard to get the orientation right, I knew these cuts wouldn’t get me far.

So after this iteration, I went back to doing a sort of piecemeal fitting, starting with getting those forward side baffles trimmed to the proper length (as opposed to “kinda close” like before). Below you can (hopefully) see the little hash marks I made at each paper clip location; this is the beginning of laying out the cut line:

A nice little game of “connect the dots” results in a trim line:

I think it was after cutting to that line – or maybe there was one more iteration, I can hardly keep track – I was finally able to get the upper cowl in place. Peeking in the inlet, we can see that there’s still more trimming to do; the gap at the very front of the inlet is good, but where it curves up, it’s still too close:

I did decide that this was the right time to add the rear side baffles into the mix. The left rear side baffle shows the contrast between the trimmed and untrimmed state:

I did go ahead and get the initial trim done on those rear side baffles, but that was when I called it a night. I’d done enough repeated installation and removal of paper clips for one day.

Next up I’ll get those rear side baffles trimmed to where the cowl will sit in place, then I’ll move on to the rear baffles…and after that I guess I’ll do paper clips all around again so I can get the final trim done.

Posted in Firewall Forward | Hours Logged: 4.5

Baffles: fine-tuning the inlet ramps

The baffle journey continues! The overall theme here was to refine the interface between the inlet ramps, the forward side baffles, and the cowl inlets. As seen below, as provided, the ramps sit well below the lower portion of the inlet:

This isn’t what we want. We need those ramps to fit closely to the inlets, so they can eventually seal together. So I got to get even more practice taking the cowl on and off while tweaking the bends of both ramps. At least I was able to bend the ramps in place, instead of having to remove and reinstall them repeatedly; that at least reduced the tedium a bit. After a few iterations, I had both ramps resting gently against the bottoms of the inlets.

This led to the next tweak: since the inlets aren’t perfectly flat, we need more bending. The idea is to mark the spot where the ramps contact the inlets near the spinner, and draw a diagonal line outboard. Then the ramp gets bent along this angle, until the outboard portion of the ramp sits up nicely against the inlet as well. Unfortunately this did require taking the ramps on and off a few times (along with the cowl, of course).

The result is a nice close fit across most of the width of the inlet:

Next up, the ramps and side baffles need to be trimmed. They can’t actually overlap the inlets as seen above; if they did, then installing the cowl would require starting an inch or so forward of the final position and sliding it backwards. That can’t work once the prop is in place.

Instead, the ramps are trimmed until they stop just short of the aft edge of the inlets. This will allow the cowl to be lifted vertically into place, so it can work within the space behind the prop spinner. Eventually there will be flexible material added to the cowl, which will seal against the ramps…but that’s later:

With that trial-and-error work done, the next step was to fabricate a support bracket for the left ramp. This will prevent the forward board edge of the ramp from being pushed down by high-pressure air entering the cowl. The bracket consists of a flat plate that screws into the engine block and a thick angle to tie that plate into the ramp. Both pieces are precut, but the plate needs to be trimmed to fit. I ended up cutting off about half an inch or so to get it to clear the ramp.

Then the plate gets screwed into place, the angle is clamped to the ramp and against the plate, and the four holes get match-drilling. Here are the two pieces prior to drilling:

Then, after demurring and such, they get riveted together. The angle also needs to be drilled to the ramp. Curiously, the plan images show the angle having three prepunched holes in this spot, but my angle had none. The instructions say to only rivet the two outboard holes, and not the middle one – I think it ends up being in common with another attach angle that will be added later. So I just laid out and drilled the two outboard holes for now – I’ll figure out the middle one later.

Here’s the support angle after drilling the ramp attach holes:

The next step would be to rivet the ramp assemblies together, but I decided it was a bit late for riveting (these will require use of the rivet gun). Instead I jumped ahead to adding some bends to the forward side baffles. Previously, after finishing all that tweaking, I traced the edge of each ramp on the intersecting side baffle. These lines then are used to bend the lower flanges inboard; this bend provides some more support for the forward outboard corner of each ramp.

The instructions sort of gloss over the details here, but I had to do some trimming of both pieces to accommodate the bends. One of them I was able to do on my little bending brake, which was nice, but the other one I had to do the old manual way – clamping it with a piece of wood and beating the crap out of it with a hammer.

Once the bends were done, I remounted the side baffles on the engine; they’ll be ready to receive the ramps again once I get those assemblies riveted together:

Next session will involve some fun scratch metal working, as I address those square corners between the ramps and the side baffles.

Posted in Firewall Forward | Hours Logged: 4

Baffles: Fitting the tapered cylinder extensions

Not much in the way of shiny content today. Mostly I’ve been working on getting those tapered cylinder extensions fitted in place and drilled for rivets. Part of what made this fun is that for the most part, there’s just no good way to clamp the extensions to the adjacent baffles, especially with everything installed on the engine – which is what I wanted, so I could ensure the extensions laid across the cylinders properly.

The one exception to this was the #1 baffle, where I was able to get a cleco clamp through the large hole for the prop governor oil line. I wasn’t so lucky with #2, but that’s still at the front of the engine, where there’s decent access, so it wasn’t so bad. #3 and #4 were quite a bit more challenging, since I had to work around the engine mount. I ended up using some creative methods involving scrap wood and popsicle sticks to sort of hold things in place while I marked one hole at a time, then drilled it on the bench, then went back to mark the second, and so on.

Here are a couple photos of the #1 and #2 extensions in place; the extensions are the little wedge-shaped pieces just barely visible near the cylinder bases I didn’t even bother trying to get similar photos of the other two, because 1) it would have been a lot tougher to frame and 2) I was more in a “just get it done and move on” mode.

With those in place, I went back to the instructions and started…following them (a rare luxury at this stage of the build). The ensuing work was just getting the two inlet ramps baffle assemblies deburred and match-drilled as needed. There were a couple pieces to get riveted together, but for the most part everything is staying clecoed for the time being.

So those ramps are back in place, and I have the lower cowl hung again right now. The next step will be tweaking and trimming the baffle pieces in this area so they’re in the right spot relative to the cowl inlets. There’s also some fun to be had up here to get things fitting nicely to the rounded corners of those inlets…stand by for fabricating some fun conical aluminum pieces…

Posted in Firewall Forward | Hours Logged: 5