So, this is another multi-day update – I’ve been continuing to chip away at the glass work. I ended up doing a couple more rounds of the sand-prime-groan-sand dance, and this morning I decided to add a bit more filler to a couple countersinks that needed some work. But after sanding that down and shooting a bit more primer, I finally decided that this thing was as done as it was ever going to be.
That meant it was time to move on to the question of wiring routing. Last week I went looking for something to use for conduit in the bottom. I have plenty of flex conduit on hand, but the issue there is that the wire in this case will be getting pushed through the conduit – not likely to work well with the ribbed conduit. I wanted something smooth on the inside, so I ended up ordering some tubing from Amazon. Unfortunately it was way more flexible than I was expecting, and when I tried to route it along the 90° bend below the snap bushing, it just collapsed.
So I spent a lot of time today trying to work out some sort of alternative. I found some more rigid scrap tubing that was a bit too small, and tried sort of “flaring” the end to fit over the snap bushing – that didn’t work out. I looked online for other possibilities, but didn’t find anything that seemed like a better choice. I even considered ordering some 1/2” soft aluminum tubing and slightly enlarging the end.
Finally, though, I decided that maybe putting conduit in here really was overkill. So I clecoed the bottom in place again, and tried pushing through the wire. This time, with a bit more care, it ended up in the general vicinity of the tail light opening. A hook made from some scrap Romex allowed me to hook the end of the wire and get it close enough to grab with needle nose pliers. With that, I decided to abandon the whole conduit idea entirely.
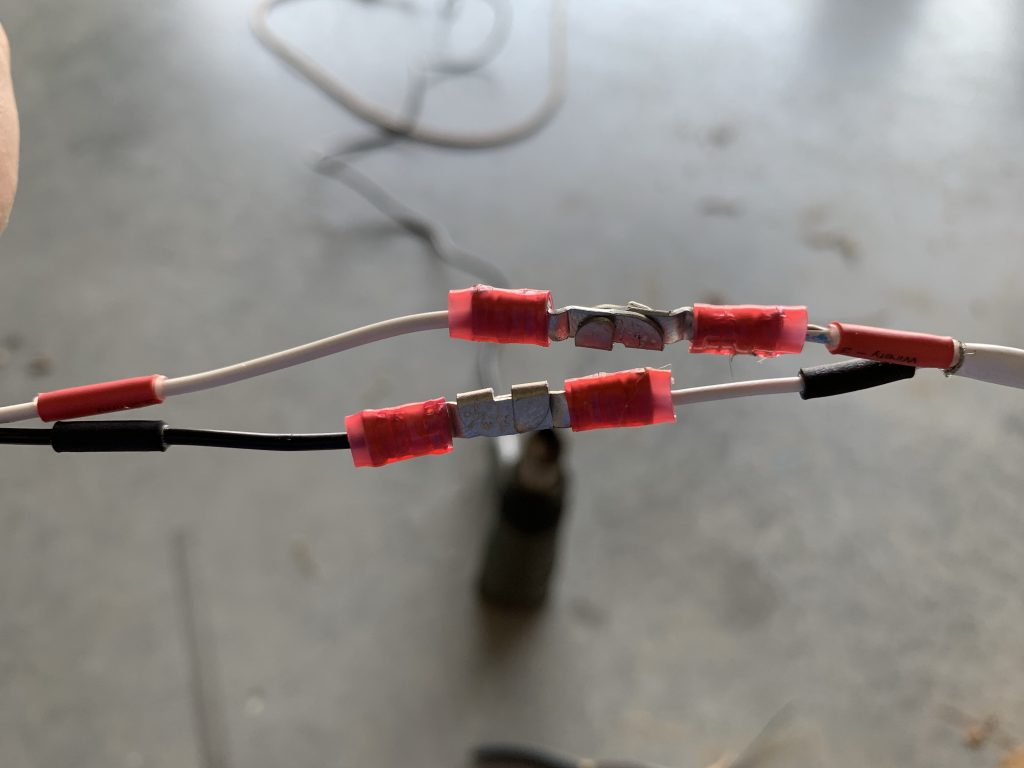
So I figured it was time to actually add the terminations in here. At one point I’d been considering using a Molex connector back here, but this is a spot that will quite likely get wet, and I think something more weatherproof is a better idea. So in place of a fancy connector, I’ve decided to just use plain old knife connectors.
The fun part is making sure that it’s nigh-impossible to mix the wires up. Proper polarity is kind of important for LEDs. Even better, the two internal wires from the shielded bundle (from the fuselage) aren’t super well-marked – one is white and the other is white with a little blue stripe. I figured I’d use my usual printed heat shrink, but even that felt not as foolproof as I’d liked. (By the by, on consideration here is that a paint shop will, at some point, be removing and installing this light. As a control freak, my mind imagines lots of potential for errors.)
Then I remembered that I’d bought a set of red and black heat shrink tubing, which I’d used for making some new battery cables for my golf cart. Instead of fancy labeled heat shrink, why not just use standard colors for power and ground? Then it’s just matching up colors instead of reading labels. As an additional indicator, I staggered the wire lengths, which will make it even harder to inadvertently reverse them. This also has the side benefit of making it easier to thread both connectors through the snap bushing.
The resulting connection setup, mocked up: (these will get heat shrinked when they’re final-assembled)
Unfortunately I had to go do some yard work after that, so that was the end of the day. Next I’ll need to reattach the rudder, get that bottom piece riveted on, and final-install the tail light.